&color=rgb(100%2C100%2C100)&link=https%3A%2F%2Fgithub.com%2Faserto-dev%2Ftopaz)
RBAC, ABAC, and ReBAC - Differences and Scenarios
Sep 9th, 2022

Roie Schwaber-Cohen
Authorization |
Engineering

In this post, we’ll review three of the most popular authorization models:
- Role-based Access Control
- Attribute-based Access Control
- Relationship-based Access Control
Before we delve into each model, let’s quickly review the essential components that are applicable to all three. For any authorization model to work, we’ll need:
- Action - the activity that is going to be performed. We can think of this action as the permission the authorization system will grant or withhold.
- Identity - An authenticated subject (a user or system) that wants to take the action that needs to be authorized.
- Resource - This is the object of the authorization process. The authorization process will determine whether the subject has the ability to perform the action on that resource.
We use these three components in our authorization policy, which is the set of rules that will determine whether or not the identified subject is authorized to perform an action on a resource.
Role-based Access Control (RBAC)
RBAC is a very straightforward form of authorization: we define permissions that correspond to actions a subject can take on a resource. We group these permissions to form roles and assign those to subjects in our system to define what they are allowed to do.
For example, a permission could be view, edit or delete. These permissions are grouped to form roles. For example, a viewer role would map to the “view” permission, an editor would combine view and edit, and an admin would group all three permissions.
Grouping permissions into roles makes it easier to reason about the authorization model: it limits the number of rules that need to be defined to grant users the appropriate permissions to perform actions on each resource. Keeping this level of indirection allows us to modify the permissions assigned to particular roles without having to redefine the authorization model altogether.
Finally, we assign roles to our users, groups, or systems - and when they try to access a resource, the system expects that the roles assigned contain the permissions required to access the resource.
RBAC models are easy to reason about, modify and audit. We would typically use the RBAC model when we’re able to form a relatively static mapping between users, roles, and resources.
In some cases, using RBAC bears the risk of “role explosion” - where a large number of roles is required to cover all the required authorization scenarios. In those situations, we would consider using other authorization models either instead of, or in addition to, the RBAC model.
Example Policy
With Aserto, the roles and permissions mapping would be stored in the data.json file and bundled with the policy. In this example data.json file, we define the roles viewer, editor and admin and assign them the appropriate permissions:
{
 "roles": {
   "viewer": {
     "perms": {
       "view": {
         "allowed": true
       }
     }
   },
   "editor": {
     "perms": {
       "view": {
         "allowed": true
       },
       "edit": {
         "allowed": true
       }
     }
   },
   "admin": {
     "perms": {
       "view": {
         "allowed": true
       },
       "edit": {
         "allowed": true
       },
       "delete": {
         "allowed": true
       }
     }
   }
 }
}
The Rego policy, in this case, would be:
package example.rbac.__action

user_roles = input.user.attributes.roles
action = input.resource.action

default allowed = false

allowed {
 some index
 data.roles[user_roles[index]].perms[action].allowed
}
To simplify this example, we assume the desired action (view, edit or delete) is passed to the policy via the resource context. Our policy will iterate over the roles assigned to the user and check the data.json file to see whether the desired action is allowed given the role assigned to them.
Attribute-based Access Control (ABAC)
In contrast to RBAC, ABAC focuses on the use of attributes associated with the subject, the resource, or the environment to determine whether they have access to a particular resource or not. While roles are static for the most part, attributes are meant to produce a more fine-grained authorization model that would take into account the dynamic values of these attributes.
While ABAC models are harder to reason about than RBAC models, they allow for a much finer-grained authorization model that allows us to define dynamic behaviors that aren’t available otherwise. For example, we can control actions performed on a resource based on a user’s location, time of day, current IP address, and so on. That also means that we have to take care to address all the potential values these attributes may have - or risk an unwanted behavior. Go here for more about RBAC vs ABAC.
Example Policy
In this example, we’ll assume that the identity our policy is referencing is associated with a dynamic attribute - such as a location. In our data.json file, we’ll define a list of allowed locations from which access to an endpoint will be allowed:
{
  "allowedLocations": ["USA", "Canada", "France", "Italy"]
}
Then, our policy will be defined as follows:
package example.abac

user_location = input.user.properties.attributes.location

default allowed = false

allowed {
  data.allowedLocations[_] = user_location
}
Our main assumption here is that the user’s location is an attribute that is dynamically updated by the application whenever the user’s location is recorded. In the policy, we iterate over each of the allowed locations and compare it to the user’s location. If the user’s location is included in the set of allowed locations, the allowed clause will evaluate as true.
Relationship-based Access Control (ReBAC)
When we build a ReBAC model, we describe a relationship graph between subjects and objects in our system. We then formulate our authorization policy by checking whether a particular type of relationship exists for any user or resource.
ReBAC allows us to go even further and describe complex relationships between resources in our system. For example, we can use ReBAC to describe ownership of resources, hierarchies between resources as well as groupings of resources. While it is possible to model some of these relationships using RBAC and ABAC, ReBAC allows us to do so more concisely and so it makes it easier to reason about the authorization model.
This authorization approach moves us into the “policy-as-data” realm, as opposed to the “policy-as-code” approach used by RBAC and ABAC. The policy is split between declarative rules and logic that is effectively derived from the data structure itself. This might make it harder to reason about, especially where the graph itself becomes more complex.
Example Policy
Using a relationship graph, we can check for paths of variable lengths between nodes. For example, we can describe a hierarchical structure between a set of folders and documents in an organization, like so:
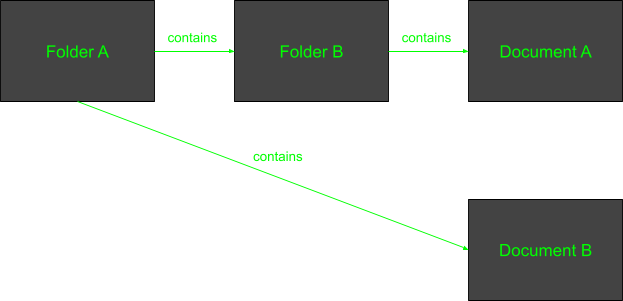
When we grant a user permission to perform actions on the “parent” folder, we can define our authorization policy such that if a user can perform actions on the “parent” folder, they can do so for anything that folder “contains”.
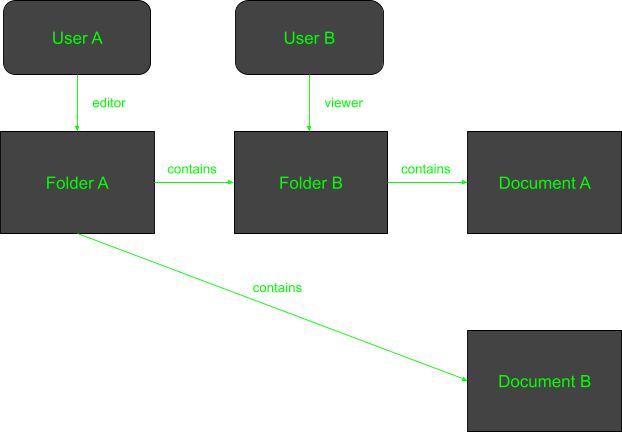
We associate the permissions can-view and can-edit with the editor relationship and the can-view permission with the viewer relationship.
As we can see, User A is an editor of Folder A. Our policy can leverage the hierarchy to allow User A also to apply the permissions associated with editor to Folder B, Document A and Document B that are contained in Folder A. On the other hand, User B is a viewer on Folder B, so they only have the can-view permission for Folder B and Document A which is contained within it.
In Aserto, the relationship graph lives in the Directory, where we define the object types and relation types that are involved, and populate the graph with instances of those object types and relation types. Once we do that, we can specify the policy - for example, for the can-edit permission:
package example.rebac.edit.__fileSystemResource

fileSystemResource = ds.object({
 "key": input.resource.fileSystemResource,
 "type": "file-system-resource",
})

user = ds.object({
 "key": input.user.id,
 "type": "user",
})

allowed {
  ds.check_permission({
    "subject": { "id": user.id },
    "permission": "can-edit",
    "object": { "id": fileSystemResource.id }
  })
}
Combining the three approaches
Fortunately, we aren’t limited to using only one of these authorization models at a time. With Aserto, we can define a policy that combines one or more of these approaches. Let’s review an example that applies all three in one policy.
In the following example, we’re enforcing several rules:
- If a user is an
admin, they may edit any file system resource - regardless of any other condition. - If a user is an
editor, they may edit a file only if their location is in one of the permitted locations. - If a user has been explicitly granted the
can-editpermissions to a particular resource, they may do so regardless of their location.
package example.rebac.edit.__fileSystemResource

user_attributes = input.user.properties.attributes

fileSystemResource = ds.object({
 "key": input.resource.fileSystemResource,
 "type": "file-system-resource",
})

user = ds.object({
 "key": input.user.id,
 "type": "user",
})

allowed {
  user_attributes.roles == "admin"
}

allowed {
 user_attributes.roles[_] == "editor"
 data.allowedLocations[_] = user_attributes.location
}

allowed {
  ds.check_permission({
    "subject": { "id": user.id },
    "permission": "can-edit",
    "object": { "id": fileSystemResource.id }
  })
}
Summary
In this post, we reviewed three of the most popular authorization models. Each of them is capable of handling a different set of scenarios. For more about these access control models and example policies, go here.
With Aserto, you can combine the three and create very fine-grained authorization models that would be applicable in virtually any scenario. You can even use our open-source authorizer, Topaz, to do this.
Topaz is a great way to get started with fine-grained authorization. It offers ~1ms authorizations, supports the three models described above, and can be implemented by a single developer and production ready in 1 week. Aserto is built on top of Topaz and adds a control plane for easy management of users, policies, resource and relationship information, and decision logs.
We’d love to hear what you think about the combination of these three approaches - you’re always welcome to join our Slack channel!
Roie Schwaber-Cohen
Developer Advocate
Related Content

Implement Fine-Grained Security, or Get Left Behind
Authorization has to happen close to the application, because it’s in the critical path of every application request. But fine-grained security requires real-time access to user attributes and resource relationships.
Sep 22nd, 2022

Access Control - Build vs. Buy
When it comes to software, companies and their engineering teams constantly wrestle with the age-old question of “build vs. buy”: should the company spend time, effort, and capital on building the software in-house, or alternatively outsource the solution to an external vendor? Access Control solutions are no different. In this post, we'll explore the pros and cons of building or buying an access control system.
Sep 29th, 2022
Deploying an Application to Kubernetes with an Aserto Sidecar
In production, we're most likely to set up the Aserto edge authorizer as on Kubernetes as a sidecar. In this post, we’ll review how to set up and deploy your application to Kubernetes and set it up to make authorization requests to an Aserto sidecar.
Oct 13th, 2022