&color=rgb(100%2C100%2C100)&link=https%3A%2F%2Fgithub.com%2Faserto-dev%2Ftopaz)
Deploying an Application to Kubernetes with an Aserto Sidecar
Oct 13th, 2022
Roie Schwaber-Cohen
Authorization |
Engineering
In production, we're most likely to set up the Aserto edge authorizer as on Kubernetes as a sidecar. In this post, we’ll review how to set up and deploy your application to Kubernetes and set it up to make authorization requests to an Aserto sidecar.
Prerequisites
- An Aserto account. If you don’t have one yet, sign up here.
- The Aserto CLI (installation instructions can be found here)
- The
kubectlCLI (installation instructions can be found here) - Docker (installation instructions can be found here)
What are sidecar containers, and why should I use them?
Sidecar containers are containers that run side-by-side with the application container. When we set up an application with a sidecar, we’re telling Kubernetes that the two containers will share resources like volume storage and network. This will reduce the latency between the sidecar and the application. This is critically important since we want the authorization decisions the authorizer makes to happen with as little latency as possible since they gate every application request. This always ensures the authorizer is virtually always available to our app - again, critical since it gates all requests.
Pointing your application to a local authorizer
In this tutorial, we’ll use the Node.JS Todo app as the application we’ll deploy on Kubernetes. In previous posts about this application, we pointed the application middleware to the hosted authorizer. In order to use the sidecar edge authorizer, we’ll
- Change the
ASERTO_AUTHORIZER_SERVICE_URLto “https://localhost:8383” - Add a reference to where we expect the TLS certificate to be generated
- Add our Aserto credentials (Authorizer API Key and Tenant ID)
- Add the reference to our instance of the
policy-todopolicy image.
JWKS_URI=https://citadel.demo.aserto.com/dex/keys
ISSUER=https://citadel.demo.aserto.com/dex
AUDIENCE=citadel-app

ASERTO_POLICY_ROOT=todoApp
ASERTO_AUTHORIZER_SERVICE_URL=https://localhost:8383
ASERTO_AUTHORIZER_API_KEY=<Your Authorizer API Key>
ASERTO_POLICY_ID=<Your “policy-todo” Policy ID>
ASERTO_TENANT_ID=<Your Tenant ID>

CERT_PATH=/cert/gateway-ca.crt
Adding the certificate reference to your application
When the authorizer is started, it automatically generates the TLS certificates required for the application and the authorizer to communicate securely. Note the following segment (in index.ts, line 21) that will add the authorizerCertFile option to the authzOptions if a certificate path is defined in the .env file.
FROM node:18
WORKDIR /app

COPY package.json /app/.
COPY yarn.lock /app/.
COPY *.ts /app/.
COPY .env /app/.

ENV PATH /app/node_modules/.bin:$PATH

RUN yarn install
CMD ["yarn", "start"]
We’ll build the Docker image by running the following command from within the application folder:
docker build -t todo-app . We’ll use this image when we build our deployment configuration file.
Create a namespace
We'll create the namespace aserto so that we can easily remove all the assets we deploy to the cluster if we so wish. In a file called namespace.yaml, we'll add the following:
---
apiVersion: v1
kind: Namespace
metadata:
  name: aserto
We'll create the namespace by "applying" the file with the following command
kubectl apply -f namespace.yamlSet up the Edge Authorizer in the Aserto console
To make sure our edge authorizer is registered with the Aserto console, we’ll create a new “Edge Authorizer” connection. In the connections tab, we’ll
- Click “New Connection”
- Select the type “Edge Authorizer”
- Name the connection
todo-edge-authorizer - Use the display name “Todo Edge Authorizer”
Once we complete this step, we’ll see the following connection created:
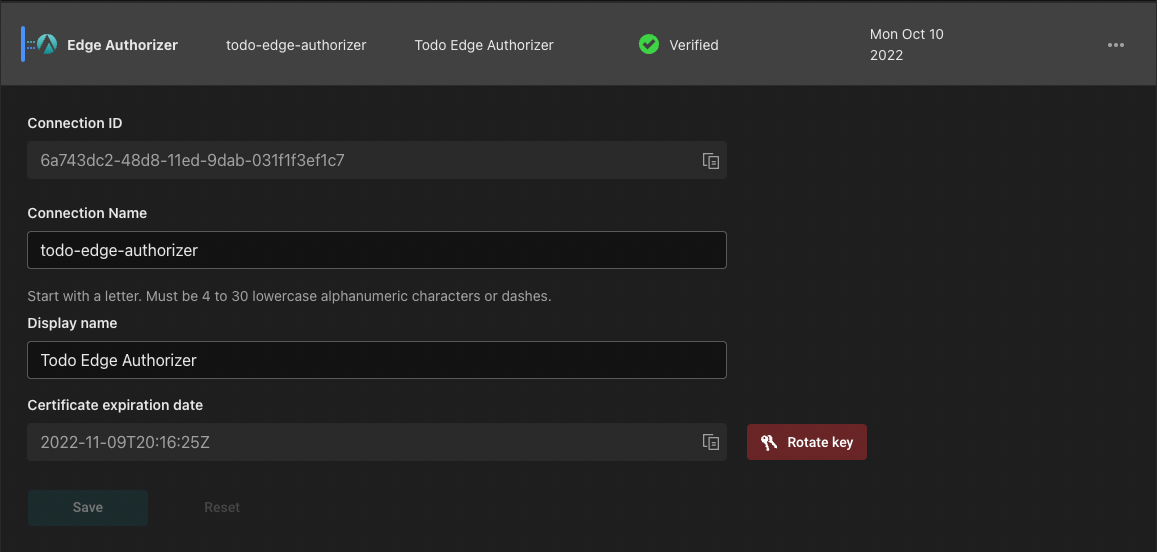
We’ll copy the Connection ID created for our edge authorizer and open our terminal. We’ll first log in to Aserto using the command aserto login. Next, we’ll run the following command to to generate the certificates required for the Sidecar to communicate securely with Aserto:
aserto p client-cert <edge-authorizer-connection-id>This will return a JSON object with data about the client certificate, for example:
{
 "certificate": "-----BEGIN CERTIFICATE----- <elided data> -----END CERTIFICATE-----",
 "common_name": "edge-test.69b537c3-8db5-11ec-8417-00c5cc9cb8c0.edge-authorizer.aserto.com",
 "expiration": "2022-06-24T17:11:31Z",
 "id": "2b:d0:75:a0:7f:25:e8:2d:75:3d:20:cd:f3:e7:0c:f6:8d:02:94:01",
 "private_key": "-----BEGIN RSA PRIVATE KEY----- <elided data> -----END RSA PRIVATE KEY-----"
}
We’ll create a new file called client-certs-secret.yaml that will contain these certificates.
apiVersion: v1
type: opaque
kind: Secret
metadata:
 name: client-certs-secret
 namespace: aserto
stringData:
 client.crt: |
   <Content of "certificate">
 client.key: |
   <Content of "private key">
We’ll apply this secret to deploy it to our cluster:
kubectl apply -f client-certs-secret.yamlConfigure the Edge Authorizer
Next, we’ll create a file called config-secret.yaml that will contain the configuration required by the Aserto edge authorizer.
We’ll have to replace some placeholders with values retrieved from the Aserto console:
<ASERTO_TENANT_ID>- your tenant ID<ASERTO_POLICY_ID>- the Policy ID for your policy-todo instance<ASERTO_DISCOVERY_API_KEY>- Retrieved from the “Aserto Discovery” connection in the Connections tab (under API key).
---
apiVersion: v1
type: opaque
kind: Secret
metadata:
 name: aserto-sidecar-config-secret
 namespace: aserto
stringData:
 config.yaml: |
   ---
   logging:
     prod: true
     log_level: trace

   directory_service:
     path: /directory/directory.db

   opa:
     instance_id: <ASERTO_TENANT_ID>
     graceful_shutdown_period_seconds: 2
     config:
       services:
         aserto-discovery:
           url: "https://discovery.prod.aserto.com/api/v1/discovery/policies"
           response_header_timeout_seconds: 60
           credentials:
             bearer:
               token: <ASERTO_DISCOVERY_API_KEY>
               scheme: basic
           headers:
             Aserto-Tenant-Id: <ASERTO_TENANT_ID>
       discovery:
         name: opa/discovery
         prefix: <ASERTO_POLICY_ID>
   controller:
     enabled: true
     server:
       address: relay.prod.aserto.com:8443
       client_cert_path: /client-certs-secret/client.crt
       client_key_path: /client-certs-secret/client.key
     tenant_id: <ASERTO_TENANT_ID>
     policy_id: <ASERTO_POLICY_ID>

   api:
     grpc:
       listen_address: "0.0.0.0:8292"
       connection_timeout_seconds: 2

     gateway:

       listen_address: 0.0.0.0:8383
       allowed_origins:
       - https://*.localhost:3001
We’ll similarly deploy this secret as well:
kubectl apply -f config-secret.yamlSetting up the authorizer and application Kubernetes deployment configuration
Next, we’re going to set up the deployment configuration that will set the application alongside the authorizer.
apiVersion: apps/v1
kind: Deployment
metadata:
 name: todo-app-deployment
 namespace: aserto
spec:
 selector:
   matchLabels:
     app: todo-app
 replicas: 2
 template:
   metadata:
     labels:
       app: todo-app
   spec:
     containers:
       - name: todo-app
         resources:
           requests:
             memory: "256Mi"
             cpu: "50m"
           limits:
             memory: "2048Mi"
             cpu: "2000m"
         image: todo-app
         imagePullPolicy: Never
         volumeMounts:
           - name: certs
             mountPath: "/certs"
             readOnly: false
         ports:
           - containerPort: 3001
       - name: aserto-sidecar
         resources:
           requests:
             memory: "256Mi"
             cpu: "50m"
           limits:
             memory: "2048Mi"
             cpu: "2000m"
         image: ghcr.io/aserto-dev/authorizer-sidecar:latest
         imagePullPolicy: Always
         args: ["run", "-c", "/config/config.yaml"]
         ports:
           - containerPort: 8383
             name: https
           - containerPort: 8282
             name: https-grpc
           - containerPort: 8585
             name: http-metrics
         volumeMounts:
           - name: certs
             mountPath: "/root/.config/aserto/authorizer/certs"
             readOnly: false
           - name: config
             mountPath: "/config"
             readOnly: true
           - name: client-certs-secret
             mountPath: "/client-certs-secret"
             readOnly: true
     volumes:
       - name: certs
         emptyDir: {}
       - name: config
         secret:
           secretName: aserto-sidecar-config-secret
           items:
             - key: config.yaml
               path: config.yaml
       - name: client-certs-secret
         secret:
           secretName: client-certs-secret
           items:
             - key: client.crt
               path: client.crt
             - key: client.key
               path: client.key
     restartPolicy: Always
This is where the “sidecar” pattern comes into play. By defining two containers in this deployment, we’re letting Kubernetes know that the two will be shared in one pod. Some important things to note here are
- Since we’re deploying a local docker image, we’ve added the imagePullPolicy: Never option to our container. In a production scenario, we would push this image to a registry and point the deployment to that image.
- The application and the sidecar share volumes. We’ve created a
certsvolume, which is then mounted to both thetodo-appand theauthorizer-sidecarcontainers. When we mount it toauthorizer-sidecar, we specify the path into which certificates are automatically generated. When we mount it totodo-app, we just specify the path/certs. This way, the middleware is able to access the generated certificate when communicating with the authorizer. - Since the two containers share a network, the calls we make from the application to the authorizer are done over
localhost, and we don’t have to create a special network interface to connect the two.
Now that we have the application and sidecar running, the edge authorizer instances will be registered with the control plane, as shown below. We can also trigger a policy and directory sync manually from the console, which will trigger the edge authorizer to retrieve the latest policy or directory data from the control plane.
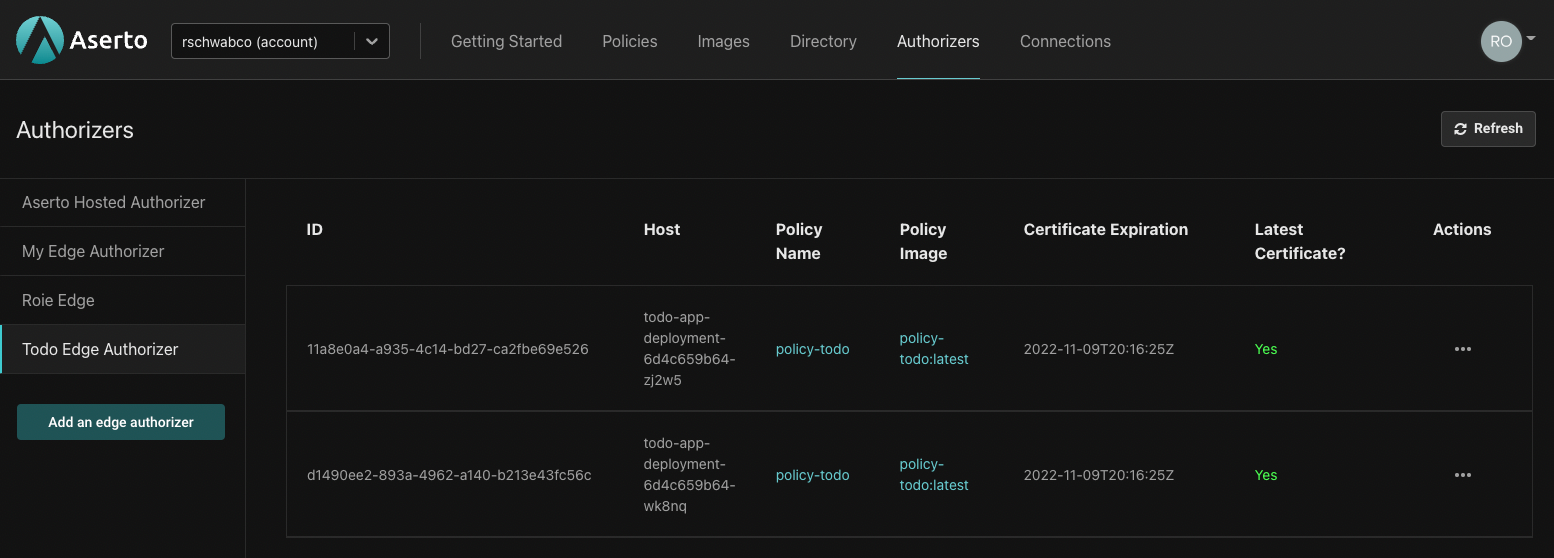
That's it! Our application and the Aserto sidecar are set up and ready for testing.
Testing
To test our application, we can create a port-forwarding to expose the port 3001:
kubectl port-forward deployment/todo-app-deployment 3001:3001 --namespace asertoFinally, we can test our application by making requests to port
3001, such ascurl -X GET \
'http://localhost:3001/todos' \
--header 'Accept: */*' \
--header 'Authorization: Bearer <Access token>'We could also run the todo-application against our cluster. To do so, clone this repo and then run the following commands in the cloned folder:
yarn
yarn start
This will start the application which is already configured to hit port 3001.
Summary
We hope you find this tutorial useful. If you'd like to learn more about the Aserto Edge Authorizer, please head to our documentation website. As always, we'd love to hear your thoughts and answer any questions you have in our Slack channel.
Roie Schwaber-Cohen
Developer Advocate
Related Content

Open-source cloud-native authorization on theCUBE
Listen to Aserto CEO, Omri Gazitt, discuss open-source cloud native authorization system Topaz.sh, the future of cloud, and views of WebAssembly on theCUBE.
Nov 3rd, 2022
How to avoid Broken Access Control vulnerabilities
Broken Access Control vulnerabilities are pervasive. This post explores three techniques that can be combined to create secure-by-default applications that can avoid or eliminate Broken Access Control vulnerabilities.
Dec 21st, 2022

A CISO perspective on Broken Access Control
A CISO view of what Broken Access Control is, why it keeps them up at night, and some strategic priorities your organization can pursue to address and mitigate broken access control threats.
Jan 4th, 2023