&color=rgb(100%2C100%2C100)&link=https%3A%2F%2Fgithub.com%2Faserto-dev%2Ftopaz)
The New Aserto Directory
Sep 1st, 2022

Roie Schwaber-Cohen
Authorization |
Engineering
Aserto is happy to announce the launch of our new directory. In this post, we’ll review the new capabilities of the Aserto directory. We’ll also walk through a simple example of how to apply these features in your directory and policies.
There are two popular approaches to implementing an authorization mechanism:
- Policy-as-code - Spearheaded by the Open Policy Agent project (OPA), the approach defines the authorization policy logic using code expressions written in a programming language.
- Policy-as-data - inspired by Google’s Zanzibar paper, this approach defines the authorization model as a relationship graph between subjects and objects.
Aserto allows you to combine these two approaches to support even the most complex and fine-grained authorization scenarios. Your policies will still encapsulate the logic of your authorization model in the form of Rego code. But now, Aserto’s new directory allows you to define your domain model to express different relationships within it. You can then leverage those relationships in the authorization decision process. This marries the policy-as-code and policy-as-data approaches to enjoy the best of both worlds.
The limitations of the policy-as-code approach
While powerful, there are limitations to the policy-as-code approach. Specifically, if we want to describe a very fine-grained authorization model, we are forced to then be very explicit in the data loaded into the authorizer (for example, in the data.json file used by OPA). For example, if we want to define ownership of resources, we would have to explicitly define the ownership relationship explicitly, which could become unwieldy when many resources are involved. Having the roles and permissions tightly coupled with the policy bundle itself also makes it harder to update them independently.
We are also limited in the types of relationships we can effectively describe and leverage. For example, built-in functions supported by Aserto before this latest release allowed users to traverse a relationship graph between user objects. But, this traversal was limited to a handful of built-ins (like the is_manager or is_employee), and customization was required to allow for additional built-ins. Moreover, these built-in functions assumed that the user objects in the directory formed the graph that would allow resolving these relationships. For example, the is_manager built-in relied on the ID in the attributes.manager field on the user object. This approach was helpful for some cases - but we saw the need to allow users to expand beyond it.
We wanted to allow users to define their own types of relationships and to use them as they will. This is where Aserto’s new directory comes into play: it allows users to define their own domain models to express any number of fine-grained authorization scenarios. The policy-as-code approach is still a powerful tool at our disposal and combined with the policy-as-data approach, it becomes even more powerful.
Before you get started
- Log in to your Aserto account. If you don’t have one, sign up here.
- Retrieve your tenant id as well as your Aserto Directory API key found in the Connections tab under “Aserto Directory”
- Create a new policy image (This post assumes you are familiar with the process of creating and updating your policy image, but if you aren’t - you can learn more about it here).
Defining a domain model
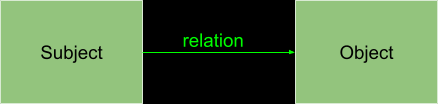
To get started with this new hybrid approach, we first need to define a domain model. Let’s imagine a simple scenario: we have an online store with multiple departments where users can take specific actions within those departments based on their roles. Instead of defining roles in our data.json file, we will now define object types and relation types (which we also refer to as a role) in the directory. This effectively produces triples that look like this:
When we model our domain in this way, we’re able to ask questions like:
- Is the user Morty a viewer in the Teleporters department?
- Is the user Rick an owner in the Spaceships department?
The answers to these questions would be used in the context of making an authorization decision. For example, if Morty is a viewer, he would be allowed to view a product in the Teleporters department. If Rick is an owner, he could be allowed to create and delete products in the Spaceships department.
In our model, we need two object types:
- User - Rick and Morty are instances of the “User” object type
- Department - Spaceships and Teleporters are instances of the “Department” object type
The user object type exists by default in the Aserto directory, so we only need to create the Department object type. Open the directory GraphQL interface found here, and add the following request headers, replacing the placeholders with the values you retrieved before:

Next, run the following mutation:
mutation createDepartmentObjectType {
 setObjectType(
   type: {
     name: "department"
     displayName: "Department"
     status: []
     isSubject: false
   }
 ) {
   objectType {
     id
     name
     displayName
   }
 }
}
Let’s create a couple of departments to populate the directory:
mutation CreateDepartmentObjects {
 spaceships: setObject(object: {
   type: {name: "department"}
   key: "spaceships"
   displayName: "Spaceships"
   properties: {}
 }) {
   object {
     id
     key
     displayName
     type {
       name
     }
   }
 }

 teleporters: setObject(object: {
   type: {name: "department"}
   key: "teleporters"
   displayName: "Teleporters"
   properties: {}
 }) {
   object {
     id
     key
     displayName
     type {
       name
     }
   }
 }
}
Next, let’s turn our attention to the two predicates in this example: “viewer” and “owner”. To define these predicates, we will create new relation types:
Let’s create these using the directory’s GraphQL interface:
mutation createRelationTypes {
createDepartmentOwnerRelationType: setRelationType(type:{
objectType: {name: "department"}
name: "owner",
displayName: "department::owner"
status: [],
ordinal: 0,
}){
relationType {
id
}
}
createDepartmentViewerRelationType: setRelationType(type:{
objectType: {name: "department"}
name: "viewer",
displayName: "department::viewer"
status: [],
ordinal: 1,
}){
relationType {
id
}
}
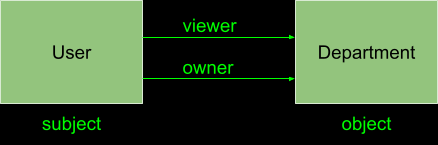
}We now have two relation types (viewer and owner) between our subject (User) and our object (Department).
For this policy to apply to our users Rick and Morty, we will need to create relation instances between them and instances of the department objects. We’ll define the relations such that:
- Rick is the owner of the Spaceships department and a viewer of the Teleporters department.
- Morty is the viewer of the Spaceships department and an owner of the Teleporters department.
First, we’ll have to retrieve Rick and Morty’s user IDs:
query ListRickAndMorty {
 objects(first: 10, where: {
   type: {
     name: {
       equals: "user"
     },
   },
   key: {
     in: ["CiRmZDA2MTRkMy1jMzlhLTQ3ODEtYjdiZC04Yjk2ZjVhNTEwMGQSBWxvY2Fs", "CiRmZDE2MTRkMy1jMzlhLTQ3ODEtYjdiZC04Yjk2ZjVhNTEwMGQSBWxvY2Fs"]
   }
 }
 ) {
   nodes {
     id
     displayName
   }
 }
}
The result will look like this (notice the IDs will be different for each directory instance):
{
 "data": {
   "objects": {
     "nodes": [
       {
         "id": "fd0614d3-c39a-4781-b7bd-8b96f5a5100d",
         "displayName": "Rick Sanchez"
       },
       {
         "id": "fd1614d3-c39a-4781-b7bd-8b96f5a5100d",
         "displayName": "Morty Smith"
       }
     ]
   }
 }
}
Now, we’ll create the relations for Rick between the two departments:
mutation CreateRickOwnerRelations {
 spaceships: setRelation(relation: {
   source: {key: {key: "spaceships", type: {name: "department"}}}
   relationType: {name: {name: "owner", objectType: {name: "department"}}}
   target: {id: "fd0614d3-c39a-4781-b7bd-8b96f5a5100d"}
 }) {
   relation {
     source {
       displayName
       type {
         name
       }
     }
     type {
       displayName
     }
     target {
       displayName
       type {
         name
       }
     }
   }
 }

 teleporters: setRelation(relation: {
   source: {key: {key: "teleporters", type: {name: "department"}}}
   relationType: {name: {name: "viewer", objectType: {name: "department"}}}
   target: {id: "fd0614d3-c39a-4781-b7bd-8b96f5a5100d"}
 }) {
   relation {
     source {
       displayName
       type {
         name
       }
     }
     type {
       displayName
     }
     target {
       displayName
       type {
         name
       }
     }
   }
 }
}
And Morty’s will look very similar:
mutation CreateMortyDepartmentRelations {
 spaceships: setRelation(relation: {
   source: {key: {key: "spaceships", type: {name: "department"}}}
   relationType: {name: {name: "viewer", objectType: {name: "department"}}}
   target: {id: "fd1614d3-c39a-4781-b7bd-8b96f5a5100d"}
 }) {
   relation {
     source {
       displayName
       type {
         name
       }
     }
     type {
       displayName
     }
     target {
       displayName
       type {
         name
       }
     }
   }
 }

 teleporters: setRelation(relation: {
   source: {key: {key: "teleporters", type: {name: "department"}}}
   relationType: {name: {name: "owner", objectType: {name: "department"}}}
   target: {id: "fd0614d3-c39a-4781-b7bd-8b96f5a5100d"}
 }) {
   relation {
     source {
       displayName
       type {
         name
       }
     }
     type {
       displayName
     }
     target {
       displayName
       type {
         name
       }
     }
   }
 }
}
With the relations set, we can now apply the new ds.check_relation built-in in our policy to check for the existence of a relation of a certain type between a subject and an object to make a decision. In this case, the subject is the user, and the object is the department. For example, we can define the following policy module for an “owner”:
package is_owner.__department

default allowed = false

allowed {
 user = ds.object({
   "type": "user",
   "key": input.user.id,
 })

 department = ds.object({
   "type": "customer",
   "key": input.resource.department,
 })

 ds.check_relation({
   "sub_id": user.id,
   "obj_type": "customer",
   "relation": "owner",
   "obj_id": department.id,
 })
}
If we evaluated this policy for Rick, he would get an allowed = true decision for the spaceships departments but allowed = false for the teleporters department. The inverse would be true for Morty: He would get the allowed = false decision for the spaceships departments but allowed = true for the teleporters department.
Note that now there is no need to define these roles in a data.json file explicitly, and we’ll be able to add or modify these roles without having to update the policy bundle at all. This means we can modify the relations set up in our domain model without necessarily making any changes to our policy.
Associating Permissions to Relation Types
While relations are helpful to model roles, we will eventually want to associate many permissions to a single role. In the Aserto directory, permissions are associated with relation types. For example, we can define the owner relation type as associated with the can_create, can_delete, and can_view permissions.
First, we’ll create the permissions:
mutation CreatePermissions {
 view: setPermission(permission: {
   permission: "can_view",
   displayName: "Can View"
 }
 ){
   permission {
     permission
   }
 }
  create: setPermission(permission: {
   permission: "can_create",
   displayName: "Can Create"
 }
 ){
   permission {
     permission
   }
 }
  delete: setPermission(permission: {
   permission: "can_delete",
   displayName: "Can Delete"
 }
 ){
   permission {
     permission
   }
 }
}
Then, we’ll associate all three permissions with the owner relation type:
mutation AssociateOwnerPermissions {
 view: setRelationTypePermission(permission: {
   permission: {
     permission: "can_view"
   }
   relationType: {
     name: { name : "owner", objectType: { name: "department"}}
   },
   allowed: true
 }){
   permission{
     permission
   }
 }
  create: setRelationTypePermission(permission: {
   permission: {
     permission: "can_create"
   }
   relationType: {
     name: { name : "owner", objectType: { name: "department"}}
   },
   allowed: true
 }){
   permission{
     permission
   }
 }
  delete: setRelationTypePermission(permission: {
   permission: {
     permission: "can_delete"
   }
   relationType: {
     name: { name : "owner", objectType: { name: "department"}}
   },
   allowed: true
 }){
   permission{
     permission
   }
 }
}
Now let’s associate the viewer relation type only with the can_view permission.
mutation AssociateViewerPermissions {
 setRelationTypePermission(permission: {
   permission: {
     permission: "can_view"
   }
   relationType: {
     name: { name : "viewer", objectType: { name: "department"}}
   },
   allowed: true
 }){
   permission{
     permission
   }
 }
}
Then, we can define a policy that checks for the existence of particular permissions instead of the role - thus gaining the ability “roll up” the permissions in different ways without having to change the policy. It also allows us to define even finer-grained policies for each permission. For example, if we wanted to write a policy to check whether a user can view, it would look like this:
package can_view.__department

default allowed = false

allowed {
 user = ds.object({
   "type": "user",
   "key": input.user.id,
 })

 department = ds.object({
   "type": "customer",
   "key": input.resource.department,
 })

 ds.check_permission({
   "sub_id": user.id,
   "obj_type": "customer",
   "permissions": "can_view",
   "obj_id": department.id,
 })
}
This policy will apply both to Rick (an owner) and to Morty (a viewer) since the permission can_view is associated with both of their roles.
Summary
We are excited about the new opportunities the new directory unlocks for our users. We believe it would make it much easier to build fine-grained authorization models and enjoy the power of both the policy-as-code approach and the policy-as-data approach. To learn more about the Aserto Directory, head to our documentation website and join our Slack - we would love to hear your thoughts and assist you in creating your own domain model.
Roie Schwaber-Cohen
Developer Advocate
Related Content

RBAC, ABAC, and ReBAC - Differences and Scenarios
In this post, we'll review the differences between the RBAC, ABAC and ReBAC authorization models and consider what scenarios would be appropriate for each of them.
Sep 9th, 2022

Implement Fine-Grained Security, or Get Left Behind
Authorization has to happen close to the application, because it’s in the critical path of every application request. But fine-grained security requires real-time access to user attributes and resource relationships.
Sep 22nd, 2022

Access Control - Build vs. Buy
When it comes to software, companies and their engineering teams constantly wrestle with the age-old question of “build vs. buy”: should the company spend time, effort, and capital on building the software in-house, or alternatively outsource the solution to an external vendor? Access Control solutions are no different. In this post, we'll explore the pros and cons of building or buying an access control system.
Sep 29th, 2022