&color=rgb(100%2C100%2C100)&link=https%3A%2F%2Fgithub.com%2Faserto-dev%2Ftopaz)
Adding Authorization to a Go app with Topaz
Aug 20th, 2024

Ronen Hilewicz

Roie Schwaber-Cohen
Authorization |
Integration |
Topaz

Editor's note: the original blog post has been updated to provide a deeper introduction into Topaz, and use the latest Topaz Go middleware.
This tutorial demonstrates how authorization can be added to a Go backend service using topaz and Aserto’s Go SDK, go-aserto. It's divided into three main sections:
- An overview of topaz where we’ll learn how it performs authorization and set up an authorization policy for the application.
- Setting up a REST API service written in Go and the web application that uses it.
- Using the go-aserto package to integrate authorization middleware into the Go service.
Prerequisite
This tutorial assumes that you have Go installed and have basic familiarity with the language and its tools.
To run the web application that calls our Go backend you'll also need Node.js and Yarn.
Design
We are going to add an authorization layer to a simple task-list application that manages "ToDo" items. Users can create todo items, mark them as complete, or delete them. Authorization enforces that users can only perform actions they have permission to take.
Users are grouped by the set of permissions they are granted. We call these groups roles. In this tutorial, we’ll use three roles:
- A viewer is only able to view the list of todo items created by others. In our case, all users have permission to view the list.
- An editor can view the todo list, add todo items, and delete or complete items that they created.
- An admin can do all of the above but also complete or delete any todo item, including those created by other users.
In order to determine whether a user has permission to perform an action we must first establish the user's identity. In general, any authorization solution requires some level of authentication to be put in place first.
Topaz
Before we start building our application, let’s review the authorization process at a high level. At its heart is an authorizer—the engine that makes access-control decisions. This tutorial uses topaz, an open-source authorizer that can handle a wide range of access-control patterns including RBAC, ABAC, and ReBAC. Topaz can be easily used locally during development and later deployed to any cloud environment as a microservice or sidecar.
Topaz makes authorization decisions based on a policy. Policies can contain multiple modules and rules that control access to different parts of the application. Policies are typically maintained in Git repositories and built into OCI images that can be pushed to standard registries like ghcr.io or DockerHub. Topaz provides a number of built-in templates that include authorization policies for common use-cases and, of course, application developers can author their own.
The topaz directory is a specialized data layer that can efficiently store information needed for authorization decisions. Policies can access the directory and make decisions based on its data.
In order to make an authorization decision, topaz requires three inputs:
- An identity context represents the subject attempting to take an action. This typically denotes a user interacting with a web application or API.
- A resource context represents the application resource being accessed. The kinds of resources users can access differ from one application to the next. In our Todo application, each item on the todo list is considered a resource that can be independently secured.
- A policy context identifies the policy module and rule that should be evaluated to make the decision.
In this tutorial we’ll see how these ingredients come together to form an application with a fully functional authorization layer.
Setting up Topaz
First install topaz by following the instructions for your operating system.
Certificates
Topaz includes a web UI that can be used to explore and interact with authorization policies and data. It generates self-signed SSL certificates for development purposes but those aren't trusted by most operating systems and browsers, preventing the UI from loading successfully.
To trust the topaz development certificates run:
topaz certs trustYou can always remove them later using:
topaz certs trust --removeInstall Todo Template
Topaz includes a number of templates that lets us quickly get started with common authorization scenarios. We'll use the todo template modeled after the application we are using in this tutorial.
Install the template by running:
topaz templates install todo -fThe command performs several tasks:
- It configures topaz with the authorization policy we'll explore later in this tutorial.
- It initializes the topaz directory with a manifest that defines the application's domain model.
- It imports some sample users so we can start using the application right away.
- It opens the topaz developer console in a web browser.
We can verify that topaz is indeed running using the topaz status command:
❯ topaz status
>>> topaz "todo" is running
The output shows that topaz is running with the "todo" configuration created by the template.
Let's open the topaz console and explore what the template created.
Exploring the Topaz Console
In the next few sections we'll use the topaz console to examine the authorization model and policy installed by the todo template.
Whenever topaz is running, we can easily open the developer console using:
topaz consoleDirectory
We'll start our tour of the console in the Directory view. The first thing we see is a graphic visualization of our authorization model.

The authorization model defines the kinds of objects that can be stored in the directory, the types of relations they can have with one another, and the different permissions granted by those relations.
What we see is a graph with several horizontal lanes that cross five vertical columns. The leftmost column, with orange boxes, shows all the object types in the model. Our template has five of them: user, group, identity, resource-creator, and resource.
The second column shows the permissions defined on each type. For example, the resource type defines three permissions: can_read, can_write, and can_delete.
We'll skip the third column for now and get back to it later.
The fourth column shows the relations defined on each type. The resource type, for example, has three: owner, writer, and reader. Relations specify the ways in which objects can connect to each other. You can think of relations as roles that users or other subject can have on objects of that type.
The fifth column shows the types of objects that are allowed to be the subjects of each relation. For example, the owner of a resource can only be a user, but a writer may be either a user or the members of a group (denoted as group#member).
You can think of the topaz directory as a graph of relations between objects and subjects. By having a relation of a certain type to an object, a subject may be granted permissions on that object.
It's convenient to think of permissions as computed relations. We can explicitly create relations between objects as long as they match the types defined in the model, but permissions are always inferred.
Which brings us back to the third column. It shows the operator used to calculate whether a subject has a given permission on an object. There are four options:
- Direct assignment is the simplest. It states that in order to have permission P a subject must have relation R to the object. For example, in order to have the
can_deletepermission on aresource, ausermust have theownerrelation to it. This configuration is visualized using the equals sign (=). - Union permissions are granted to subjects that have at least one of the listed relations to the object. It's essentially a logical OR operation. The
can_writepermission onresource, for example, is granted to anyone who has either thewriterorownerrelation to the object. It is denoted with the pipe symbol (|). - Intersection permissions are only granted to subjects that have all the listed relations to the object. It's a logical AND operator, and is denoted with the ampersand symbol (
&). The model we're using in this tutorial doesn't define any intersection permissions. - Exclusion permissions are granted to users that have one relation to the object but not another. It's a logical NOT operation, and is denoted with the exclamation symbol (
!). The model we're using in this tutorial doesn't define exclusions.
Manifest
Visual representation aside, models are written in a simple YAML-based DSL. Files in that language are referred to as directory manifests. Clicking the 'Edit manifest' button in the console, opens a code editor pane that shows the type definitions we explored above.
You can learn more about the topaz domain model here.
Objects and Relations
Still in the top-level Directory view, let's click on the 'Objects' option in the navigation bar on the left.
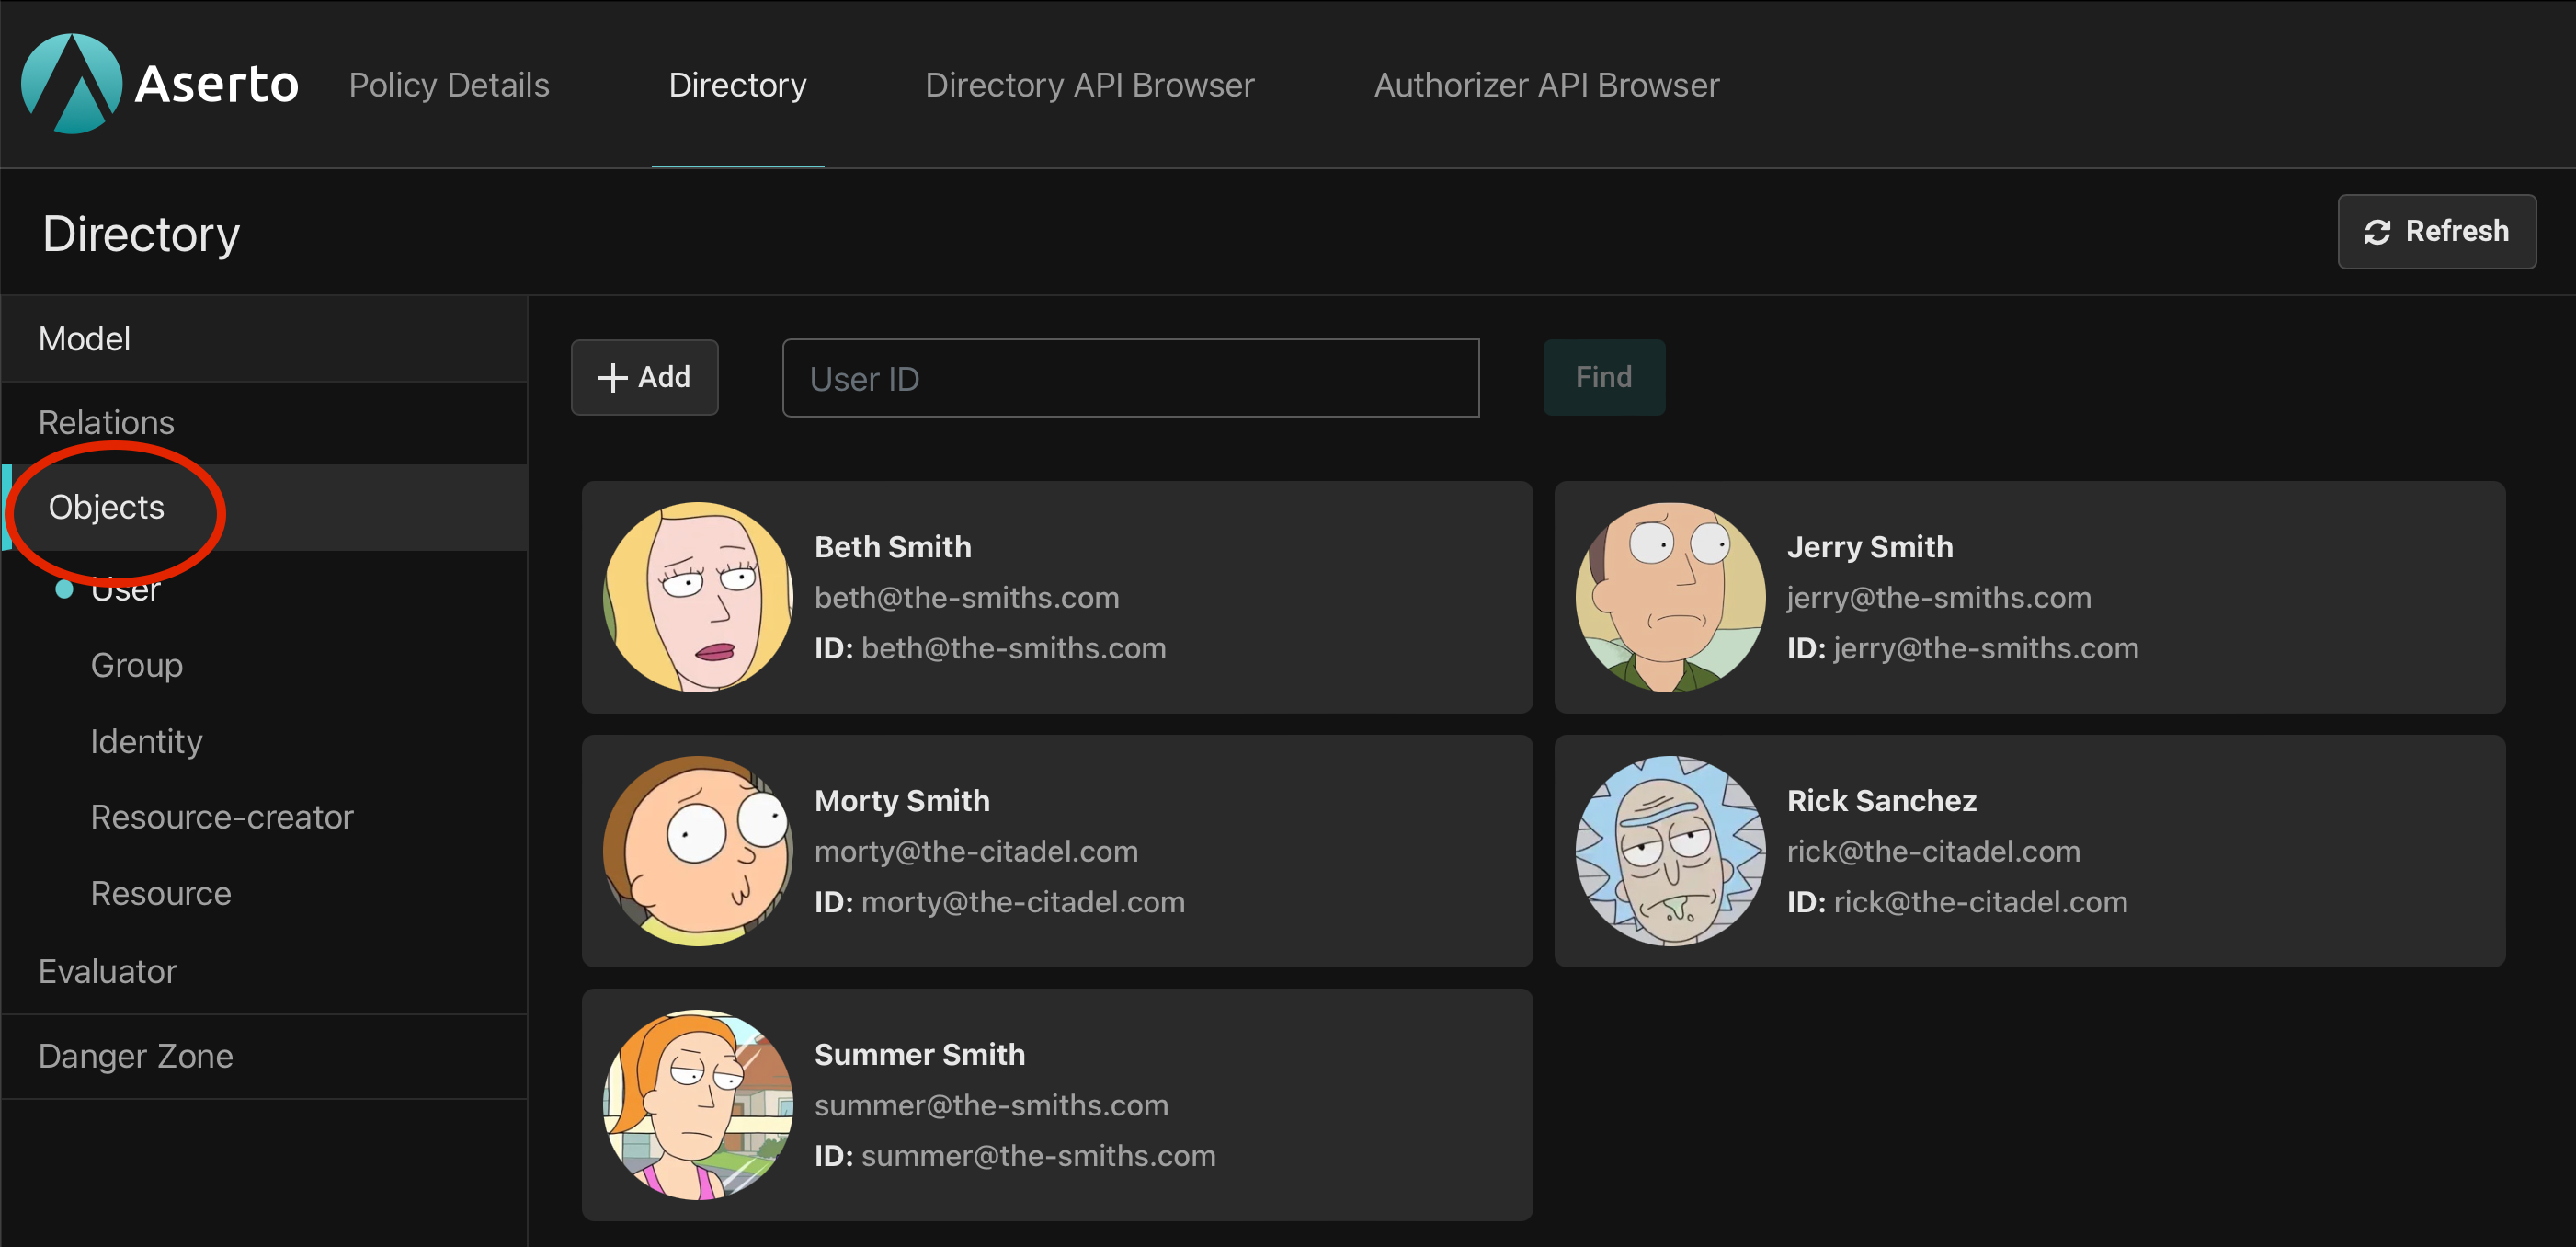
The expanded nav-bar now shows the five object types we recognize from the domain model with 'User' selected by default. On the right we see the five users populated for us by the template we installed.
Let's click on Morty and start exploring his relations.
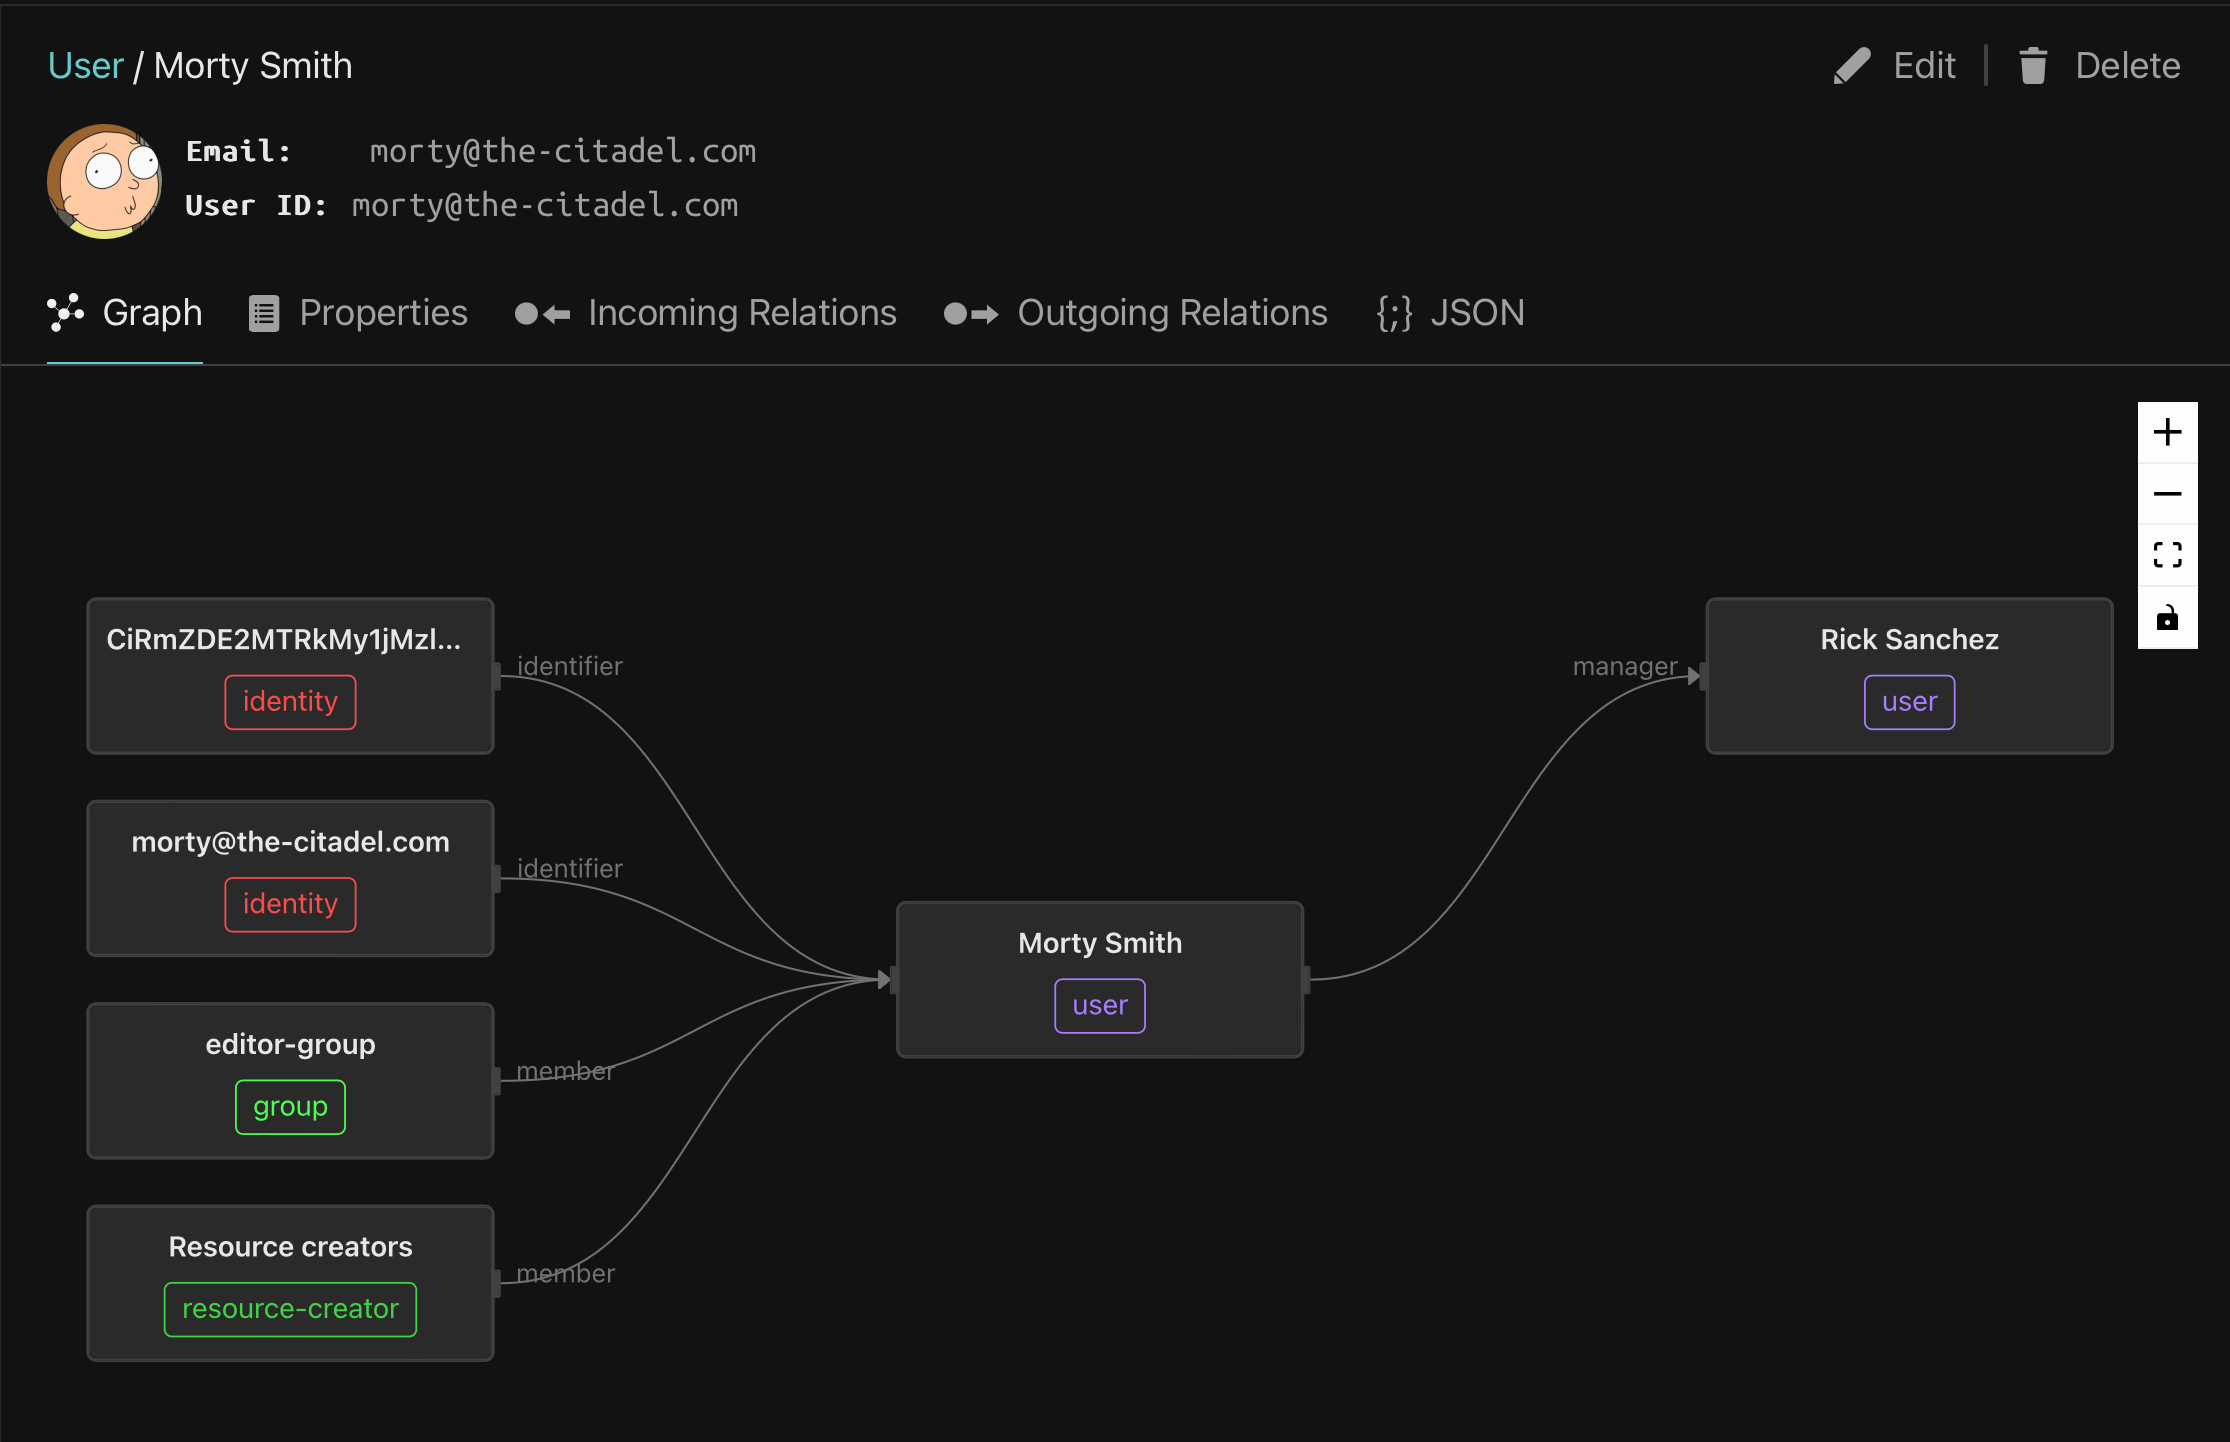
At the top, next to Morty's profile picture, we see his email and ID. Every object in the directory must have a unique ID. It's common to use an email as a unique ID for users, and that's what we see here, but we could have chosen any other unique identifier. Object IDs must be unique within a type, meaning that no two objects of the same type can share an ID but objects of different types can.
In the pane below we see a visualization of Morty's relations. The user object that represents Morty is at the center and objects with which Morty has relations show up to its left and right.
The objects on the left represent incoming relations in which Morty is the subject. On the right are outgoing relations where Morty is the object.
There are four incoming relations on the left. Two are identifier relations linked to an identity object. Identity objects are present in all topaz models. As mentioned, each object in the directory has exactly unique ID. But sometimes we want to identify an object in more than one way. For example, we may want to identify a user by email, phone number, or user ID from an external identity provider like Okta or Microsoft Entra. We achieve that by creating an identity object for each unique ID and linking it to the user with the identifier relation.
Next is a member relation with the editor group. As you might guess, groups are collections of users. If we have a set of users that all need to a have a certain relation to an object, we can create a relation between the object and each user or alternatively, make all those users members of a group and create the relation between the object and the group.
Finally we see that Morty has a member relation with the resource-creators object. This relation will be important in the application we're about to build. It grants Morty the can_create_resource permission which allows him to add new todo items to the list. See if you can find that definition in the domain model.
Properties
Now click on the 'Properties' tab below Morty's user ID.
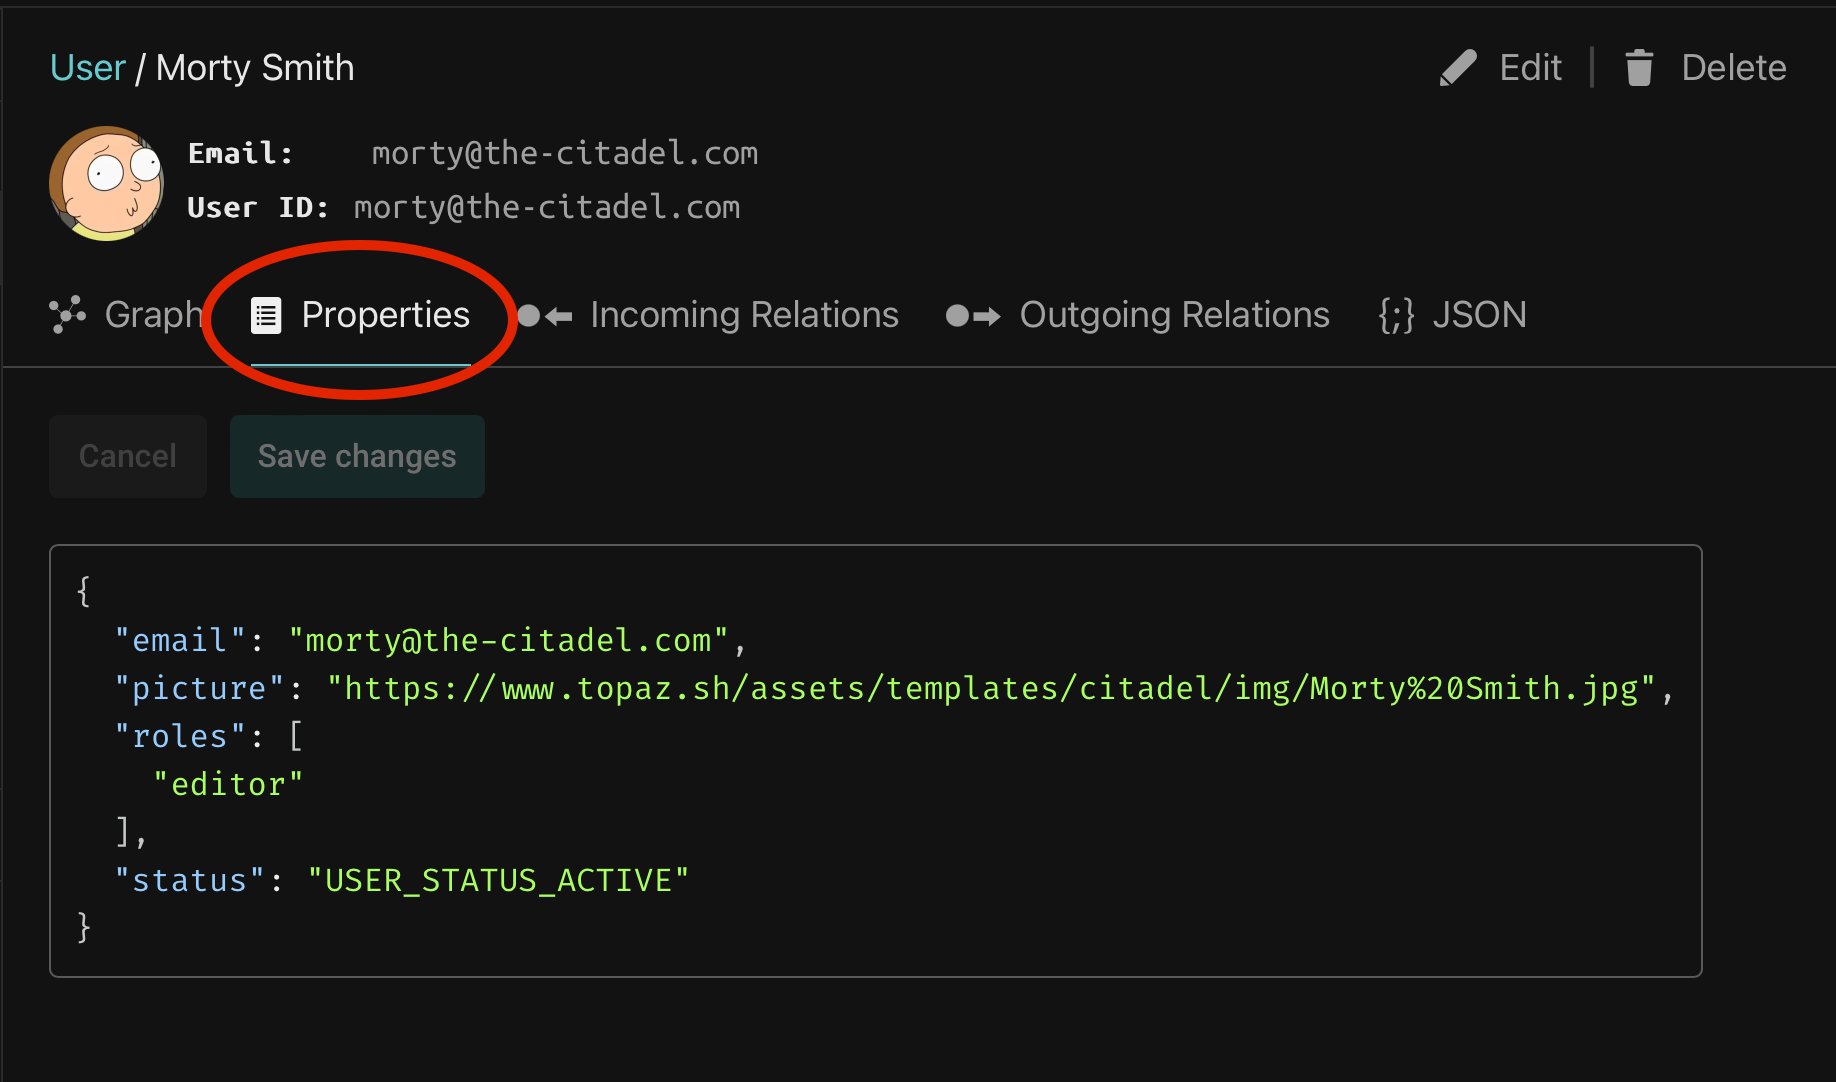
In addition to relations with other objects, a directory object can also hold properties in JSON format. The structure is entirely user-defined but the topaz console makes two special accomodations for objects of type user:
- If a user has a
pictureproperty with a valid URL, the console attempts to use it as the user's profile picture. - If a user objects has an
emailproperty, the console displays it in addition to the User ID field in the object details view.
Morty also has a roles property that demonstrates a way to give users global roles that aren't expressed as relations to specific directory objects.
User properties are automatically loaded during authorization requests and are available to the authorization policy that we'll examine in the next section.
Policy
Now that we have an understanding of the directory domain model, objects, and relations, we are going to learn about authorization policies.
If we think of the topaz directory as a data structure that contains information relevant to access control then a policy is like a program that can use that data to make authorization decisions.
Topaz uses the Open Policy Agent (OPA) internally as its decision engine and shares its policy language—Rego.
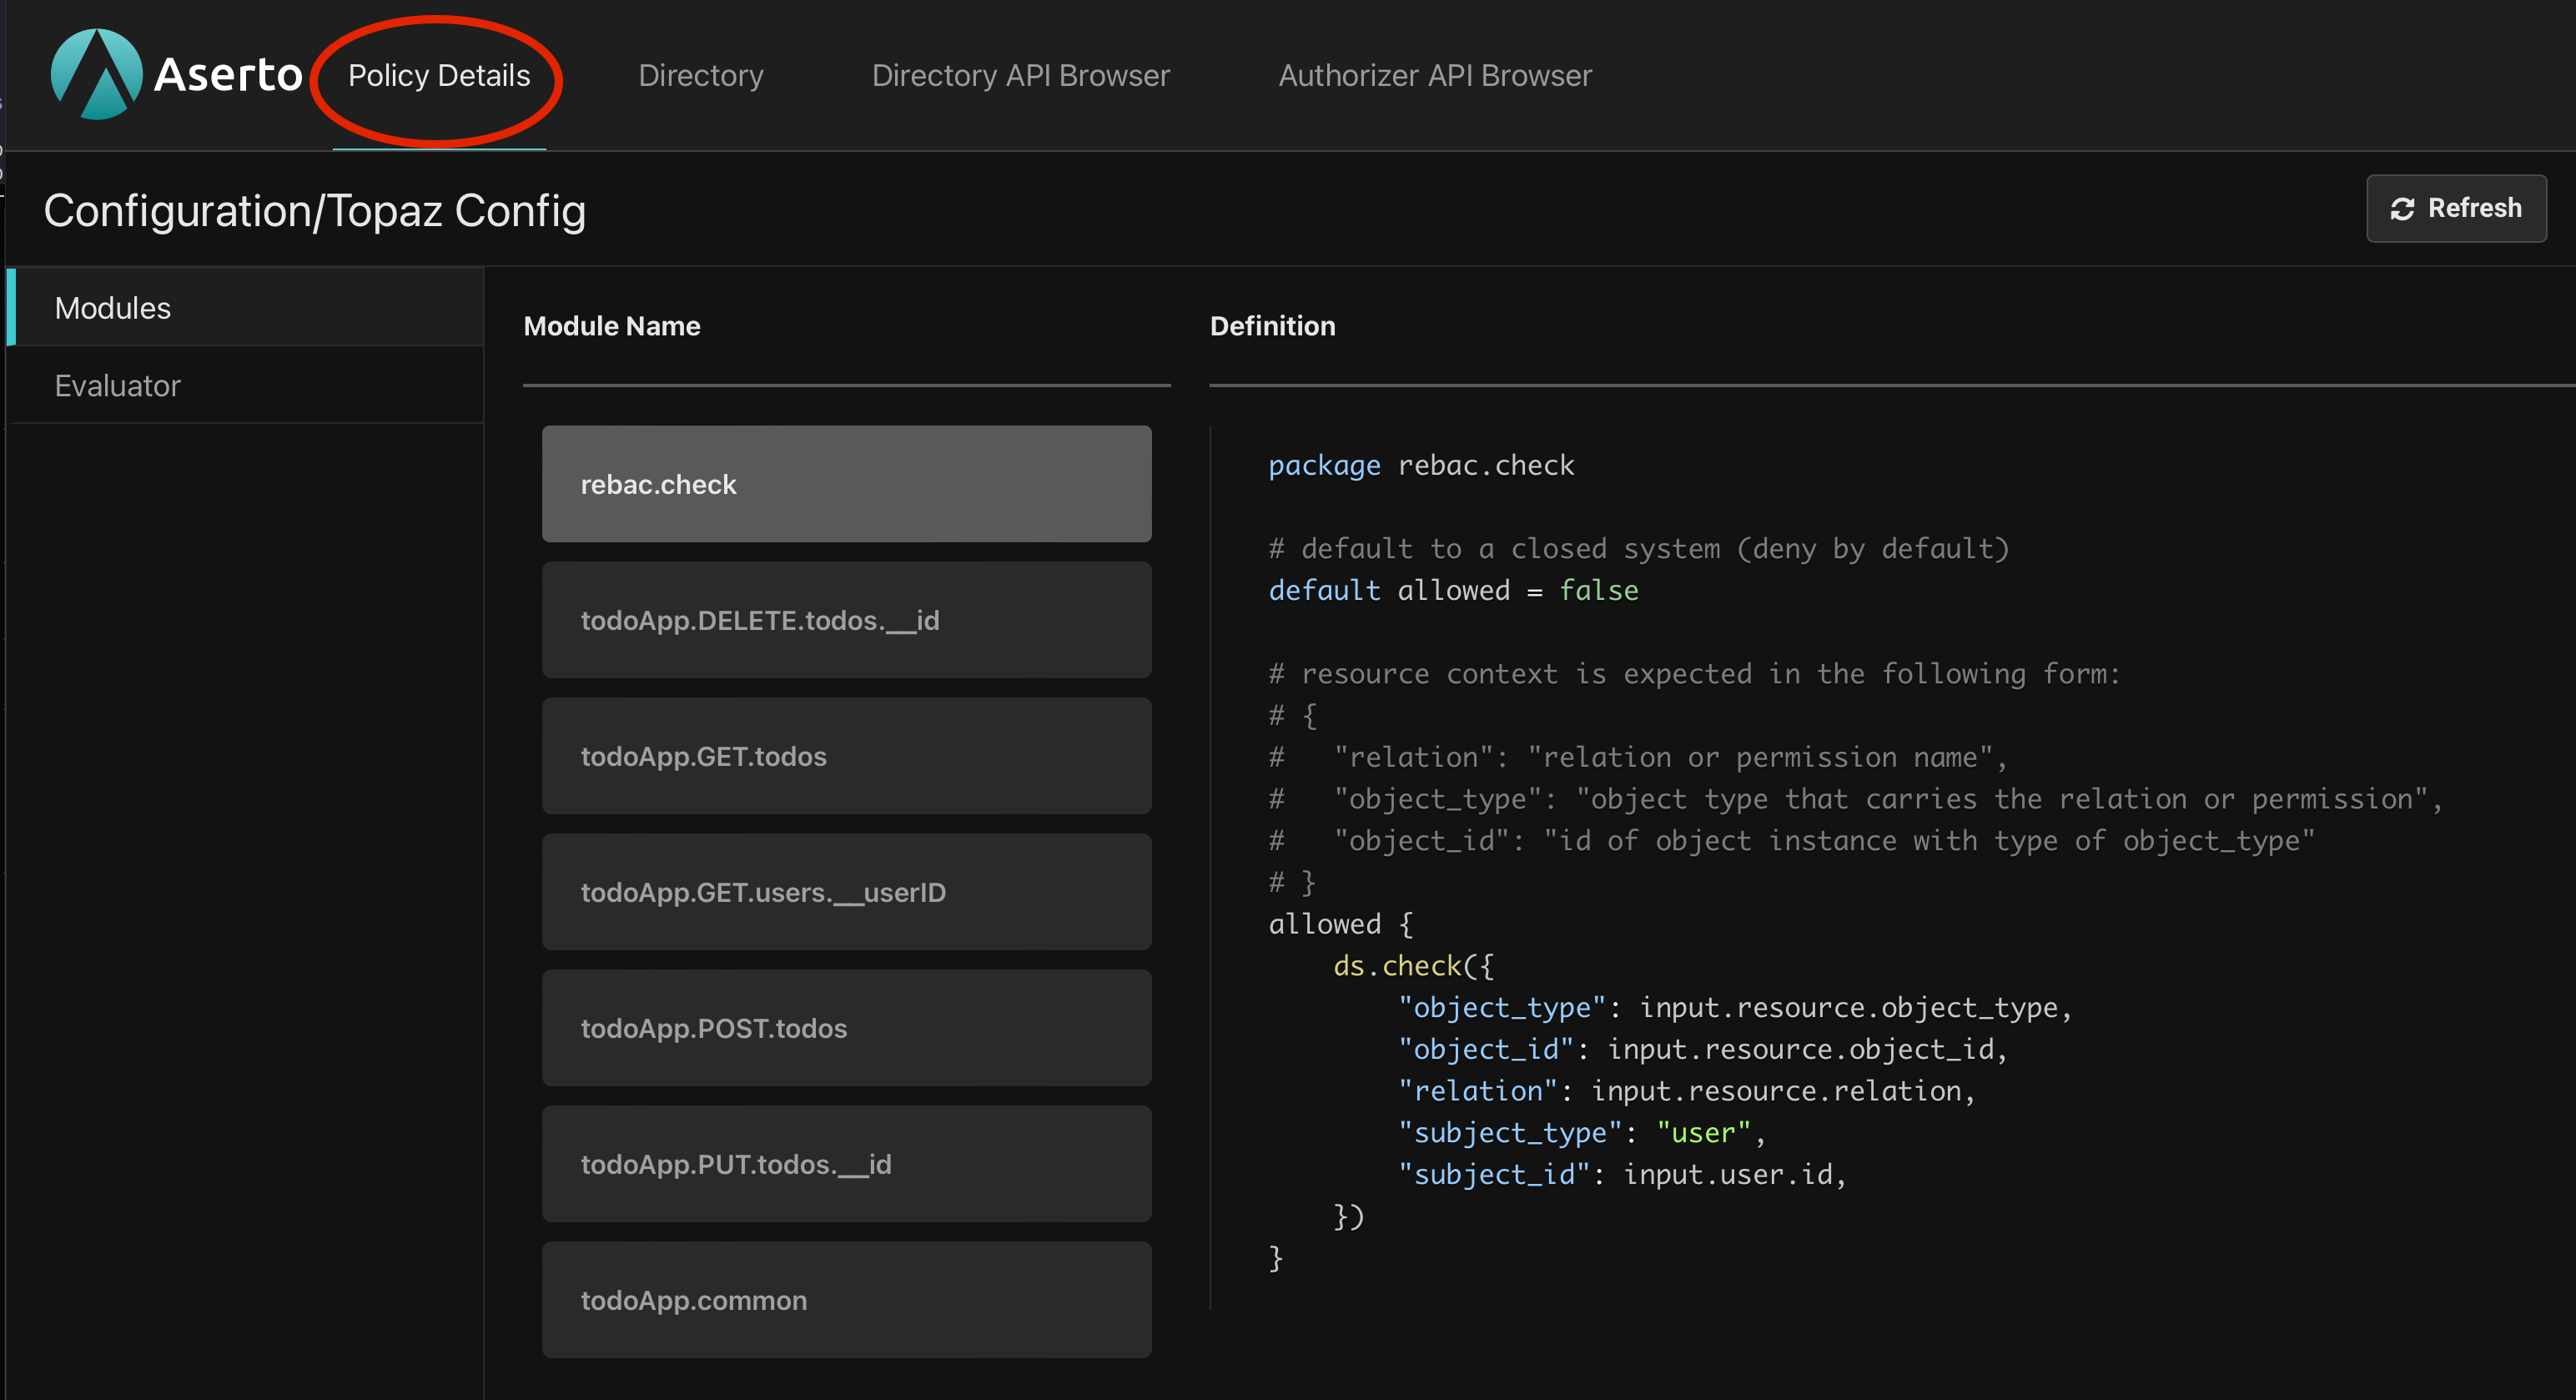
Let's examine the policy we'll be using in this tutorial. Back in the topaz console, click 'Policy Details' at the top of the page to view the modules in our policy.
A policy module is like a function we can evaluate inside the authorizer. Within a module we define rules. General OPA modules can contain many rules but in topaz, modules typically have just one boolean rule named, by convention, allowed. To make authorization decisions, the application we are about to build will evaluate the allowed rule of different modules depending on the operation being performed by a user.
Policy Inputs
Just like any other function, policy modules may need the caller to pass in parameters. If we want our policy to decide whether a given user has permission to mark a todo item as completed, we need to tell it who the user is and which todo item they're attempting to modify.
Topaz refers to thse inputs as contexts. In each request we send the authorizer an identity context that describes the subject, typically a user, that is attempting access. In addition, we can optionally send a resource context with additional information that the policy may need to make a decision. This is often some representation of the resource being accessed but applications can send arbitrary JSON objects.
Inside our policy code these contexts show up as variables. There is input.user which contains the directory user object represented by the identity context including all the of the user's properties. We saw earlier that our users have a roles property. We can access it within a policy using input.user.properties.roles.
Similarly, the JSON data from the resource context is loaded into the input.resource variable.
Policy Organization
Developers are free to organize their policy modules as they see fit but in this tutorial we'll examine two patterns that influence how we organize and name policy modules in a way that makes it easier to integrate authorization middleware into applications.
The REST Pattern
Despite its name, this pattern isn't limited to REST APIs. It is equally useful in gRPC services or any system that has distinctly named operations.
The idea is to define one policy module for each service endpoint using a naming convention that makes it possible to map an incoming request to the policy module that controls access to the endpoint.
Looking at our policy we see five modules that follow such a naming convention. Each of them corresponds to an endpoint in the service we are going to build. We'll see the endpoint implementations later in the tutorial but for now let's look at the overall structure.
Given an endpoint such as PUT /todos/{id} that we'll use to modify an existing todo item in our application, we define a policy module named todoApp.PUT.todos.__id that implements the authorization logic for the endpoint. This pattern makes it easy for our application to decide which policy module to evaluate when a request comes in to a given endpoint.
More generally, in a service called mySvc with a GET /v2/list/{list_id}/items/{item_id} endpoint, we define a policy module named mySvc.v2.list.__list_id.items.__item_id.
Using the service name as a prefix in the module name helps with disambiguation when a single policy is used by multiple services, but it's optional and can be omitted if the policy is dedicated to a single service.
URL parameters like item_id above are prefixed with a double-underscore i.e. __item_id) because (a) module names must be valid identifiers and can't include special characters, and (b) each web framework has its own way to express path parameters and having to change the policy when switching a service implementation from one framework to another is undesirable.
The ReBAC Pattern
ReBAC stands for Relation-Based Access Control. Authorization decsions are often based entirely on the set of objects and relations in the directory. In our authorization model, for example, we know that users have the can_delete permission on a resource if they have an owner relation with it. Our policy just needs to check the directory for that permission. More generally, a ReBAC check determines whether a subject has a given permission or relation on an object.
With this pattern we can authorize multiple service endpoints using a single policy module. The module takes object_type, object_id, and relation as inputs in its resource context and checks the directory to see if the calling user has the specified relation (or permission) on the given object. Topaz has a built-in ds.check() function that policies can call to do just that.
The rebac.check module in our policy illustrates the pattern:
package rebac.check

# default to a closed system (deny by default)
default allowed = false

# resource context is expected in the following form:
# {
#   "relation": "relation or permission name",
#   "object_type": "object type that carries the relation or permission",
#   "object_id": "id of object instance with type of object_type"
# }
allowed {
	ds.check({
		"object_type": input.resource.object_type,
		"object_id": input.resource.object_id,
		"relation": input.resource.relation,
		"subject_type": "user",
		"subject_id": input.user.id,
	})
}
It has a single allowed rule that defaults to false and then calls ds.check() with object_type, object_id, and relation from the resource context (input.resource) and subject_id from the identity context (input.user.id).
We'll use both patterns in our application.
Testing the Policy
The topaz console has an evaluator that lets us make authorization requests and verify that we're getting the expected decisions.
Staying in the Policy Details view, navigate to the Evaluator.
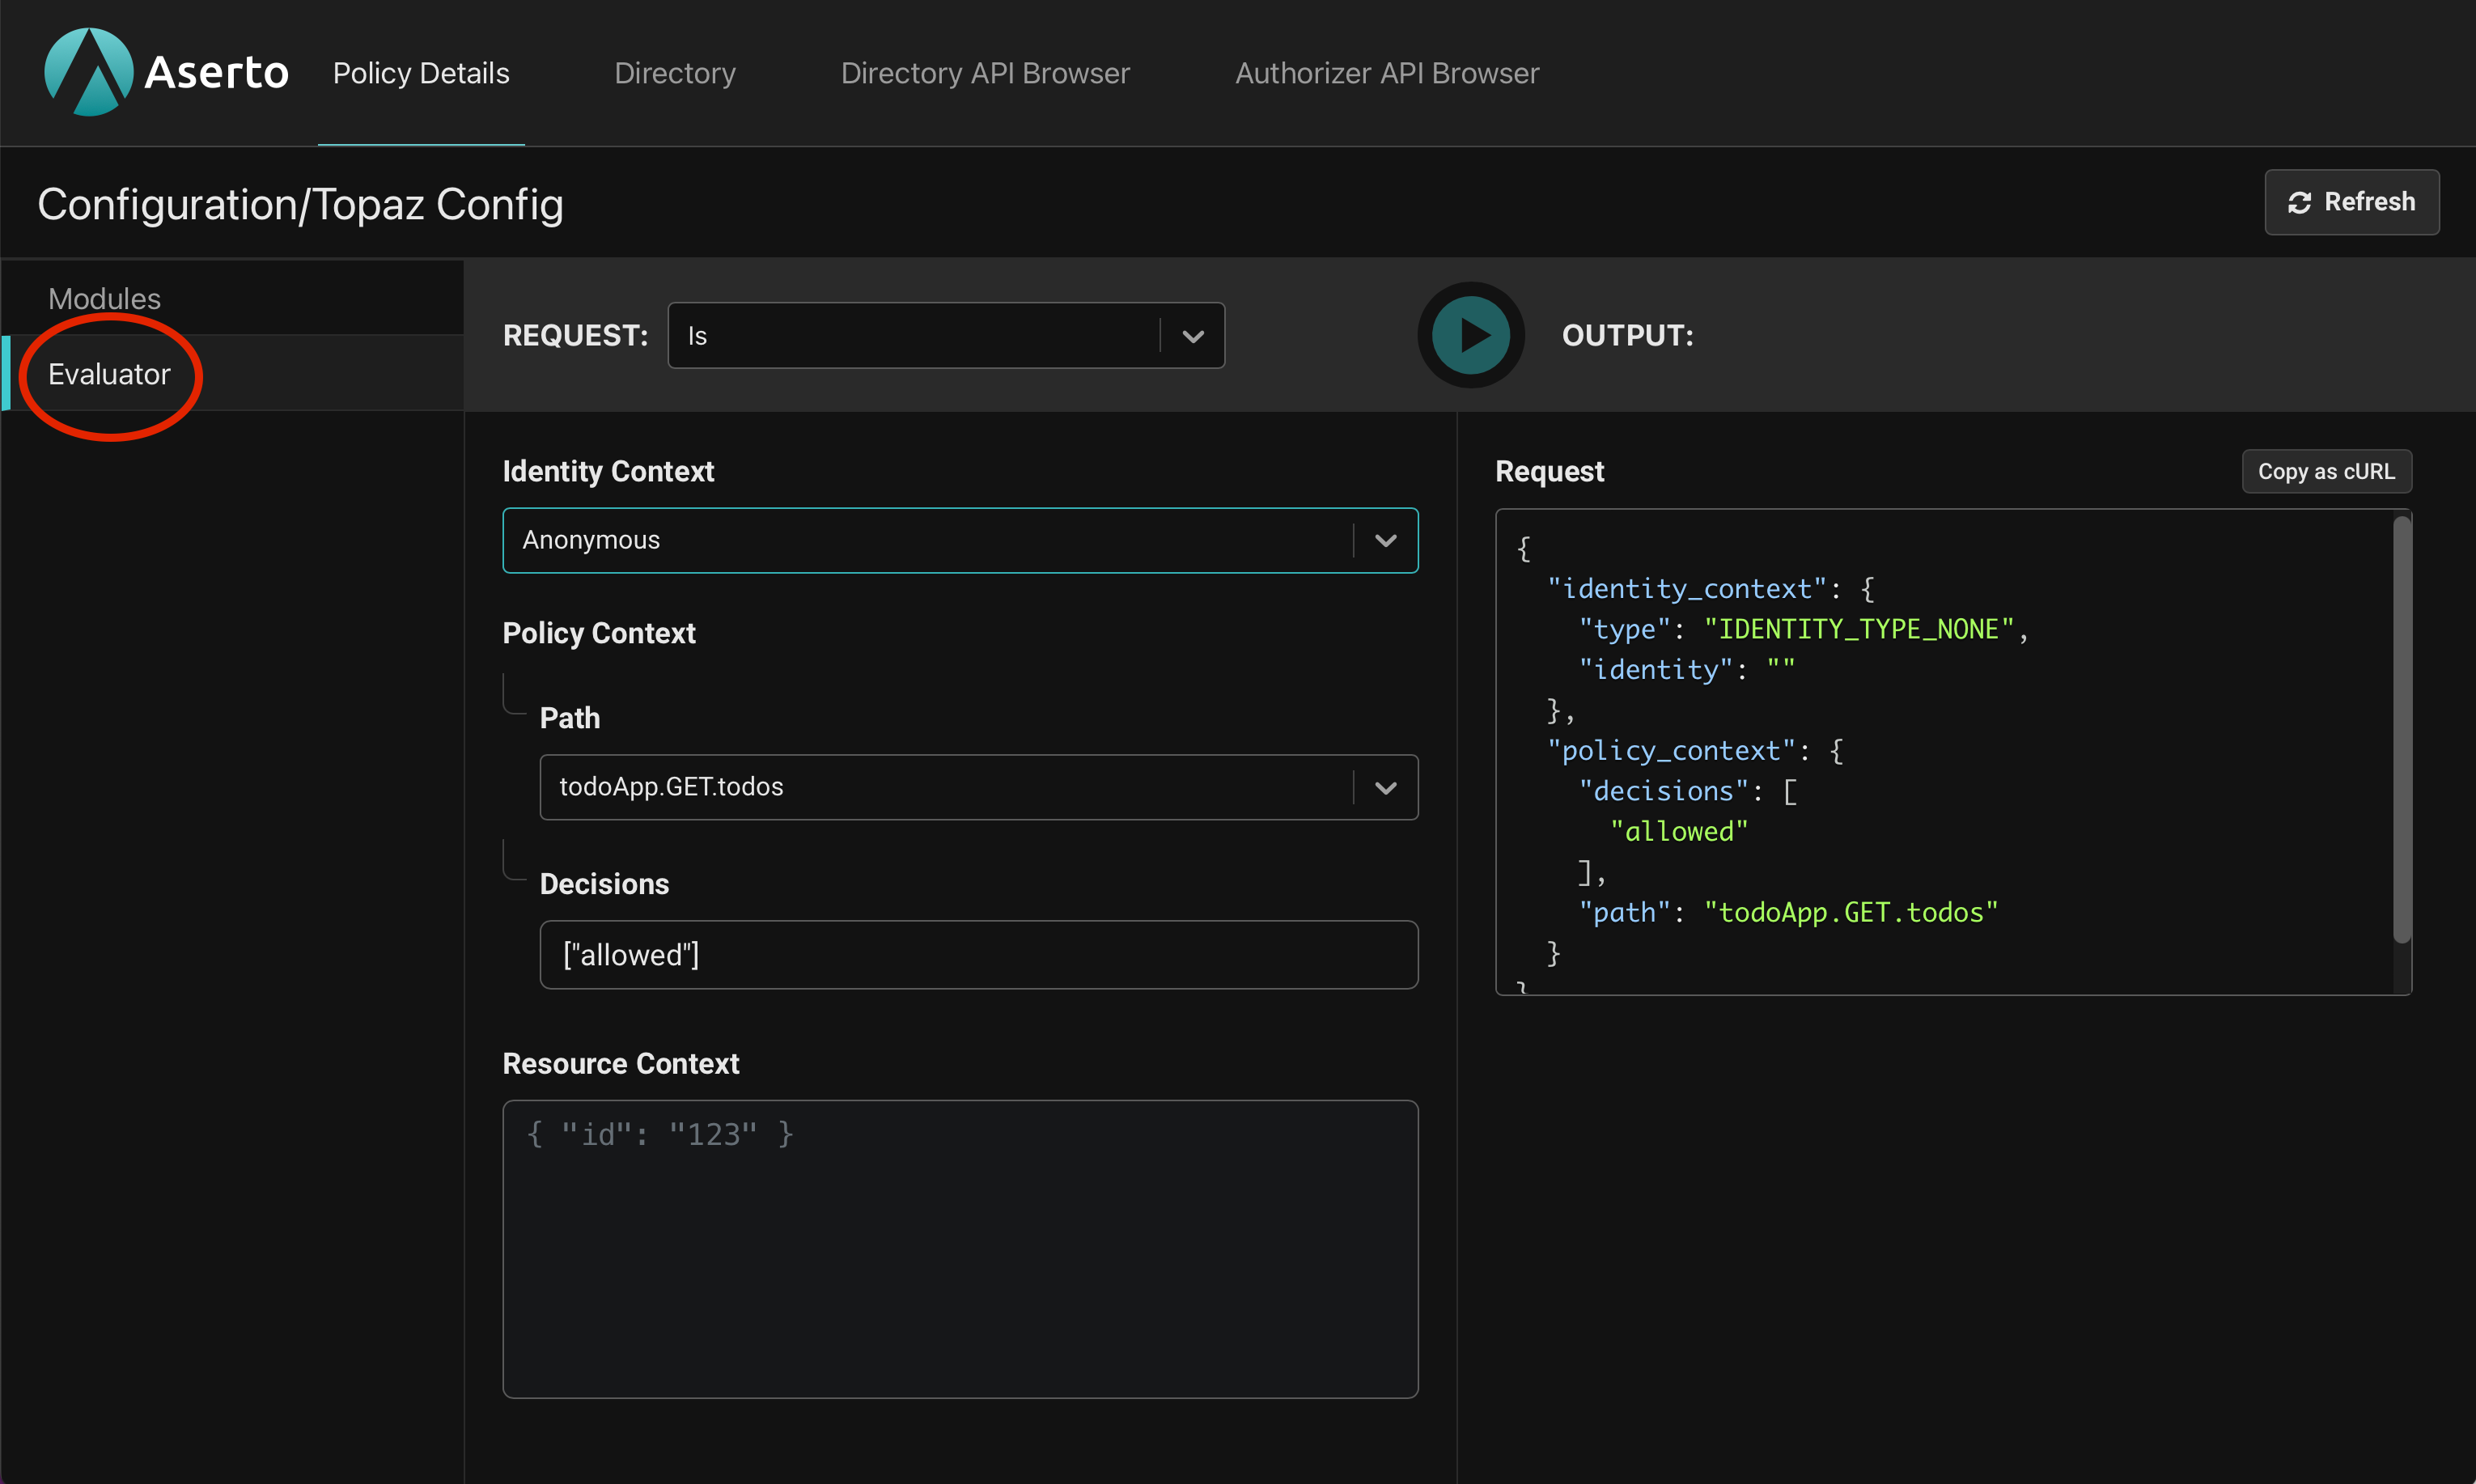
The most common type of authorization request is an Is call. It takes the path of a policy module, one or more rules to evaluate (usually just "allowed"), an identity context denoting the user, and an optional resource context in JSON format. It responds with the answer to the question "Is the user allowed access?". Let's try a few example.
First, we'll leave the Identity Context as Anonymous, set the Path in the Policy Context to todoApp.GET.todos, and click the green "play" button to send the request to topaz. The result comes back as:
{
  "decisions": [
    {
      "decision": "allowed",
      "is": true
    }
  ]
}
The output shows that the allowed decision came back as true. That's the expected result because in our application any user can view the list of todos. Indeed, the todoApp.GET.todos module in our policy set the allowed rule to be unconditionally true:
package todoApp.GET.todos

# This policy determines whether the user can view all todos

default allowed = true
We can also evaluate the policy for a specific user. If we switch the Identity Context drop-down box to Subject, we can provide a user ID and evaluate the policy as that user. To simulate a call from Morty, type his email, morty@the-citadel.com, and click the Play button again. It's no surprise that the decision still comes back as true since the module's logic doesn't depend on input.user at all.
Next, change the Policy Context's path to todoApp.POST.todos and hit the Play button. The response is still true indicating that Morty is allowed to add items to the todo list. This module checks if the user has the member relation to the resource-creators object:
package todoApp.POST.todos

# This policy determines whether the user can create todos

default allowed = false

# Only members of the "resource-creators" instance can create a new Todo.

allowed {
	ds.check({
		"object_type": "resource-creator",
		"object_id": "resource-creators",
		"relation": "member",
		"subject_type": "user",
		"subject_id": input.user.id,
	})
}
Morty does in fact have that relation (see if you can find it in the Directory) and is therefore granted access. If we change the user to jerry@the-smiths.com, who isn't a member of resource-creators we'll see that we get back false:
{
  "decisions": [
    {
      "decision": "allowed",
      "is": false
    }
  ]
}
Now that we understand how the policy works, it's time to implement our API server.
Setting up the Go Server
Our starting point is an implementation of the server that has a complete implementation of all the application endpoints but with no authorization checks.
Clone this branch to add the authorization middleware to the application yourself:
git clone -b no-authorization git@github.com:aserto-demo/todo-go-v2.gitInstall dependencies:
cd todo-go-v2

go mod tidy
And start the server:
go run .Setting up the Web Frontend
The web frontend for this tutorial is a React application that calls the APIs served by our Go backend service.
In another directory, clone the repo, install dependencies, and start the application:
git clone git@github.com:aserto-demo/todo-application.git

cd todo-application

yarn install
yarn start
Your browser should now open on http://localhost:3000 and load the login page.
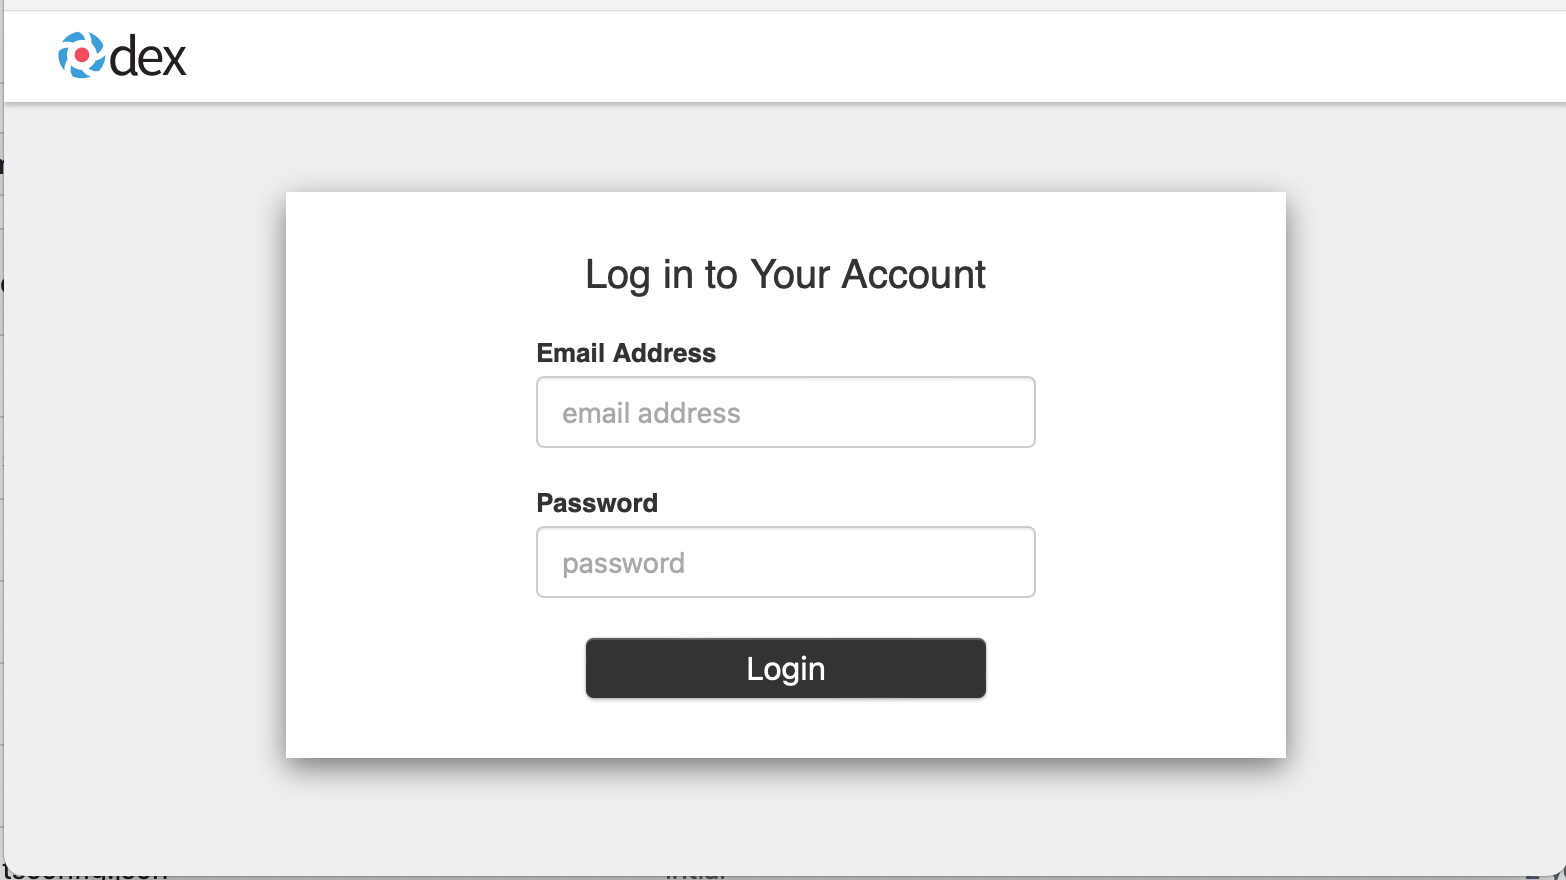
Start by logging in as Morty using the email morty@the-citadel.com and the password V@erySecre#t123!. You can add todo items by typing in the "What needs to be done?" box, mark some as completed, and delete others.
Next, with some items still on the list, click Log Out and log back in as jerry@the-smiths.com with the same password as Morty (all of our demo users share the same password). Morty's todo items appear on the board. Like before, you can create, complete, and delete new items but because our backend service has no authorization in place, you can also complete and delete Morty's items. In fact, as we saw when testing the policy, Jerry shouldn't even be allowed to add new items.
Exploring the Go Backend
Before we add authorization to the service, let's take a moment to examine its main.go file.
package main

import (
	"context"
	"net/http"
	"os/signal"
	"syscall"
	"time"

	"todo-go/server"

	"github.com/gorilla/mux"
	"github.com/rs/zerolog/log"
)

func main() {
	// Load options from .env file.
	options, err := server.LoadOptions()
	if err != nil {
		log.Fatal().Err(err).Msg("failed to load options")
	}

	// Initialize the Server
	srv, err := server.New(options)
	if err != nil {
		log.Fatal().Err(err).Msg("failed to create server")
	}
	defer srv.Close()

	// Create a context that is cancelled when SIGINT or SIGTERM is received.
	ctx, stop := signalContext()
	defer stop()

	// This middleware validates incoming JWTs and stores the subject name in the request context.
	authn := AuthenticationMiddleware(ctx, options)

	// Create the API router.
	router := AppRouter(srv, authn)

	// Start the server
	go func() {
		srv.Start(router)
	}()

	// Wait for the context to be cancelled
	<-ctx.Done()

	// Gracefully shutdown the server
	srv.Shutdown(5 * time.Second)
}
After loading settings from an optional .env file, the main() function creates a new server that acts as the API controller with functions like GetTodos(), UpdateTodo(), etc. It then creates authentication middleware that validates incoming JWTs and stores the caller's identity—the token's subject—in the request context.
func AppRouter(srv *server.Server, authn mux.MiddlewareFunc) *mux.Router {
	router := mux.NewRouter()

	// Add authentication middleware to all routes.
	router.Use(authn)

	// Set up routes
	router.Handle("/users/{userID}", http.HandlerFunc(srv.GetUser)).Methods("GET")

	router.Handle("/todos", http.HandlerFunc(srv.GetTodos)).Methods("GET")
	router.Handle("/todos/{id}", http.HandlerFunc(srv.UpdateTodo)).Methods("PUT")
	router.Handle("/todos/{id}", http.HandlerFunc(srv.DeleteTodo)).Methods("DELETE")
	router.Handle("/todos", http.HandlerFunc(srv.InsertTodo)).Methods("POST")

	return router
}
The AppRouter() function creates a gorilla/mux router, sets the authentication middleware, defines the application's API routes and wires them to the corresponding server handlers.
Adding Authorization
We'll now add authorization middleware using the go-aserto package, which has middleware for common frameworks including gorilla/mux.
For each request, the middleware makes a call to the authorizer, just like we did in the topaz evaluator, and if the decision returns as false, it rejects the request with a 403 Forbidden status.
As we've learned, in order to construct an Is call to topaz, the middleware needs three pieces of information:
- A policy context that determines which module and rule is evaluated.
- An identity context that identifies the user attempting access.
- A resource context with information about the resource being accessed.
The middleware can be configured to extract this information from the incoming HTTP request.
First we add the gorilla/mux middleware package:
go get github.com/aserto-dev/go-aserto/middleware/gorillazThen create a new files called authz.go at the root of the repo with the following code:
package main

import (
	"net/http"
	"todo-go/identity"
	"todo-go/server"

	"github.com/aserto-dev/go-aserto"
	"github.com/aserto-dev/go-aserto/az"
	"github.com/aserto-dev/go-aserto/middleware"
	"github.com/aserto-dev/go-aserto/middleware/gorillaz"
	"github.com/gorilla/mux"
)

func NewAuthorizerClient(cfg *aserto.Config) (*az.Client, error) {
	opts, err := cfg.ToConnectionOptions(aserto.NewDialOptionsProvider())
	if err != nil {
		return nil, err
	}

	return az.New(opts...)
}

func AuthorizationMiddleware(azClient *az.Client, options *server.Options) *gorillaz.Middleware {
	policy := &middleware.Policy{
		Name:     options.PolicyName,
		Decision: "allowed",
	}
	// Create authorization middleware
	authz := gorillaz.New(azClient, policy).
		WithPolicyFromURL(options.PolicyRoot).
		WithResourceMapper(func(r *http.Request, resource map[string]interface{}) {
			resource["object_id"] = mux.Vars(r)["id"]
		})
	authz.Identity.Subject().FromContextValue(identity.SubjectKey)

	return authz
}
The NewAuthorizerClient() function takes connection information and creates a client that can send Is calls to the configured authorizer, which in our case would be topaz's default address, localhost:8282.
The AuthorizationMiddleware() function uses an authorizer client and configuration options to create and set up the middleware we'll use for authorization. It takes several steps:
- It tells the middleware to evaluate the policy's
allowedrule when making decisions. - It calls
WithPolicyFromURL("todoApp")to tell the middleware to use the REST pattern and infer the name of the policy module to evaluate from the request's URL with the"todoApp."prefix. A PUT request to the/todos/{id}route, for example, would evaluate thetodoApp.PUT.todos.__idmodule. - It calls
WithResourceMapper()and provides a function that adds the value of theidpath parameter, if present, to the resource context. If a request is sent to/todos/123, for example, the resource context would be{"object_id": "123"}. - Finally, it instructs the middleware to construct the identity context by reading the caller's subject name from the request context value populated by the authentication middleware.
With that in place, we can wire the middleware into our service. We'll start with the AppRouter() function and pass it the authorization middleware:
func AppRouter(srv *server.Server, authn mux.MiddlewareFunc, authz *gorillaz.Middleware) *mux.Router {
	router := mux.NewRouter()

	// Add authentication and authorization middleware to all routes.
	router.Use(authn, authz.Handler)

	// Set up routes
	router.Handle("/users/{userID}", http.HandlerFunc(srv.GetUser)).Methods("GET")

	router.Handle("/todos", http.HandlerFunc(srv.GetTodos)).Methods("GET")
	router.Handle("/todos/{id}", http.HandlerFunc(srv.UpdateTodo)).Methods("PUT")
	router.Handle("/todos/{id}", http.HandlerFunc(srv.DeleteTodo)).Methods("DELETE")
	router.Handle("/todos", http.HandlerFunc(srv.InsertTodo)).Methods("POST")

	return router
}
The only difference is that we're now using both authentication and authorization middleware in our router.
// Add authentication and authorization middleware to all routes.
router.Use(authn, authz.Handler)
Next, we'll modify the main function to create the authorization middleware and pas it to AppRouter().
func main() {
	...

	// This middleware validates incoming JWTs and stores the subject name in the request context.
	authn := AuthenticationMiddleware(ctx, options)

	// Create an authorizer client
	azClient, err := NewAuthorizerClient(options.Authorizer)
	if err != nil {
		log.Fatal().Err(err).Msg("failed to create authorizer client")
	}
	defer azClient.Close()

	// This middleware authorizes incoming requests.
	authz := AuthorizationMiddleware(azClient, options)

	// Create the API router.
	router := AppRouter(srv, authn, authz)

	...
}
And finally, import "github.com/aserto-dev/go-aserto/middleware/gorillaz":
import (
	"context"
	"os/signal"
	"syscall"
	"time"

	"todo-go/server"

	"github.com/aserto-dev/go-aserto/middleware/gorillaz"
	"github.com/gorilla/mux"
	"github.com/rs/zerolog/log"
)
Testing with Authorization
After making these changes, restart the Go server and reload the application page in the browser. You should still be logged in as Jerry. This time, however, Jerry can no longer create new todo items or modify ones created by other users. He can still mark his own items as completed and delete them though.
You can log out and log back in as Morty to see that he can create new todo items.
Finally, log in as rick@the-citadel.com who is a member of the admin group, which gives him permission to complete and delete other users' todo items.
Bonus: ReBAC Middleware
When discussing how to organize our policy module we saw two patterns. First is the REST pattern in which each service endpoint uses its own policy module. That's the pattern our services now uses. Each API route maps to its own policy module.
The second pattern is ReBAC in which a single policy module can be used to authorize multiple endpoints by taking an object and permission or relation as parameters. The POST endpoint in our service is a good candidate for that pattern because its corresponding policy module, todoApp.POST.todos looks remarkably similar to the generic rebac.check module.
In todoApp.POST.todos we have:
allowed {
  ds.check({
    "object_type": "resource-creator",
    "object_id": "resource-creators",
    "relation": "member",
    "subject_type": "user",
    "subject_id": input.user.id
  })
}
And in rebac.check:
allowed {
  ds.check({
    "object_type": input.resource.object_type,
    "object_id": input.resource.object_id,
    "relation": input.resource.relation,
    "subject_type": "user",
    "subject_id": input.user.id
  })
}
The only difference is that todoApp.POST.todos uses hard-coded values for the object_type, object_id, and relation fields in the ds.check() call whereas rebac.check reads them from the resource context, input.resource.
Instead of creating many policy modules that only differ in the values they pass to ds.check(), the Aserto authorization middleware can be used to configure the rebac.check parameters for each route.
Let's modify our AppRouter() function to do that for the POST route. We no longer want to apply the same authorization logic to all routes so instead of using the middleware on all routes we'll explicitly set it on each route.
func AppRouter(srv *server.Server, authn mux.MiddlewareFunc, authz *gorillaz.Middleware) *mux.Router {
	router := mux.NewRouter()

	// Add authentication middleware to all routes.
	router.Use(authn)

	// Set up routes
	router.Handle("/users/{userID}", authz.HandlerFunc(srv.GetUser)).Methods("GET")

	router.Handle("/todos", authz.HandlerFunc(srv.GetTodos)).Methods("GET")
	router.Handle("/todos/{id}", authz.HandlerFunc(srv.UpdateTodo)).Methods("PUT")
	router.Handle("/todos/{id}", authz.HandlerFunc(srv.DeleteTodo)).Methods("DELETE")

	router.Handle(
		"/todos",
		authz.Check(
			gorillaz.WithObjectType("resource-creator"),
			gorillaz.WithRelation("member"),
			gorillaz.WithObjectID("resource-creators"),
			gorillaz.WithPolicyPath("rebac.check"),
		).HandlerFunc(srv.InsertTodo)).Methods("POST")

	return router
}
We removed authz from the router.Use() call and instead we're using authz.HandlerFunc(<controller>) in the first four routes.
But the POST route is different. We create it's middleware handler by calling authz.Check() with various options. The middleware's Check() function implements the ReBAC pattern and its arguments let us configure the resource context with the object_type, object_id, and relation fields expected by our rebac.check module.
In this example we're passing the same hard-coded constants used in todoApp.POST.todos, but we also have options like WithObjectIDFromVar(), WithRelationMapper(), and others that can be used to dynamically set the object and relation based on the incoming request.
Summary
In this guide we learned how to create a simple backend service in Go with an authorization layer that uses topaz and the go-aserto package. We learned about topaz and its authorization model and policies, and saw how we can test them using the topaz console's evaluator. We hope you found this tutorial helpful and that you are able to use it to implement authorization with topaz in your own applications.
Ronen Hilewicz
Principal Engineer
Roie Schwaber-Cohen
Developer Advocate
Related Content
Authorization 101: Multi-tenant RBAC
Every multi-tenant B2B SaaS product needs an authorization model. The trick is to build one that can scale with your app.
Sep 9th, 2024
API Authorization using Aserto and Zuplo
Platform Engineering teams that want to authorize access to their APIs now have a turnkey solution from Aserto and Zuplo.
Sep 25th, 2024

Authentication and authorization with Auth0 and Aserto
In this guide, we will demonstrate adding application authorization and role-based access management to the sample Auth0 web app using Aserto.
Oct 28th, 2024