&color=rgb(100%2C100%2C100)&link=https%3A%2F%2Fgithub.com%2Faserto-dev%2Ftopaz)
Creating a Rego policy for a Todo application
Apr 28th, 2022

Roie Schwaber-Cohen
Authorization |
Integration
Aserto uses the Open Policy Agent (OPA) as the decision engine for evaluating authorization decisions. Rego is the policy language for defining rules that are evaluated by the OPA engine. In this tutorial, we’ll demonstrate building a Rego policy for a simple Todo application.
Prerequisites
You should have Node.js and Yarn or NPM installed on your machine to use the test application that accompanies this tutorial.
Authorization - quick overview
Before we get started with building the policy, let’s talk about how the authorization process takes place. At the heart of the authorization process is the Authorizer, where authorization decisions get made.
There are three inputs that contribute to an authorization decision:
- the identity context: the actor that is taking the action. Our application will resolve the user’s identity after they have logged in, and pass that identity to the server with every request.
- the resource context: the resource that is being acted upon. In our Todo application, the resource is each todo item - and particularly information about the owner of each todo item.
- the policy context: the rules should be applied to make the authorization decision. Policies can be stored either as OCI images or as code in GitHub or GitLab. A policy consists of multiple policy modules that correspond to the endpoints that are being protected. Our server will be set up with middleware that will resolve which policy module should be invoked for a given request.
In this tutorial, we’ll build a set of policy modules and see how they govern the authorization behavior of an application.
Design
The application we’ll add authorization to is a classic Todo application. We’ve all seen those before: Users can create a todo, mark it as complete or delete it. In this tutorial, we’ll limit the abilities of different types of users and check whether or not they are permitted to take specific actions.
Users can be grouped by the set of permissions they will be granted. We call these groups “roles”. In this tutorial, we’ll have three roles:
- A “viewer” - will be able to only view the todo list
- An “editor” - will be able to view the todo list, add a todo item, and delete or complete a todo item they have previously created.
- An “admin” - will be able to do all of the above, but also be able to complete and delete any todo item.
As we mentioned before, we need to establish the identity of a user in order to determine what actions they may perform. So we’ll need to have some way of authenticating them in the first place.
Every todo item will be saved in the database including an identifier of the user who created it. We’ll use this information to determine whether the currently logged in user is allowed to perform an action on any of the todo items. We’ll also use it to display a profile image of the user in the todo list, so we can tell which user created a particular todo item.
Getting started with Aserto
In this part of the tutorial, we’ll spend some time interacting with the Aserto console. To get started, log in to your Aserto account (if you don’t already have an Aserto account, sign up here). In the console, we’re going to:
- Connect to an identity provider - In this tutorial, we’ll use a sample identity provider, called Acmecorp
- Connect to the Open Policy Registry where we can find the public Todo policy
- Create a policy instance
Add the Acmecorp IDP
In order to understand how the authorization process works, we’ll need to add an identity provider. For the purposes of this tutorial, we’ll use the Acmecorp IDP, which is a sample identity provider that we created for you. It includes over 250 users with different roles and attributes you can use to test your policies (when you’re ready to go to production, you’ll be able to use Auth0 or Okta as your IDP).
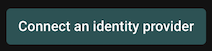
To set up the Acmecorp IDP, head to the “Directory” tab and click “Connect an identity provider”.
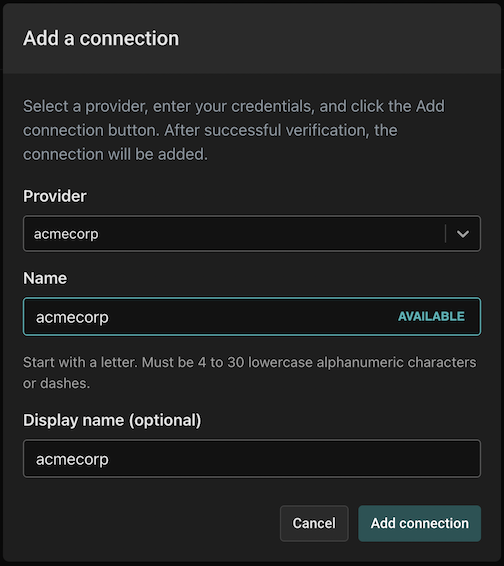
Select the acmecorp provider, and name the connection acmecorp. Use the display name acmecorp and click “Add connection”.
The Directory tab will now be populated with the users from the Acmecorp IDP.

Next, we want to set up the policy that will determine how authorization decisions are going to be made. For the purpose of this tutorial, we have created a policy that you can easily load into your Aserto tenant.
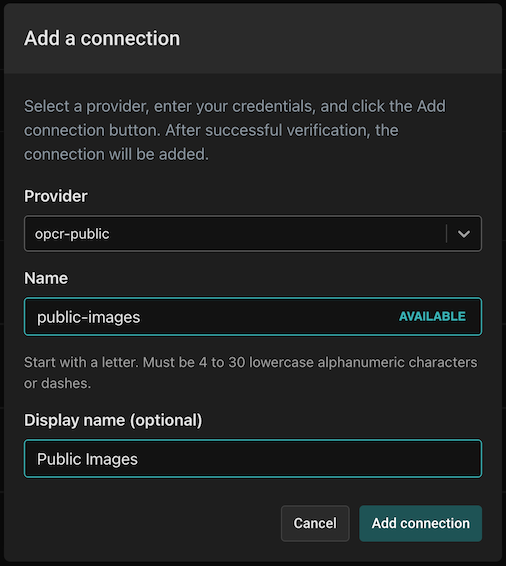
Connect to the public policy registry
Aserto offers a collection of public policies you can add to your tenant. To add the public policy registry, head to the Connections tab and click “Add a Connection”.
Select the “opcr-public”, name the connection “public-images” and use the display name “Public Images”.
Set up the todo policy
Now we’re going to set up the policy that will govern the authorization decisions in our Todo app.
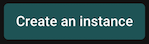
Head to the “Policies” tab, and click on “Create an Instance”.
A policy instance is a running instance of the authorizer, attached to a particular policy image. When we create a policy instance we need to tell Aserto which policy image we want to use, and which version tag of that image to use.
Select the public-images policy registry and select the aserto-templates organization. Then, select the todo-app policy repository and select the latest tag. The policy repository hosts all the versions of the policy image for this policy, and when we specify the “latest” tag we are telling Aserto to use the latest policy image in this policy repository.
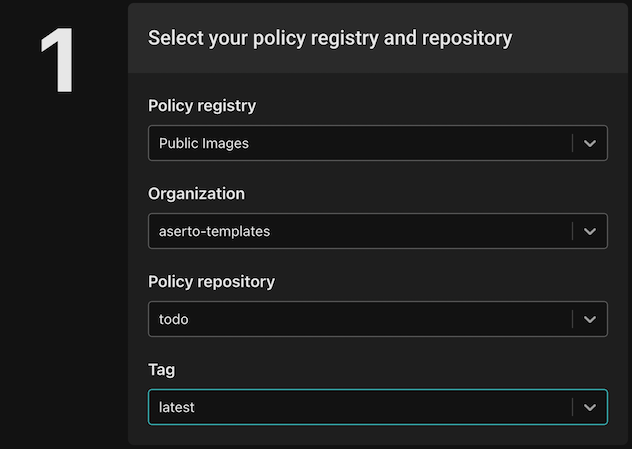
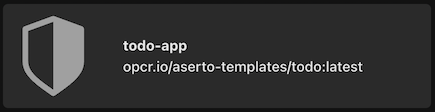
Name your policy instance todo-app and click “Create an instance”.

Review and test the todo policy
Let’s click the todo-app policy instance we created to review and test it.
Policy Module names
Policies in Aserto are comprised of multiple modules, which correspond to the endpoints that require authorization. As you can see, we have five policy modules in the todo policy.
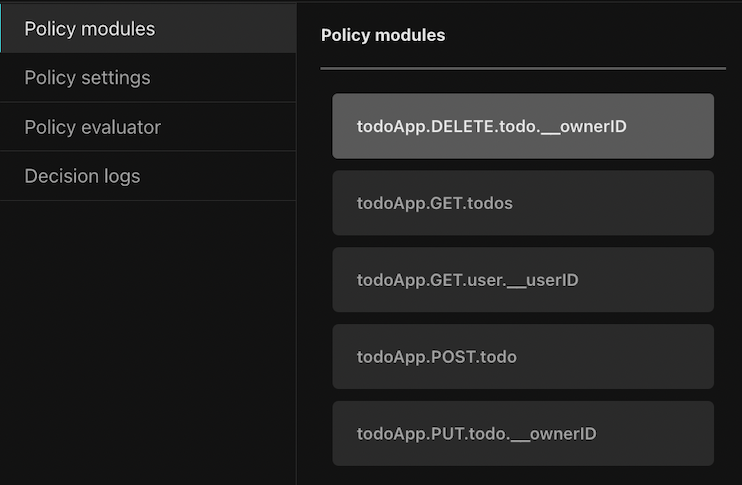
Policy modules are named using the following convention:
<policy-root>.<http-verb>.<path>.[<__parameter>]The policy modules each begin with the root name of the policy (in this case todoApp). They correspond to the application routes, for example, the GET /todos route corresponds to the todoApp.GET.todos policy module. As we’ll see later, when a request is made to the authorization middleware, it will resolve the policy module for the request based on the policy module name.
Policy modules may also have a reference to a parameter on an endpoint, which is denoted by the __ followed by the name of the parameter.
For example, the PUT /todo/:ownerID path uses the parameter ownerID and will be available to the policy module todo.PUT.todo.__ownerID as part of the resource context. We’ll see how this is used in practice a bit later.
The authorization policies
As we mentioned before, authorization policies are written in Rego, which is a higher-level language that was inspired by Datalog.
Let’s take a look at the simplest policy module: todoApp.GET.todos.
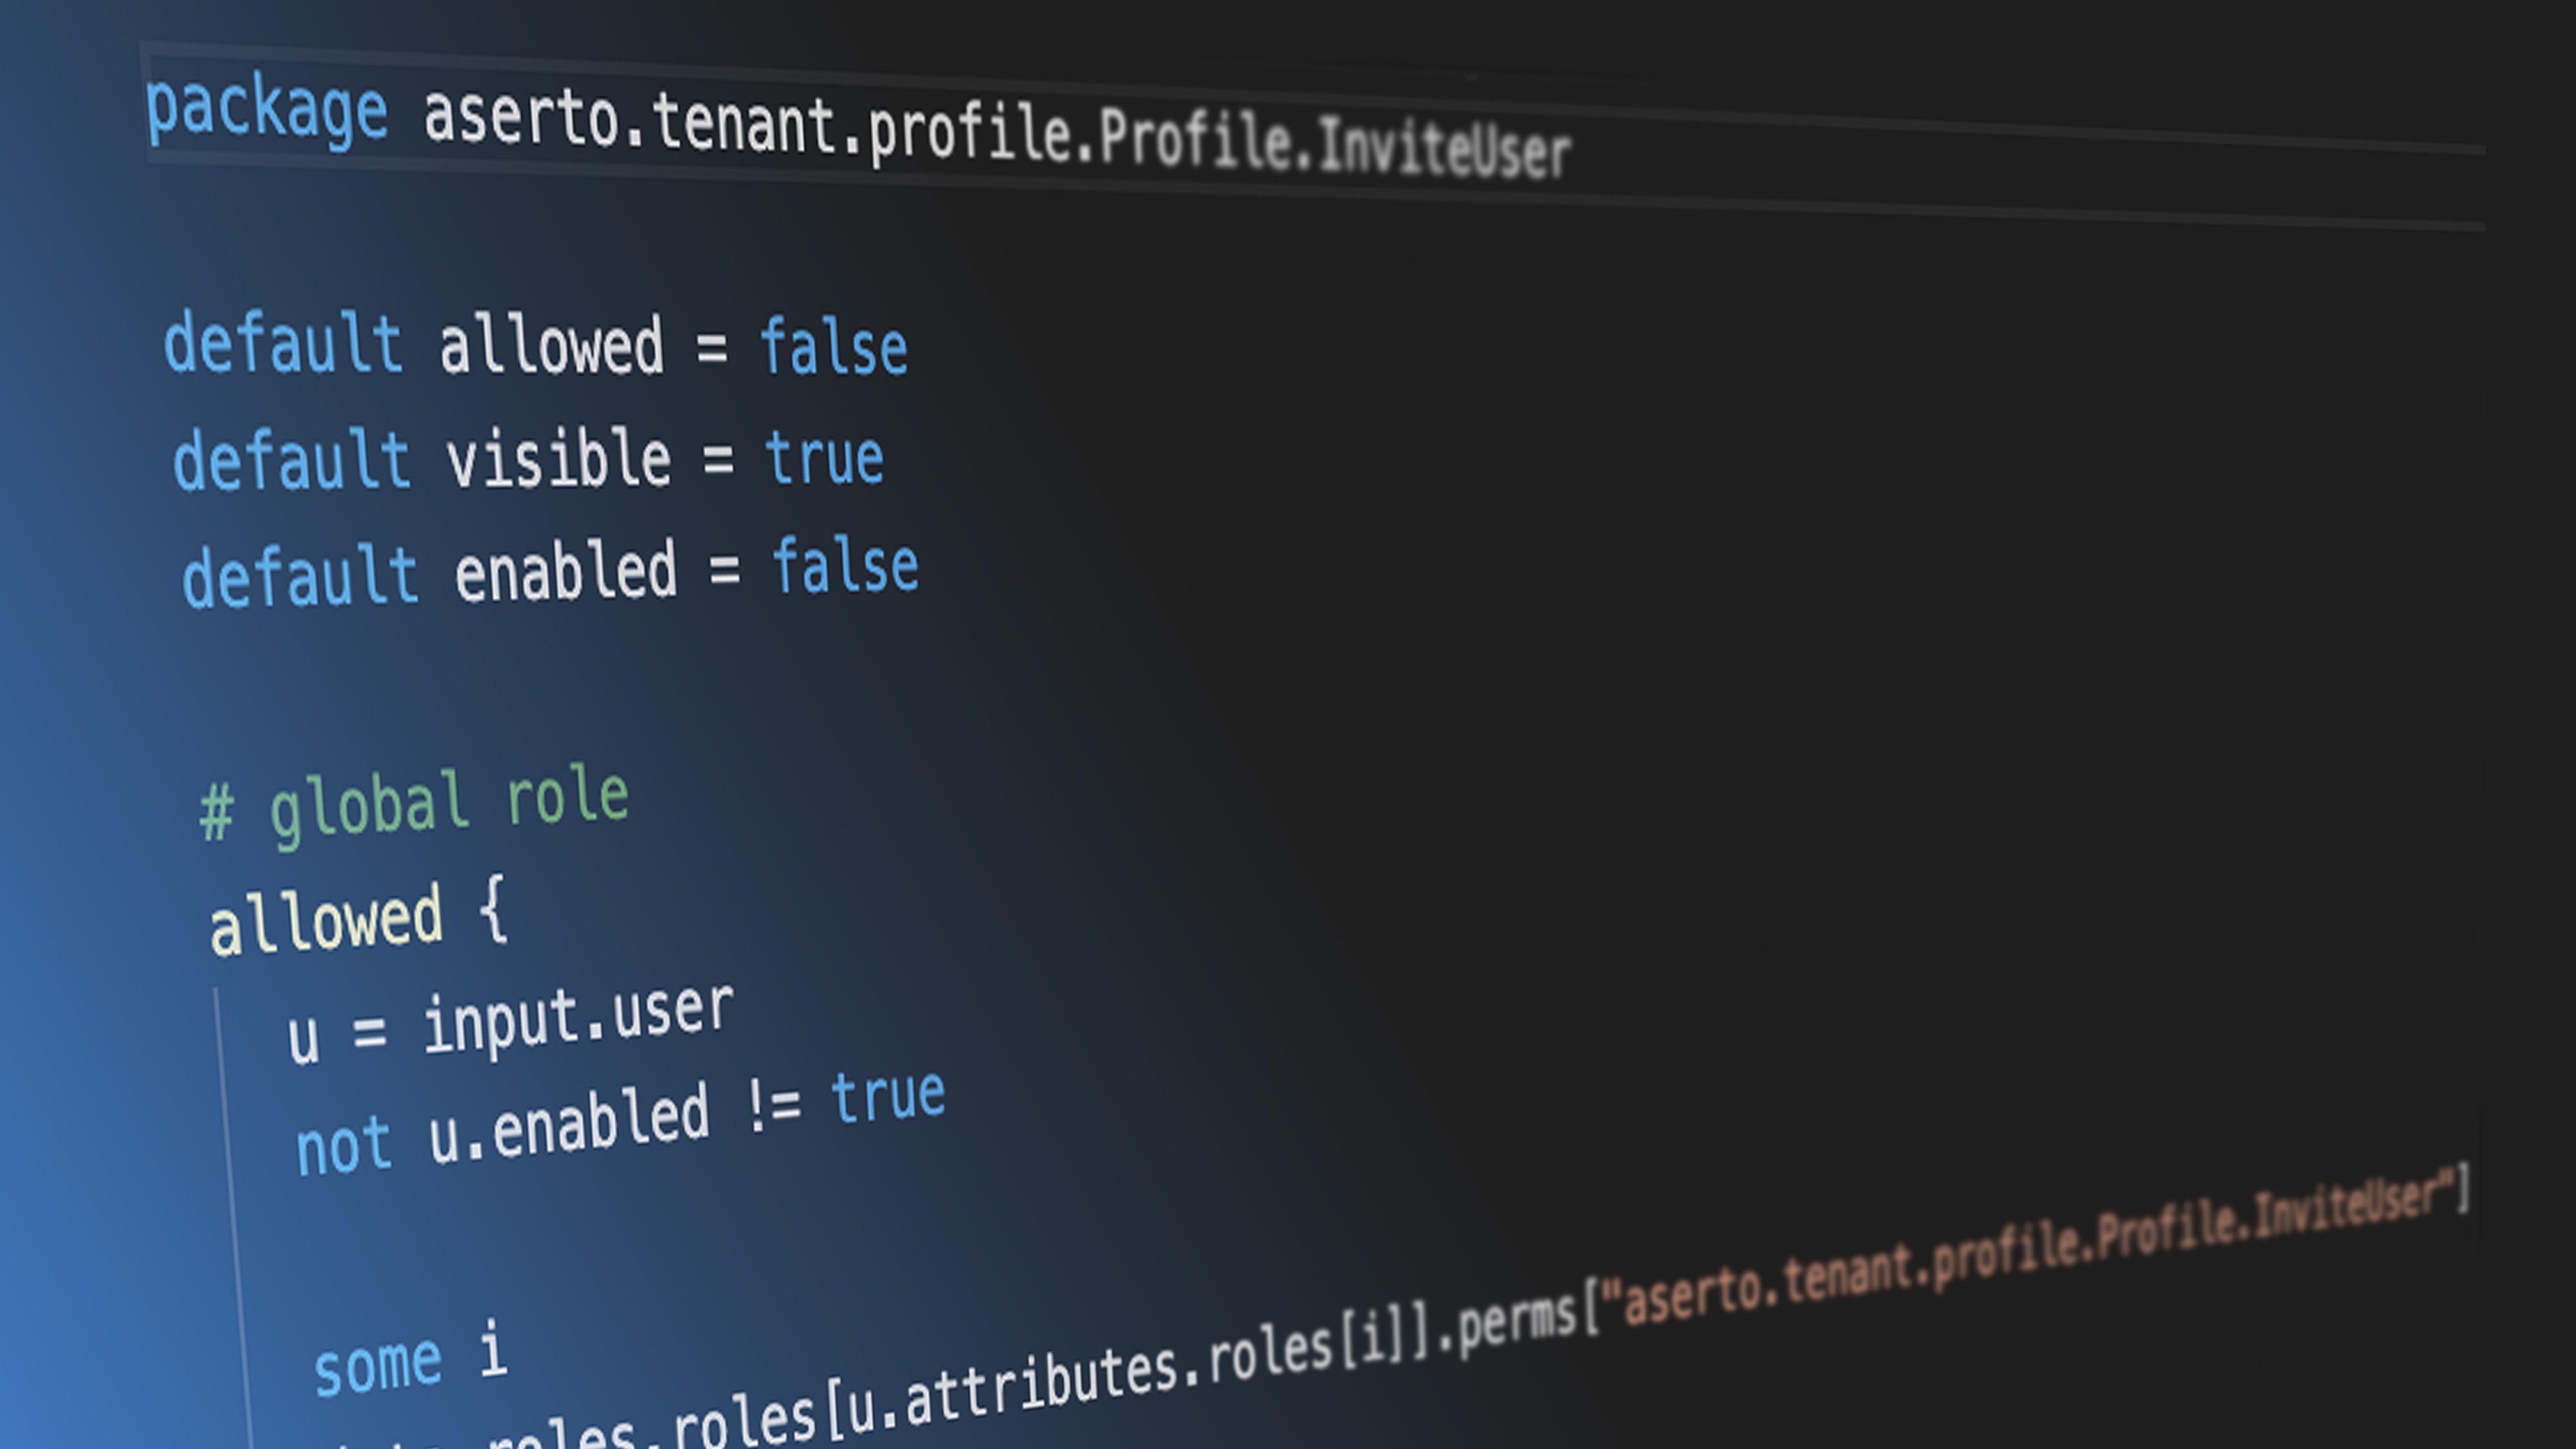
package todoApp.GET.todos

default allowed = true
This policy module allows all requests to the GET /todos route since we want any user to be able to view the todo list.
Now let’s take a look at the next policy module, todoApp.POST.todo:
package todoApp.POST.todo

import future.keywords.in
import input.user

default allowed = false

allowed {
    allowedRoles := {"editor”, “admin” }
    some x in allowedRoles
    user.attributes.roles[_] == x
}
There’s a lot more going on in this module. First, we import the future.keywords.in keyword. This allows us to use the in keyword in our policy (we’ll see how it’s used in a moment).
We also import input.user, which will allow us to refer directly to the user object in our policy without referencing the full path input.user. Aserto makes this user object available to the policy, and it represents the resolved identity of the user that is making the request.
Next, we have the default allowed = false line. We want to ensure that if the conditions in the allowed clause aren’t met, the decision will be false.
Finally, we can see the allowed clause. To understand how it works, let’s first take a look at the user input object (shortened here for brevity):
{
  "id": "fd0614d3-c39a-4781-b7bd-8b96f5a5100d",
  "email": "rick@the-citadel.com",
  "picture": "https://github.com/aserto-demo/contoso-ad-sample/raw/main/UserImages/Rick%20Sanchez.jpg",
  "identities": {
    ...
  },
  "attributes": {
    ...
    "roles": [
      "admin",
      "evil_genius",
      "grandpa",
      "squanch"
    ]
  },
  ...
}
The user.attribute.roles referenced in the policy points to the list of roles under the attributes property in the user object.
The expression some x in allowedRoles is effectively a for-each loop that iterates over the roles in the allowedRoles list we defined. The x variable is the current role in the loop. The expression user.attributes.roles[_] = x iterates over each role in the roles list found in the user object (under attributes), and checks if any of them matches the current role x. So, if one of the user roles matches one of the allowedRoles, the allowed decision will be true.
To test this policy module, we’ll head to the Policy Evaluator. In the Policy Evaluator, we can check what the authorization decision will be for a given user and policy module.
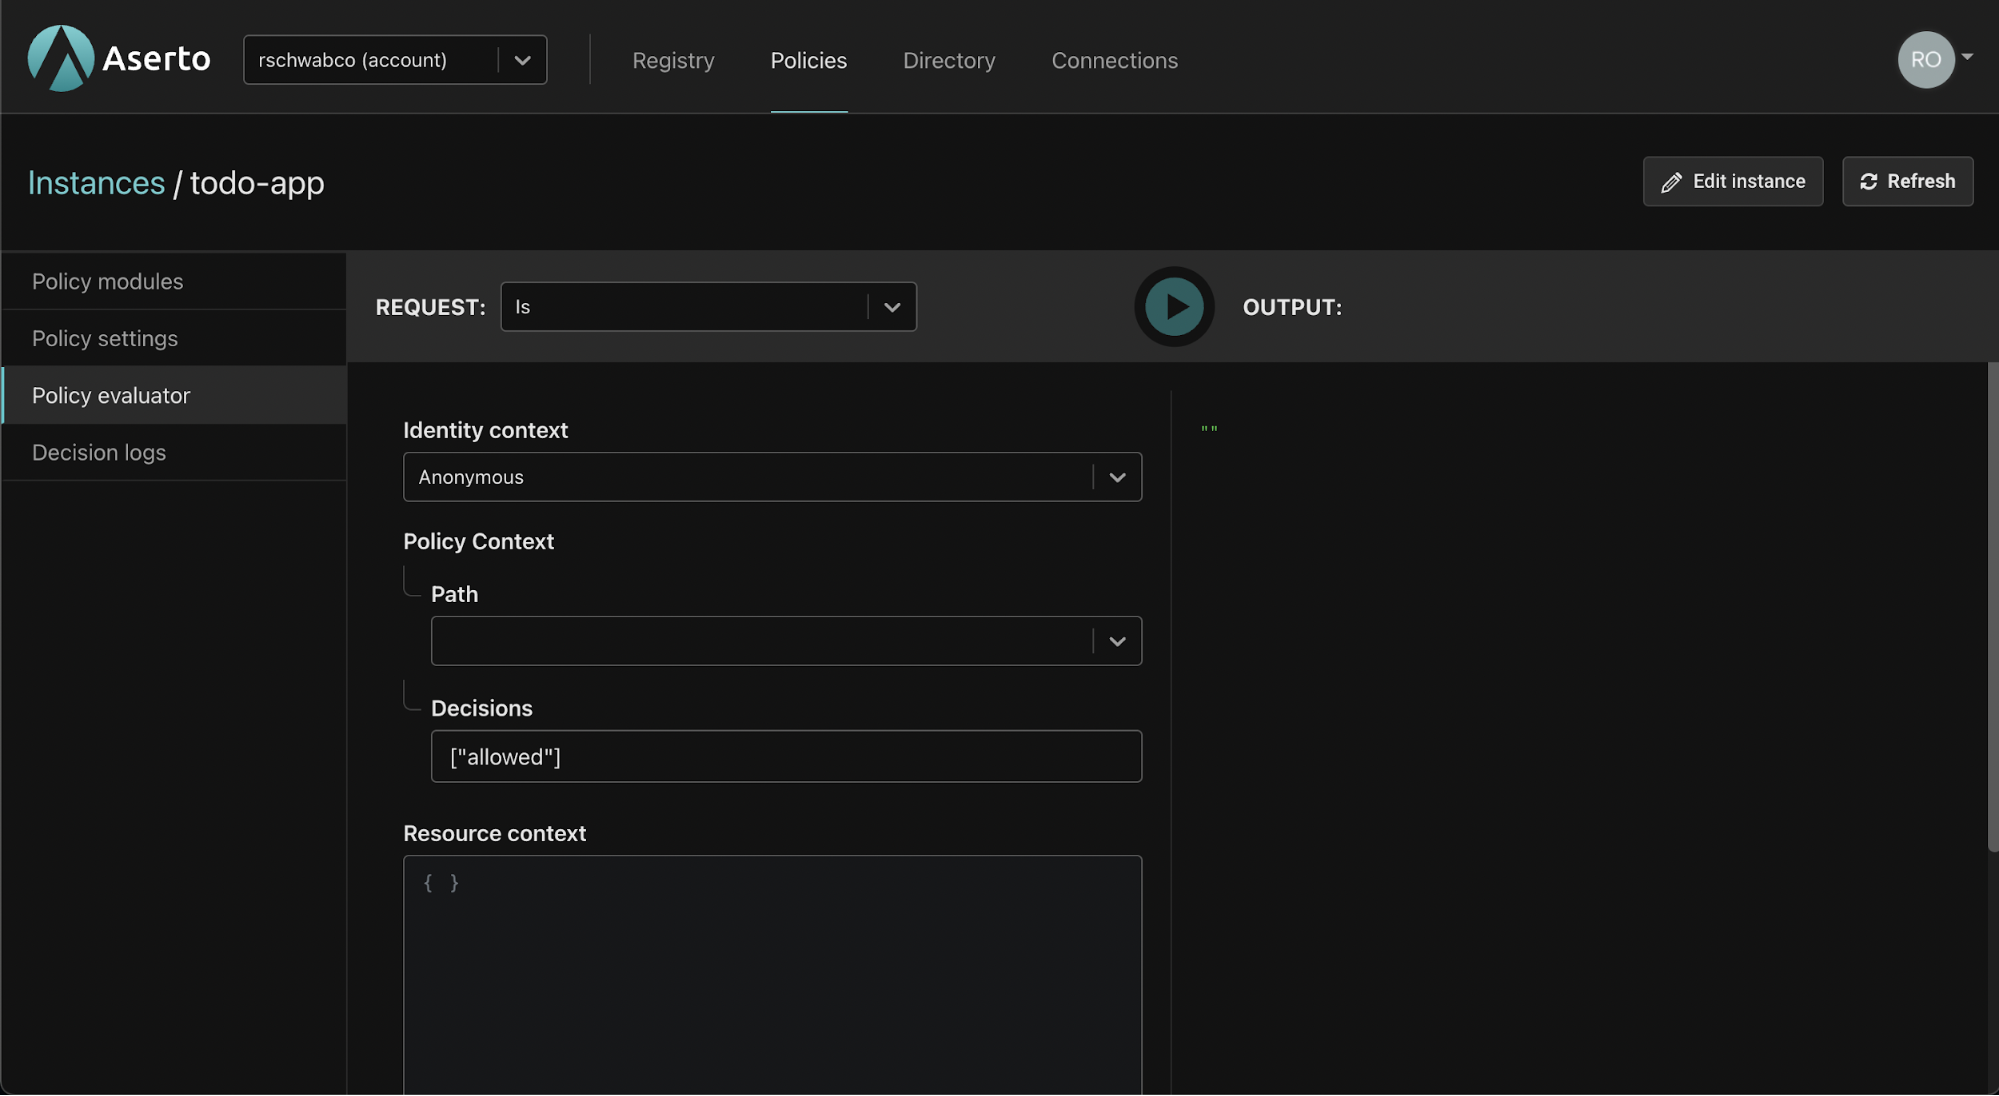
For the identity context dropdown, we have three options: We can make an “anonymous” evaluation, where no identity will be provided. Alternatively, we can pass a JWT which will be decoded by the evaluator. Finally, we can pass a “Subject” which will let us pass one of the identities found in the user object. One of these identities is the user’s email address, so to make testing easier, we’ll select the “Subject” option.
We’ll input Rick Sanchez’s email - “rick@the-citadel.com”. We’ll set the Path of the policy module to be evaluated to todoApp.POST.todo.
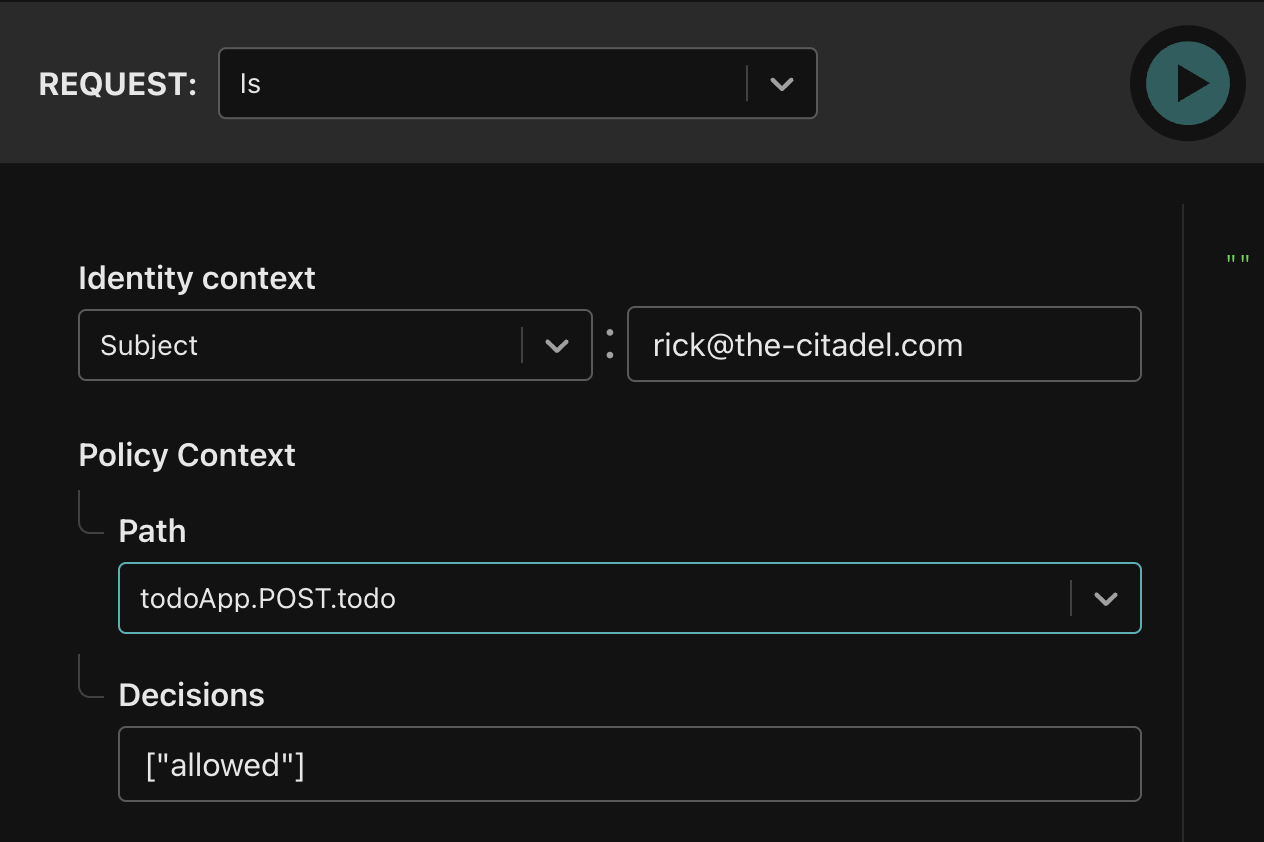
Rick is an “admin” so we’ll expect the todoApp.POST.todo policy module’s allowed decision to be true.
{
  "decisions": [
    {
      "decision": "allowed",
      "is": true
    }
  ]
}
Now let’s test this policy module with a user whom we know shouldn’t be able to create a todo - Jerry Smith. As you can see below, he doesn’t have any of the roles required by the todoApp.POST.todos policy module.
{
  "id": "fd4614d3-c39a-4781-b7bd-8b96f5a5100d",
  "display_name": "Jerry Smith",
  ...
  "identities": {
      ...
  },
  "attributes": {
    ...
    "roles": [
      "viewer",
      "dad",
      "looser"
    ],
  },
  ...
}
Let’s re-evaluate the todoApp.POST.todo policy module for Jerry. We’ll set the identity context to “Subject” and input Jerry’s email - “jerry@the-smiths.com”.
{
  "decisions": [
    {
      "decision": "allowed",
      "is": false
    }
  ]
}
The package name for the todo.PUT.todo.__ownerID module is:
package todo.PUT.todo.__ownerIDThis naming convention indicates that the parameter `ownerID` will be attached to the resource context. The same is true for the todo.DELETE.todo.__ownerID policy module.
Next, let’s examine the body of both of these policy modules since it is identical. For these two policy modules, we’re going to leverage the resource context in order to determine whether or not a user owns the todo entry they are trying to delete or update.
import future.keywords.in
import input.user
import input.resource

default allowed = false

allowed {
    user.attributes.roles[_] == "editor"
    some id , _ in user.identities
    id == resource.ownerID
}

allowed {
    user.attributes.roles[_] == "admin"
}
Similar to the previous modules, we import the in keyword and the user input object. This time, we also import the resource input object.
Let’s consider the following user:
{
  "id": "fd1614d3-c39a-4781-b7bd-8b96f5a5100d",
  "enabled": true,
  "display_name": "Morty Smith",
  "email": "morty@the-citadel.com",
  "picture": "https://github.com/aserto-demo/contoso-ad-sample/raw/main/UserImages/Morty%20Smith.jpg",
  "identities": {
    "+1-844-667-3743": {
      "kind": "IDENTITY_KIND_PHONE",
      "provider": "",
      "verified": false
    },
    "CiRmZDE2MTRkMy1jMzlhLTQ3ODEtYjdiZC04Yjk2ZjVhNTEwMGQSBWxvY2Fs": {
      "kind": "IDENTITY_KIND_PID",
      "provider": "local",
      "verified": true
    },
    "morty": {
      "kind": "IDENTITY_KIND_USERNAME",
      "provider": "",
      "verified": false
    },
    "morty@the-citadel.com": {
      "kind": "IDENTITY_KIND_EMAIL",
      "provider": "local",
      "verified": true
    }
  },
  "attributes": {
    …
    "roles": [
      "brother",
      "editor",
      "grandson",
      "little_helper",
      "sidekick",
      "son"
    ],
          …
  },
 …
}
As you can see, Morty is an editor and not an admin, so the first allowed clause will apply to him. This allowed clause introduces another for-each loop. This time, we are iterating over the keys of the user.identities object. The following expression:
some id , _ in user.identities
id == resource.ownerID
means that we will compare each of the keys in the user.identities object to resource.ownerID which comes from the resource input object. The resource input object is attached to any request where resourceContext is passed. In our case, the Aserto middleware will take the parameter passed to this path (ownerID) and attach it to the resourceContext.
When we evaluate these policy modules, we’ll now pass the resource context as well. First, let’s test a scenario where the allowed decision will be false: We’ll set the Subject to be Morty’s email - “morty@the-citadel.com” and set the resource context with Rick’s identifier:
{
  "ownerID": "CiRmZDA2MTRkMy1jMzlhLTQ3ODEtYjdiZC04Yjk2ZjVhNTEwMGQSBWxvY2Fs"
}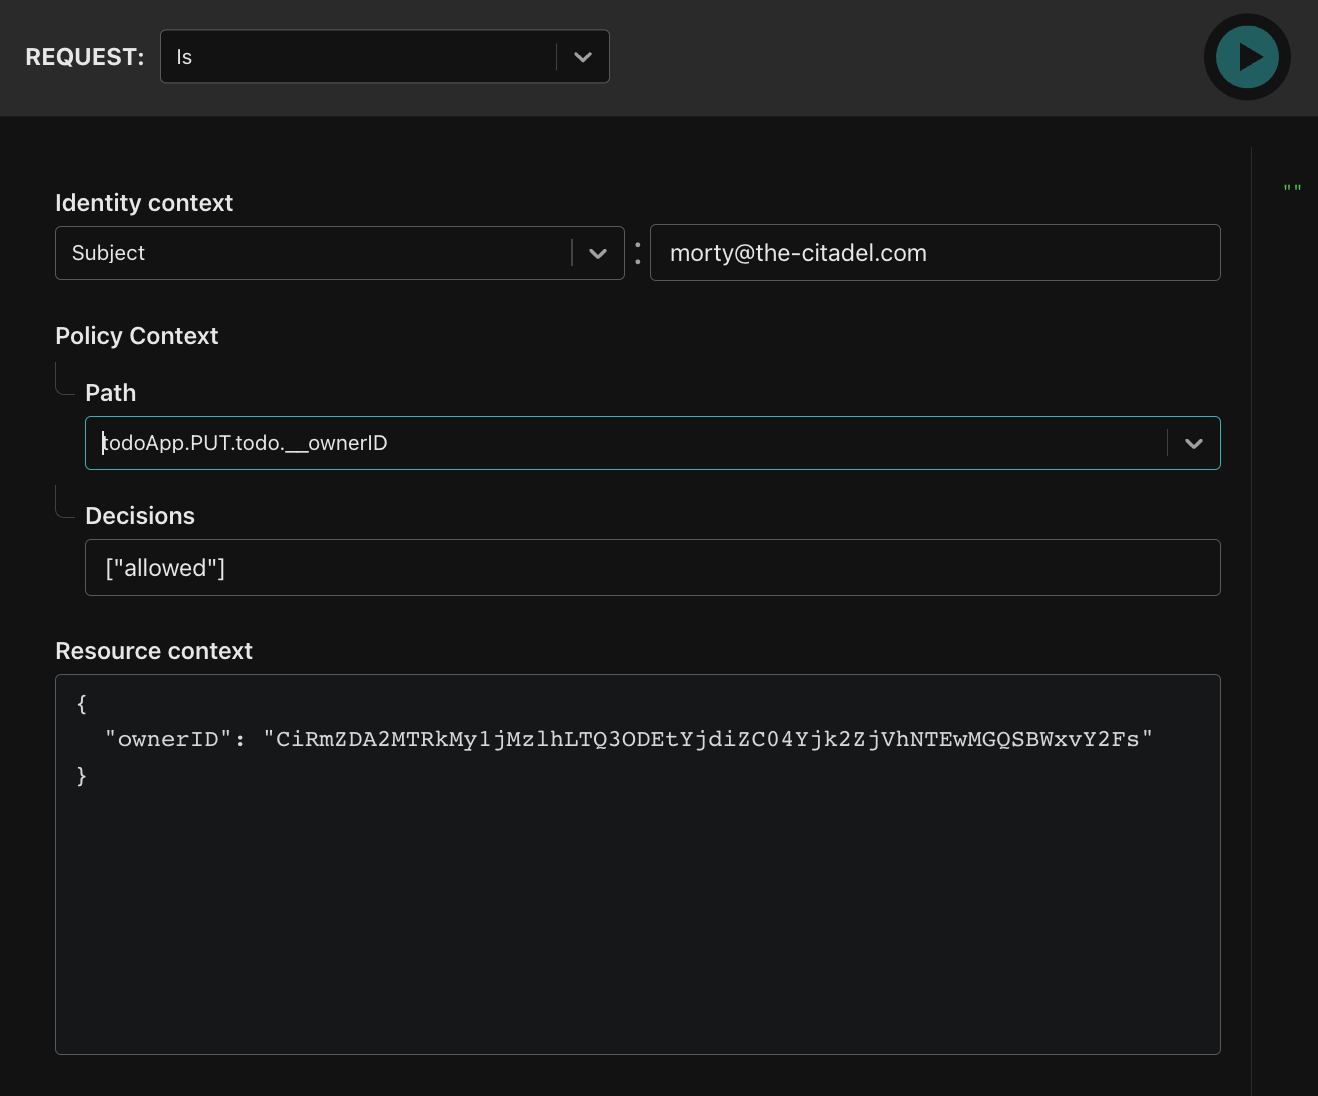
The result of this evaluation will be:
{
  "decisions": [
    {
      "decision": "allowed",
      "is": false
    }
  ]
}
This is because Morty can’t delete a todo entry that doesn’t belong to him. Let’s change the ownerID to match his own identifier (note: the identifier might look similar to Rick’s identifier, but they are different):
{
  "ownerID": "CiRmZDE2MTRkMy1jMzlhLTQ3ODEtYjdiZC04Yjk2ZjVhNTEwMGQSBWxvY2Fs"
}
Now the result will be:
{
    "decisions": [
        {
            "decision": "allowed",
            "is": true
        }
    ]
}
as we expected.
Now that we have a good understanding of how the policy module works, let’s move on to getting our Go server set up.
Testing the todo application with authorization
To test the application with the policy you created, clone the following repository and cd into it:
git clone git@github.com:aserto-demo/todo-fullstack.git
cd todo-fullstack
Then, install the application dependencies by running the command yarn install (if you're using Yarn) or npm install (if you're using NPM).
Download the .env file
Before starting your server, head to the “Policy modules” tab in the policy instance you created, and download the .env file generated for the policy instance:
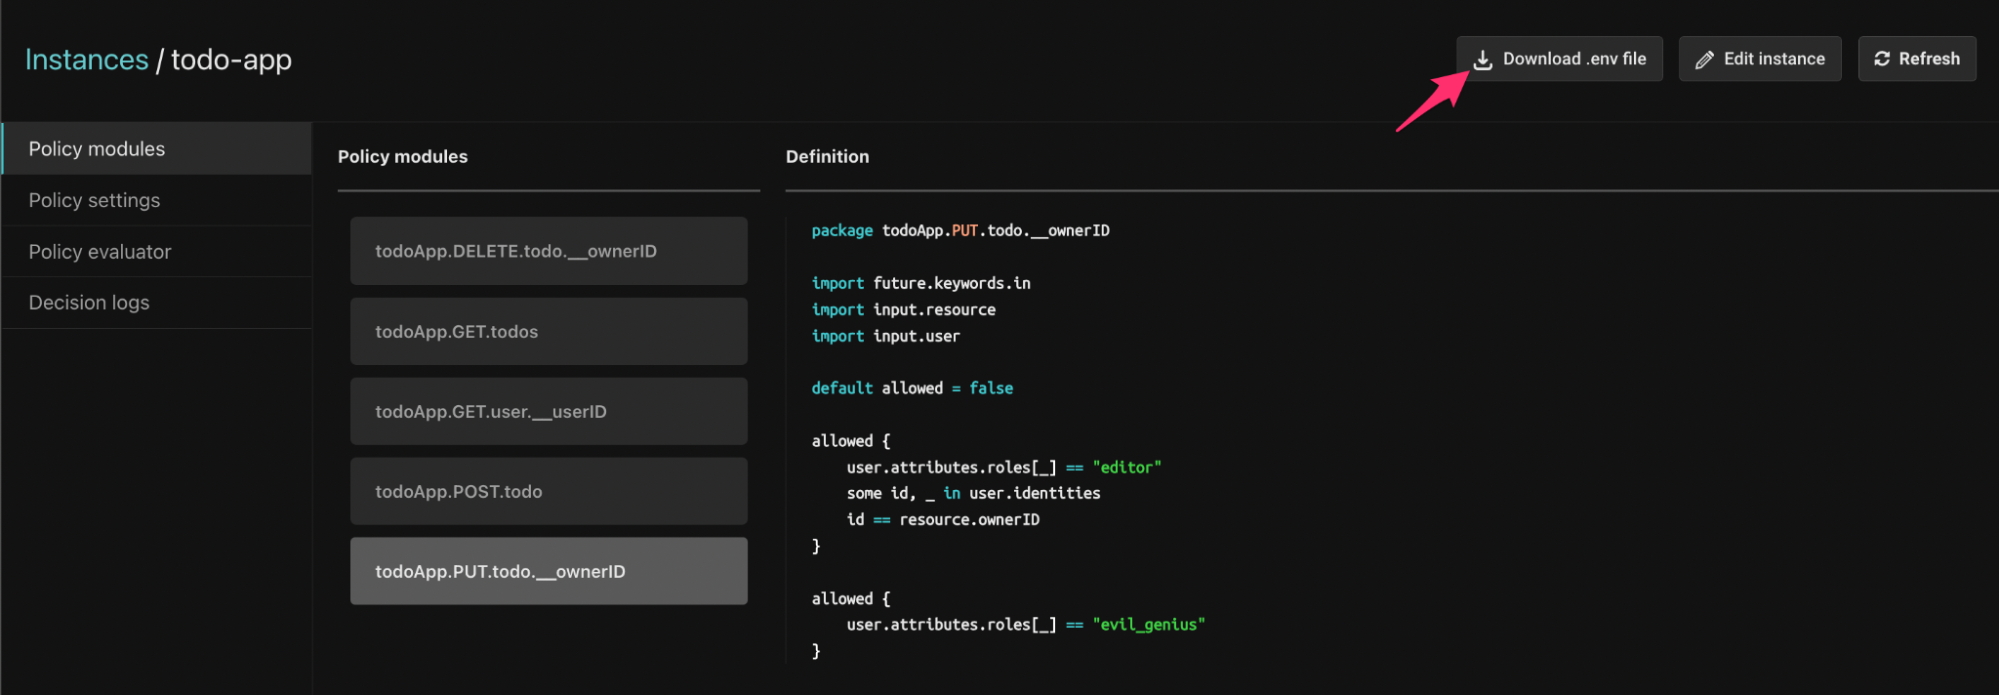
Place the downloaded file in the root folder of your server and rename it to .env. Then, add the following lines to the file:
AUTHORIZER_SERVICE_URL=https://authorizer.prod.aserto.com
JWKS_URI=https://acmecorp.demo.aserto.com/dex/keys
ISSUER=https://acmecorp.demo.aserto.com/dex
AUDIENCE=acmecorp-app
POLICY_ROOT=todoApp
Start the server
Start the server by running the command yarn start (if you're using Yarn) or npm start (if you're using NPM).
Test the application
Start by logging in as the “admin” - rick@the-citadel.com and the password V@erySecre#t123!. You can add some todo items, then complete and delete some of them. Next, log in as the “editor” - morty@the-citadel using the same password.
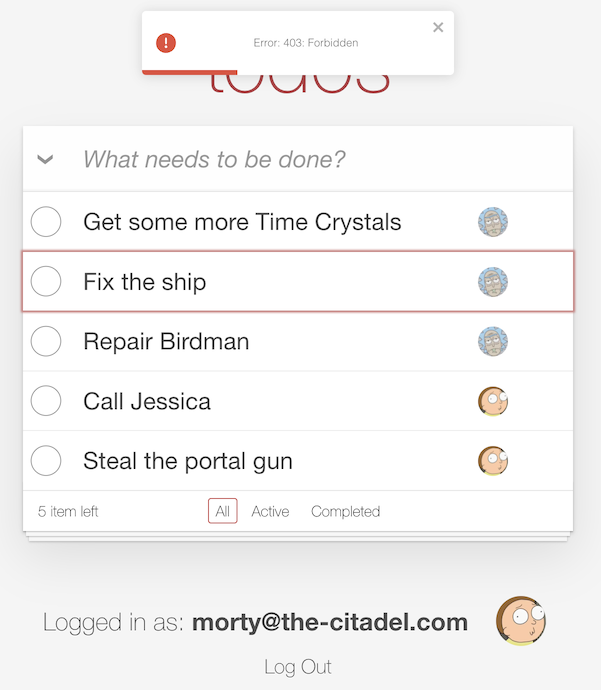
If you try to delete some of Rick’s todo items as Morty, you should now see the following error:
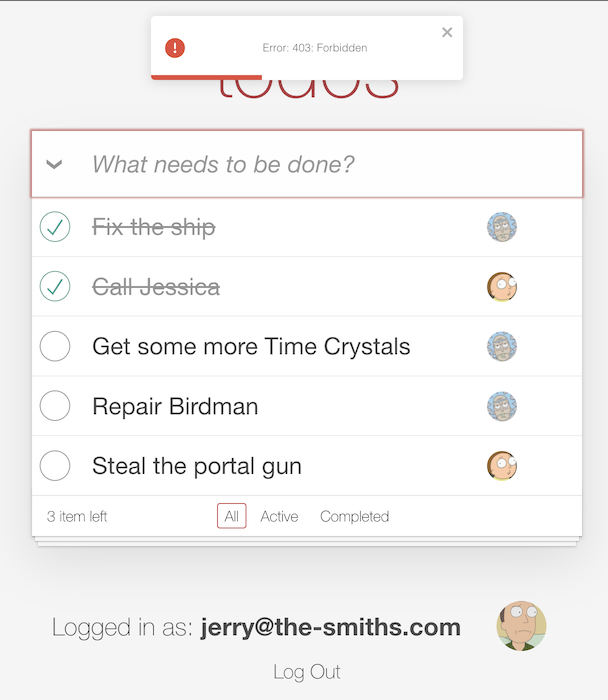
If you log in as Jerry (username: jerry@the-smiths.com, password: V@erySecre#t123!) and try to add a todo item, you should see the same error:
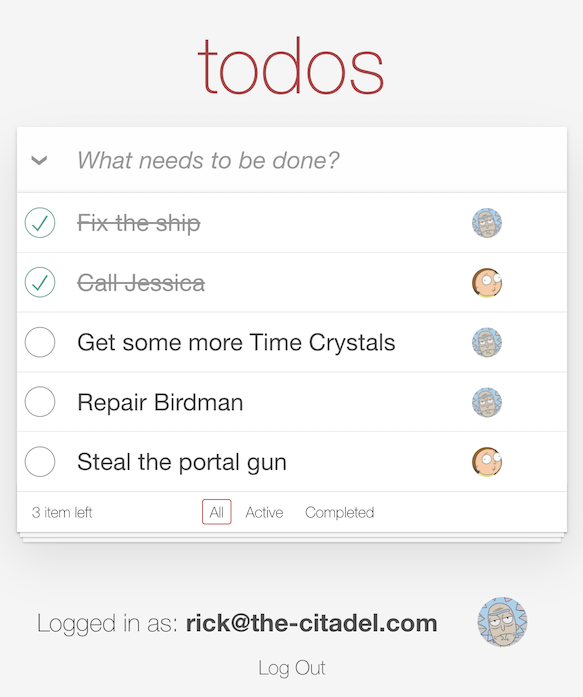
Finally, if you log in as Rick again (username: rick@the-citadel.com, password: V@erySecre#t123!) and try to delete the todo items that were created by Morty, you’ll see there are no errors.
Summary
In this tutorial, we learned about how Aserto authorization policies work and how to test them using the evaluator found in the Aserto console. We hope you found this tutorial useful and that you can use it to implement authorization with Aserto for your own applications.
Roie Schwaber-Cohen
Developer Advocate
Related Content
Policy-as-Code or Policy-as-Data? Why choose?
What is the difference between the policy-as-code and policy-as-data approaches? Which is better? Do you really have to choose? Find out more in this post.
May 26th, 2022

Securing the software supply chain for Policy-as-Code
Open Policy Agent (OPA) has been adopted in a wide variety of authorization scenarios. In all instances, extracting policy out of the application and expressing it as code has substantial benefits.
Jun 23rd, 2022

Adding Authorization to A Node.js Application
In this tutorial, we'll learn how to add authorization to a Todo app written in Node.js, using the Aserto Express.js middleware.
Jun 30th, 2022