&color=rgb(100%2C100%2C100)&link=https%3A%2F%2Fgithub.com%2Faserto-dev%2Ftopaz)
Adding authorization to a Java app with Aserto
Jun 7th, 2023

Bogdan Irimie
Engineering
This tutorial demonstrates adding authorization to a Todo application with Aserto’s Java SDK.
This tutorial has three parts:
- Authorization with Aserto: In this section, we’ll learn how authorization with Aserto works and we’ll set up and review our authorization policy.
- Setting up a Java server: In this section, we’ll build a Java server that will be used as the backend for a Todo application.
- Adding authorization to the application: In this section, we’ll add authorization to the Todo application by implementing it on our Java server.
Prerequisites
You’ll need to be familiar with Java and Maven and have both installed on your machine.
Authorization - a quick overview
Before we get started with building our Todo app, let’s talk about the authorization process. Authorization is the process of determining what an authenticated user can do in the context of the application. At the heart of the authorization process is the Authorizer, where access decisions are made. These decisions are made based on the following information:
- Identity context: the user that is taking the action. In this tutorial, the application will resolve the user’s identity from a JWT token.
- Resource context: the resource that is being acted upon. In this tutorial, our Todo application has resources in the form of individual todo items - particularly information about each todo item's owner.
- Policy context: the authorization logic/rules that need to be applied. Policies can be stored either as OCI images or as code in GitHub or GitLab. A policy consists of multiple policy modules that correspond to the endpoints that are being protected.
In this tutorial, we’ll see how these ingredients all come together to produce an application with an authorization layer.
Getting started with Aserto
To get started, login to your Aserto account (if you don’t already have an Aserto account, sign up here). When your Aserto account is first created, we automatically provision a demo identity provider (IDP), as well as an authorization policy for the Todo app.
Explore the Demo Citadel users
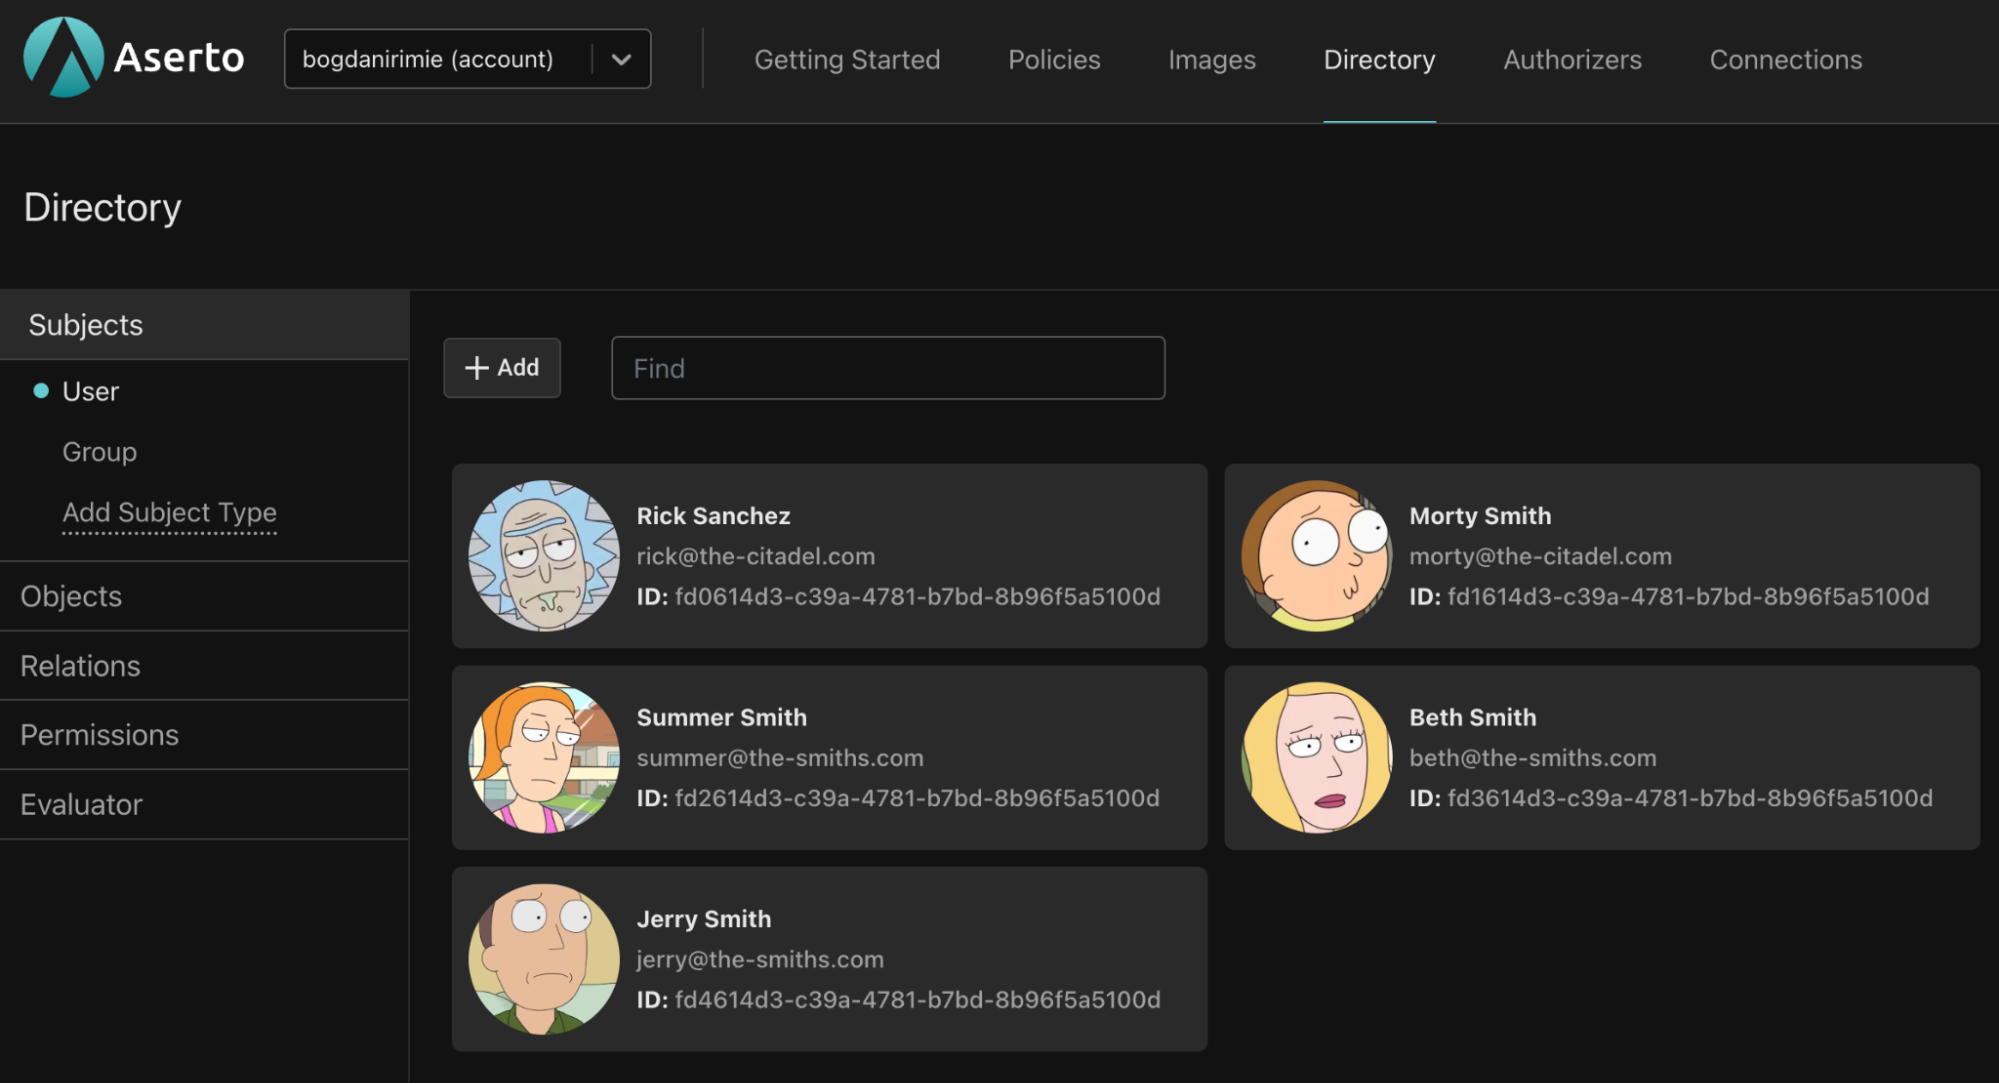
Authorization happens in the context of a user, and users come from an identity provider. For the purposes of this tutorial, we’ll use the Demo Citadel IDP, which is a sample identity provider that we created for you. It includes 5 users with different roles and properties you can use to test your policies (when you’re ready to go to production, you’ll be able to use Auth0 or Okta, or any identity provider you choose).
You can select the Directory tab to explore the users from the Demo Citadel IDP as well as their properties and roles.
Next, we want to briefly cover the policy that will determine how authorization decisions are going to be made. For the purpose of this tutorial, we’ve already provisioned a policy instance called “todo” in your Aserto tenant.
Review and test the todo policy
Navigate to the Policies tab and open the "todo" policy instance. This policy instance is created automatically when you sign up.
A policy instance is a running instance of the authorizer, attached to a particular policy image. You can create policy images in the Images tab.
Policy module names
Policies consist of multiple modules, which correspond to the endpoints that require authorization. Our todo policy has five policy modules.
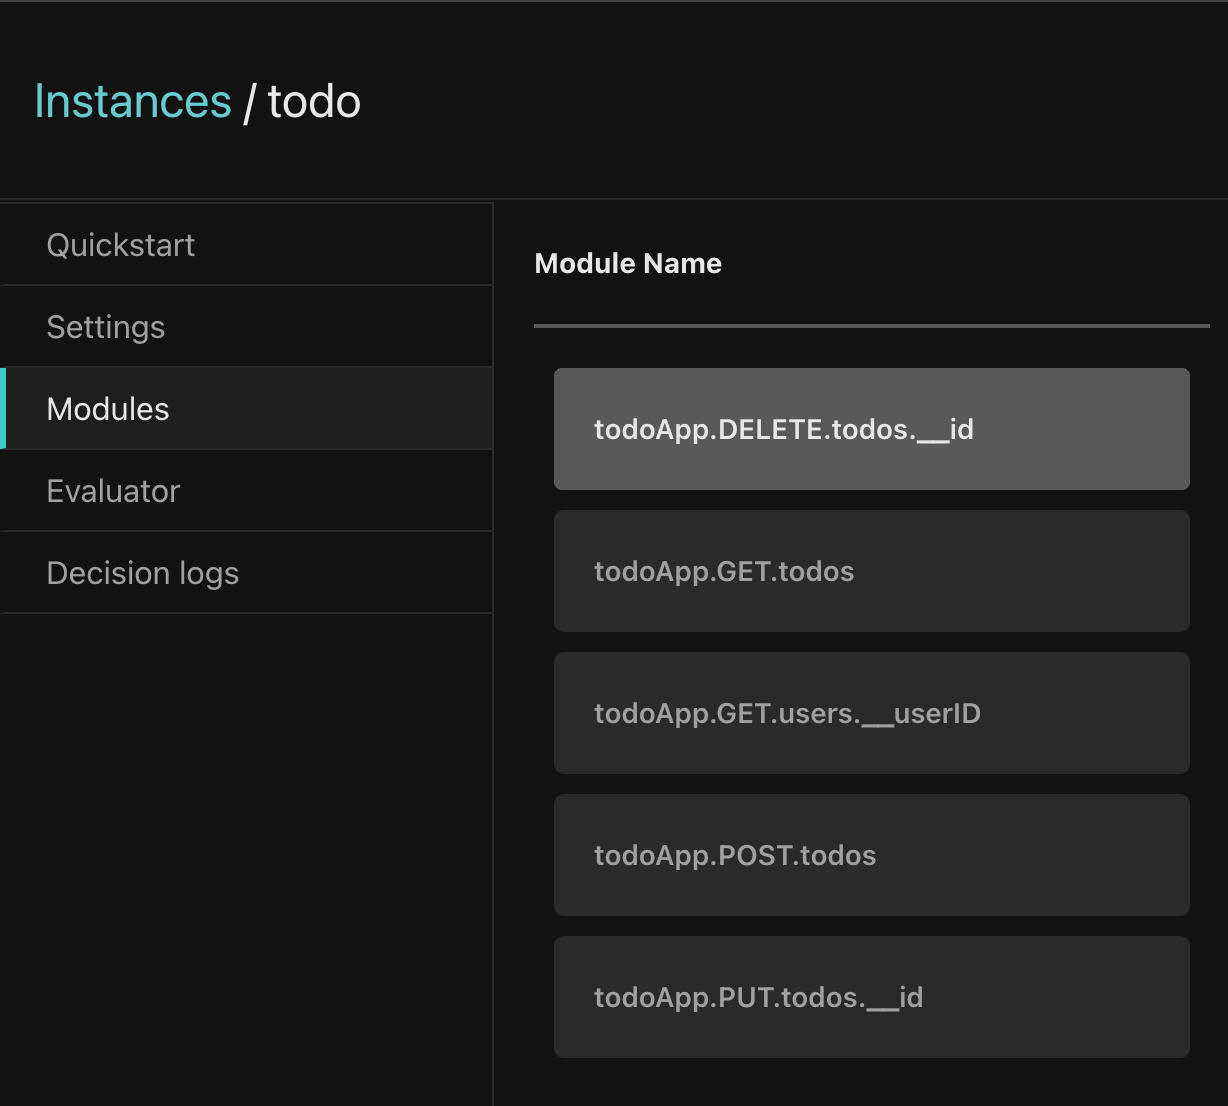
Policy modules are named using the following convention:
<policy-root>.<http-verb>.<path>.[<__parameter>]The policy modules each begin with the root name of the policy (in this case todoApp). They correspond to the application routes, for example, the GET /todos route corresponds to the todoApp.GET.todos policy module. This is important because when a request is made to the authorization middleware, it will resolve the policy module for the request based on the policy module name. More about that later on.
Policy modules may also reference a parameter on an endpoint, which is denoted by the “__” followed by the name of the parameter. For example, the PUT /todos/:__id path uses the parameter “id” and will be available to the policy module todo.PUT.todos.__id as part of the resource context. We’ll see how this is used in practice a bit later.
Authorization policies
In this tutorial we use Open Policy Agent (OPA) policies. OPA policies are written in Rego, which is a declarative language that was inspired by Datalog.
Let’s take a look at the simplest policy module: todoApp.GET.todos
package todoApp.GET.todos
default allowed = true
This policy module allows all requests to the GET /todos route, as we want every user to be able to view the todo list.
Our policy uses 3 roles, which group sets of permissions:
- A “viewer” will be able only to view the todo list.
- An “editor” will be able to view the todo list, add a todo item, and delete or complete a todo item they have created.
- An “admin” will be able to do all of the above and complete and delete any todo item.
Let’s take a look at a policy module that uses these roles, todoApp.POST.todo:
package todoApp.POST.todos

import future.keywords.in
import input.user

default allowed = false

allowed {
    allowedRoles := {"editor", "admin"}
    some x in allowedRoles
    user.properies.roles[_] == x
}
There’s a lot more going on in this module. First, we import the future.keywords.in keyword. This allows us to use the in keyword in our policy (we’ll see how it’s used in a moment).
We also import input.user, which will allow us to refer directly to the user object in our policy without referencing the full path input.user. Aserto makes this user object available to the policy, and it represents the resolved identity of the user that is making the request.
Next, we have the default allowed = false line. We want to ensure that if the conditions in the allowed clause aren’t met, we deny by default
Finally, we can see the allowed clause. To understand how it works, let’s take a look at the user input object (shortened here for brevity):
{
 "key": "fd0614d3-c39a-4781-b7bd-8b96f5a5100d",
 "properties": {
   "picture": "https://github.com/aserto-demo/contoso-ad-sample/raw/main/UserImages/Rick%20Sanchez.jpg",
   "email": "rick@the-citadel.com",
   "roles": [
     "admin",
     "evil_genius",
     "grandpa",
     "squanch"
   ],
   ...
 },
 ...
}
The user.properties.roles referenced in the policy points to the list of roles under the properties in the user object.
The expression some x in allowedRoles is effectively a for-each loop that iterates over the roles in the allowedRoles list we defined. The x variable is the current role in the loop. The expression user.properties.roles[_] == x iterates over each role in the roles list and checks if any of them matches the current role x. So, if one of the user roles matches one of the allowedRoles, the allowed decision will be true and access will be granted.
To test this policy module, we’ll head to the Evaluator. In the Evaluator, we can check what the authorization decision will be for a given user and policy module.
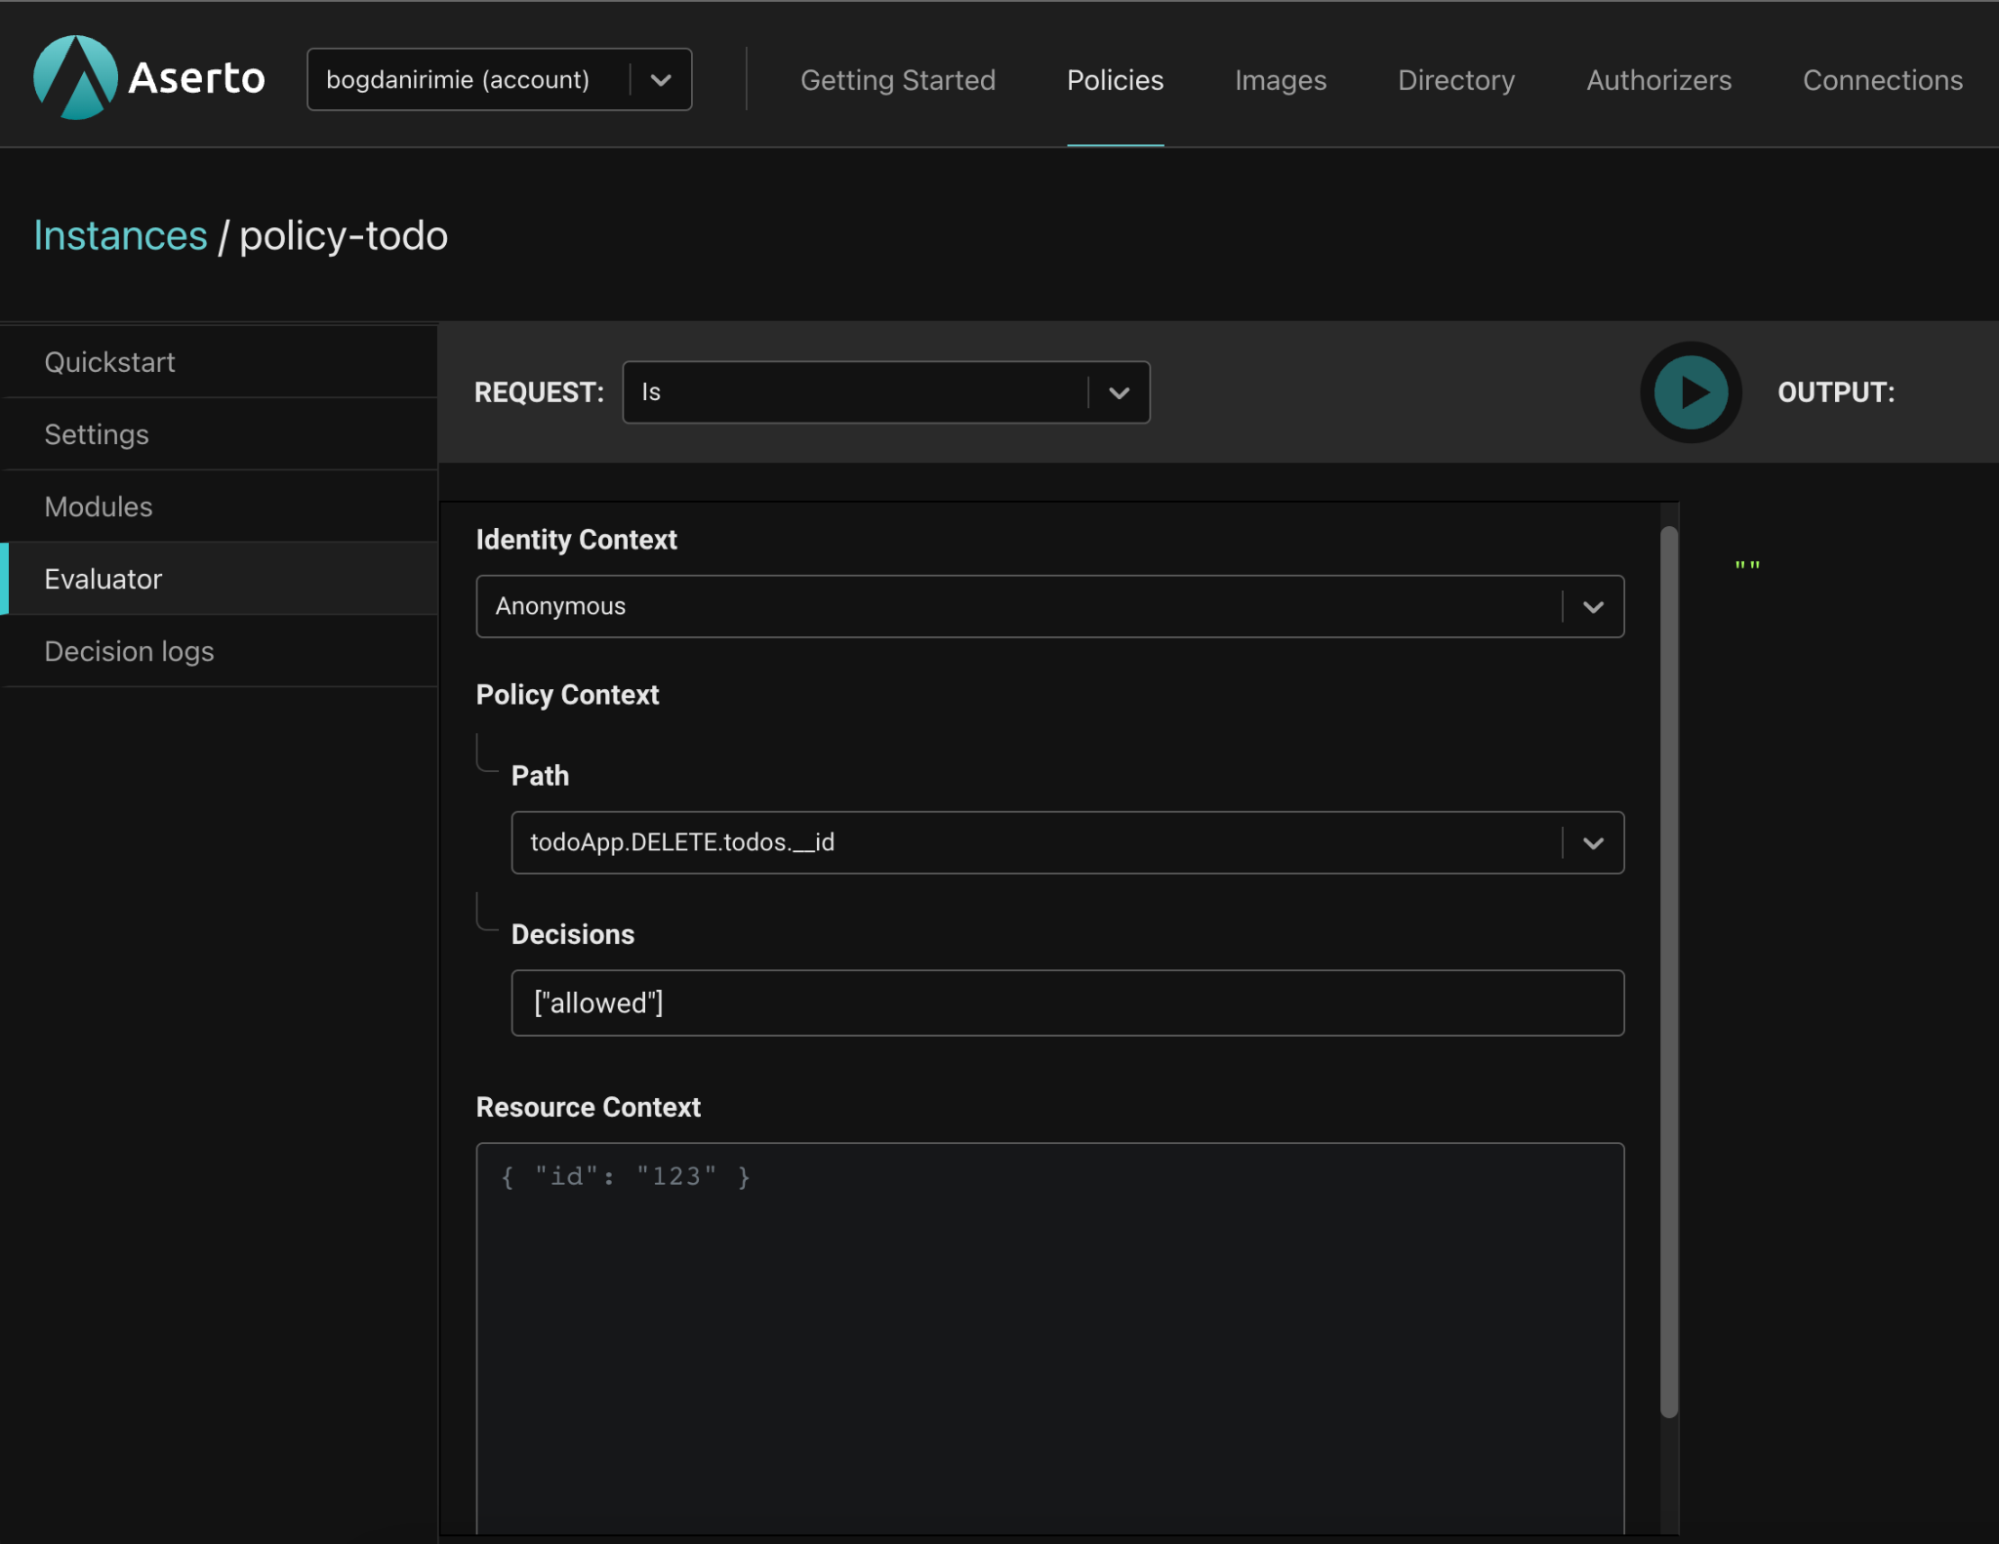
The identity context drop down provides three options:
- An “anonymous” evaluation, where no identity will be provided.
- We can pass a JWT, which will be decoded by the evaluator.
- We can pass a “Subject,” which will let us pass one of the identities found in the user object. One of these identities is the user’s email address. Let’s select the “Subject” option to simplify testing.
We’ll input Rick Sanchez as the Subject and set the Path of the policy module to be evaluated to todoApp.POST.todos.
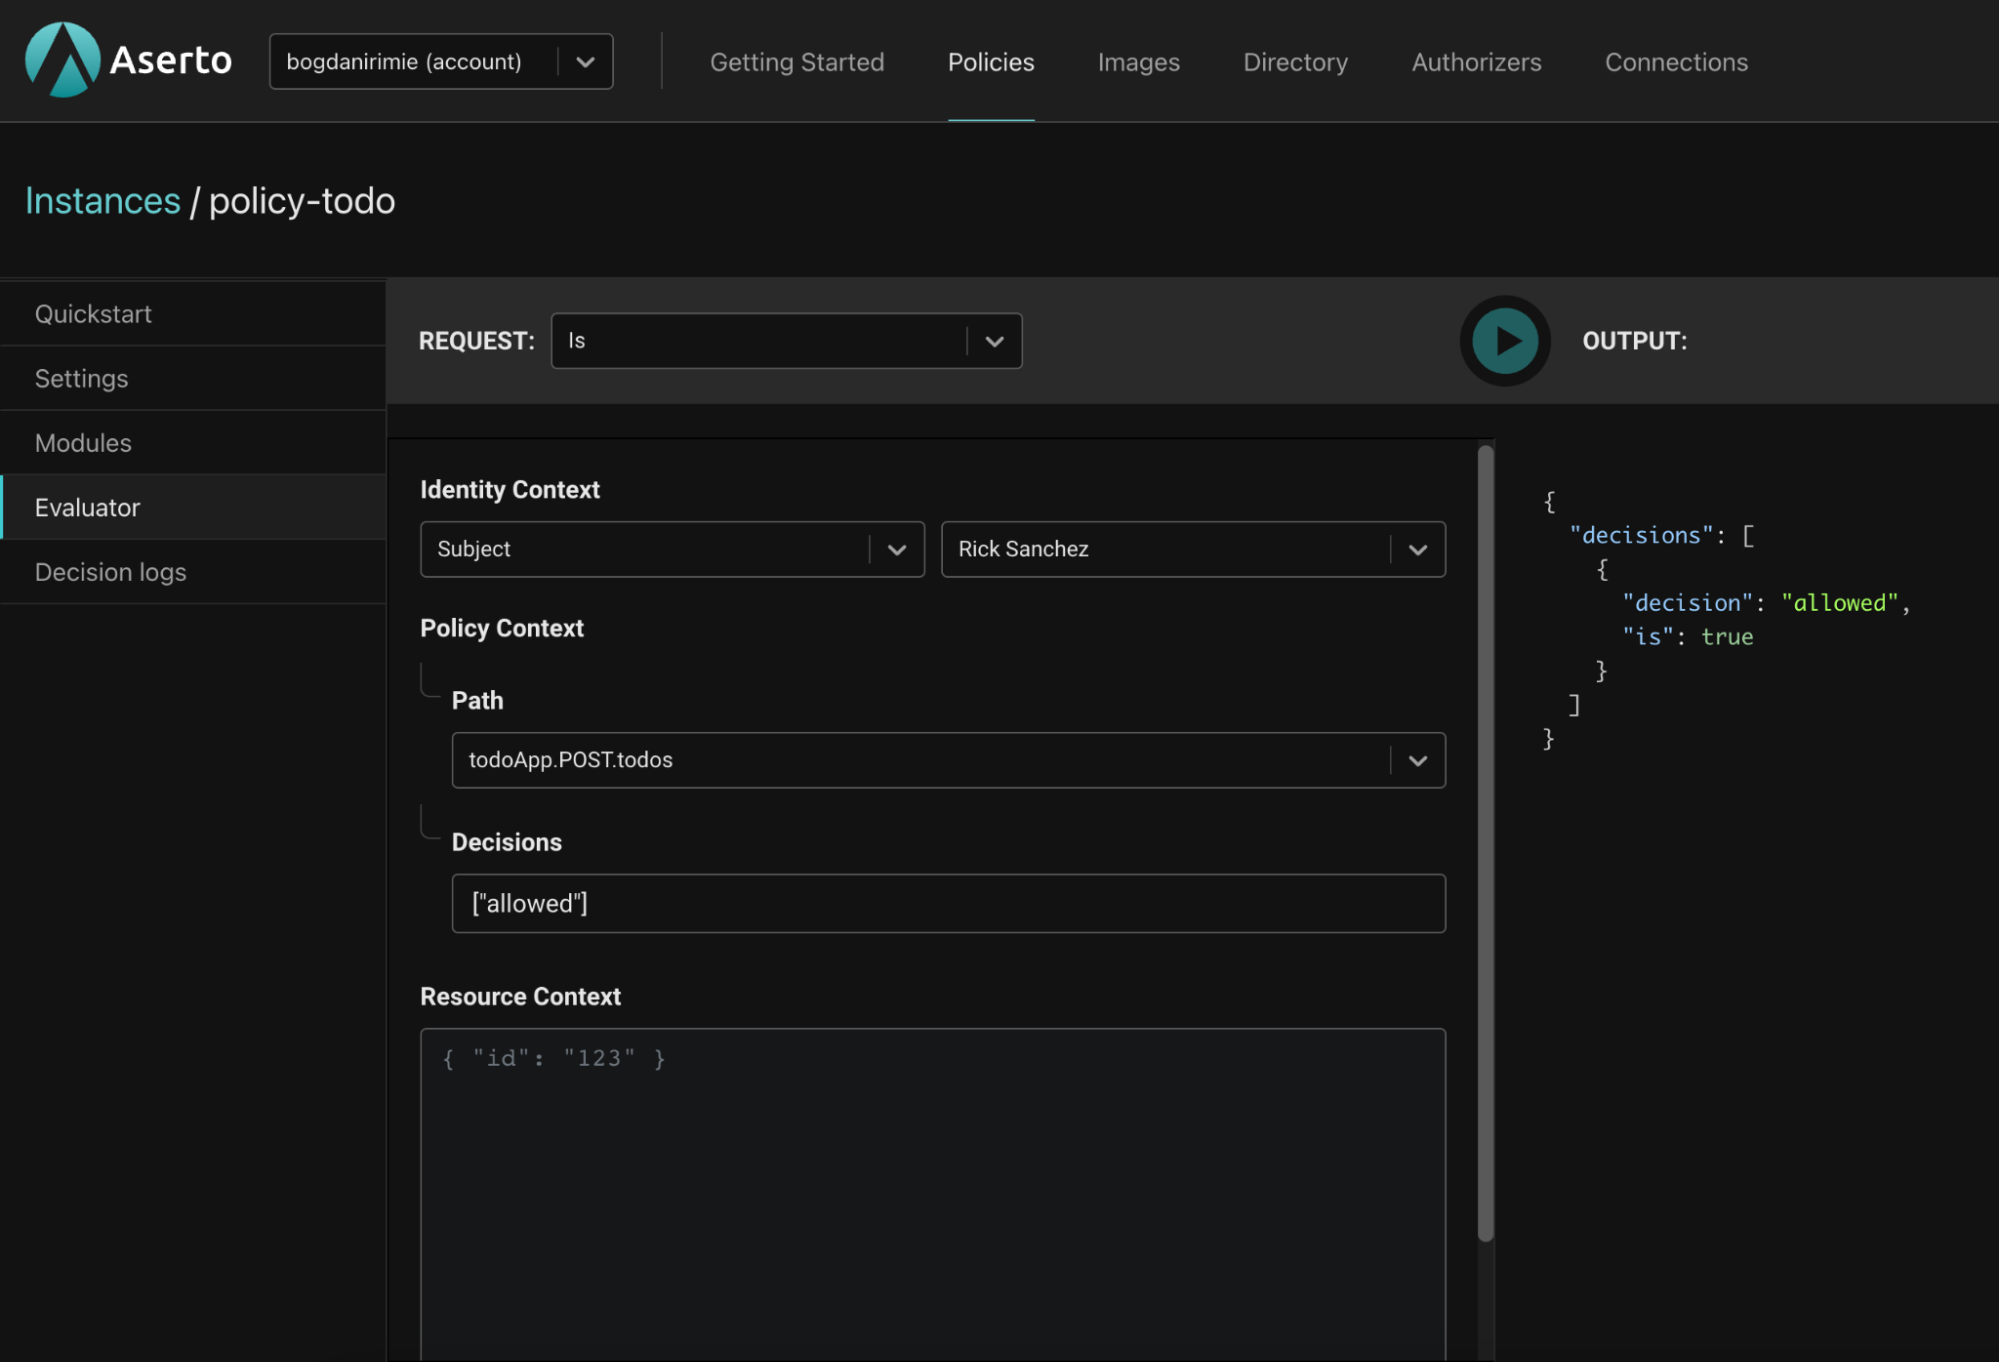
Rick is an “admin” so we’ll expect the todoApp.POST.todos policy module’s allowed decision to be true. And it is.
{
  "decisions": [
    {
      "decision": "allowed",
      "is": true
    }
  ]
}
Now let’s test this policy module with a user whom we know shouldn’t be able to perform the action. Jerry Smith should not be able to create a todo. As you can see below, he doesn’t have any of the roles required by the todoApp.POST.todos policy module.
{
 "display_name": "Jerry Smith",
 "properties": {
   "roles": [
     "viewer",
     "dad",
     "looser"
   ],
   ...
 },
 ...
}
Let’s re-evaluate the todoApp.POST.todos policy module for Jerry. We’ll set the identity context to “Subject” and input Jerry Smith.
{
  "decisions": [
    {
      "decision": "allowed",
      "is": false
    }
  ]
}
We won't cover the rest of the policy here, but if you want to learn more about how the policy works, refer to the "Learn how the 'todo' policy works" item in the Getting Started tab of the console, or click here.
Now that we understand how the policy module works, let’s move on to getting our Java server set-up.
Setting up the Java server
If you want to skip to the end, you can get the complete source code here. But if you want to follow along, start by cloning the server project which doesn’t contain the authorization logic yet. You can find it here.
Once you’ve cloned the project, the resource directory (/src/main/resources) should contain a file called .env.example. Go to the todo policy instance in the Aserto console, click the “Download config” button in the top right to download the .env file for this policy, and copy it (as .env) into the same directory.
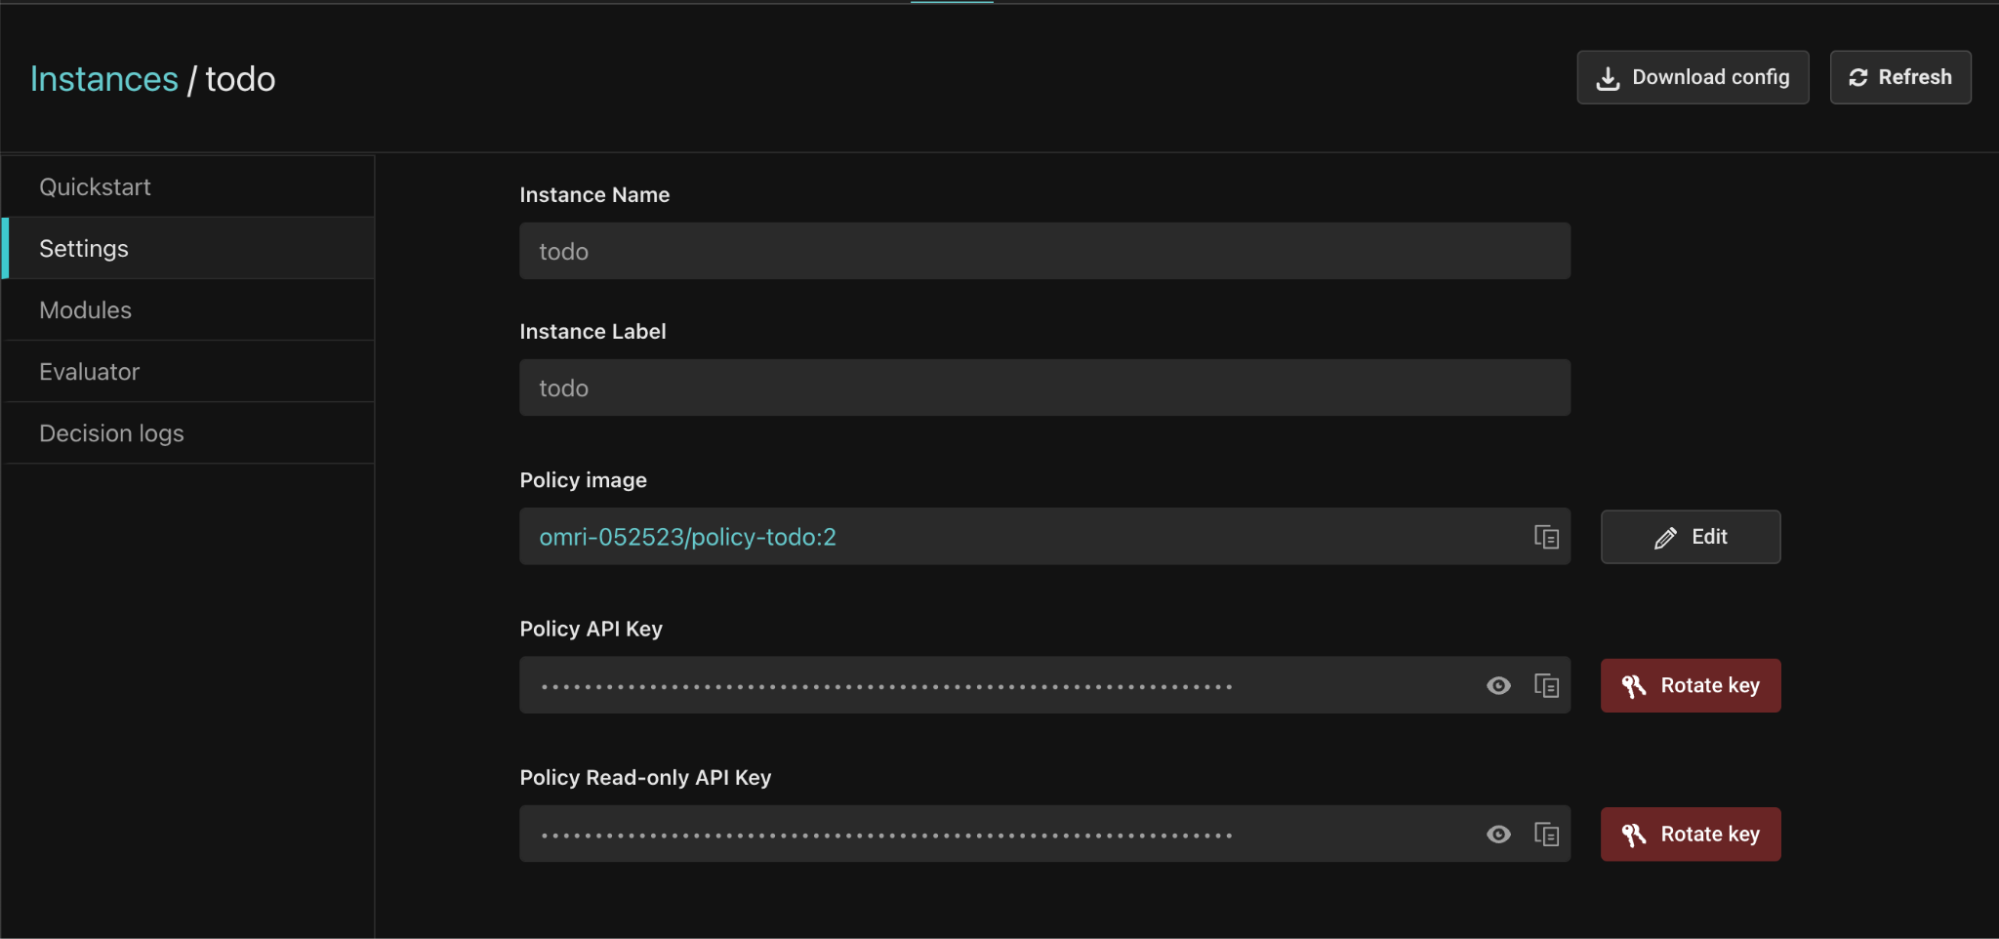
The .env file should be similar to the one bellow:
# Topaz
# ASERTO_AUTHORIZER_SERVICE_URL=localhost:8282


# Aserto hosted authorizer and directory
ASERTO_POLICY_INSTANCE_NAME=todo
ASERTO_POLICY_INSTANCE_LABEL=todo
ASERTO_TENANT_ID={Your Tenant ID UUID}
ASERTO_AUTHORIZER_API_KEY={Your Authorizer API Key}
ASERTO_DIRECTORY_API_KEY={Your Directory API Key}
ASERTO_AUTHORIZER_SERVICE_URL=authorizer.prod.aserto.com:8443
ASERTO_DIRECTORY_SERVICE_URL=directory.prod.aserto.com:8443
Install dependencies
mvn clean packageStart the server
java -jar target/todo-java-v2.jarTest
We can use curl to test the endpoints we just set up.
Create todo
curl --location --request POST 'localhost:3001/todos' \
--header 'Content-Type: application/json' \
--data '{
   "ID": "id-test",
   "Title": "todo-test",
   "Completed": false,
   "OwnerID": "sub-test"
}'
Get todos
curl --location 'localhost:3001/todos'Update todo
curl --location --request PUT \
'localhost:3001/todos/CiRmZDE2MTRkMy1jMzlhLTQ3ODEtYjdiZC04Yjk2ZjVhNTEwMGQSBWxvY2Fs' \
--header 'Content-Type: application/json' \
--data '{
    "ID": "id-test",
    "Title": "todo-test",
    "Completed": true,
    "OwnerID": "sub-test"
}'
Delete todo
curl --location --request DELETE 'localhost:3001/todos/CiRmZDE2MTRkMy1jMzlhLTQ3ODEtYjdiZC04Yjk2ZjVhNTEwMGQSBWxvY2Fs' \
--header 'Content-Type: application/json' \
--data '{
    "ID": "id-test",
    "Title": "todo-test",
    "Completed": true,
    "OwnerID": "sub-test"
}'
Get user
curl --location --request GET 'localhost:3001/user/CiRmZDE2MTRkMy1jMzlhLTQ3ODEtYjdiZC04Yjk2ZjVhNTEwMGQSBWxvY2Fs'Test the application and server
This demo includes two components: the Java server that serves our API, and the React application which consumes it.
The server should already be running, but if it isn't, run the following command in the todo-java-v2 directory:
java -jar target/todo-java-v2.jarNext, clone the todo application:
git clone git@github.com:aserto-demo/todo-application.gitInstall the application dependencies and start the application by running the following commands in the todo-application directory:
yarn
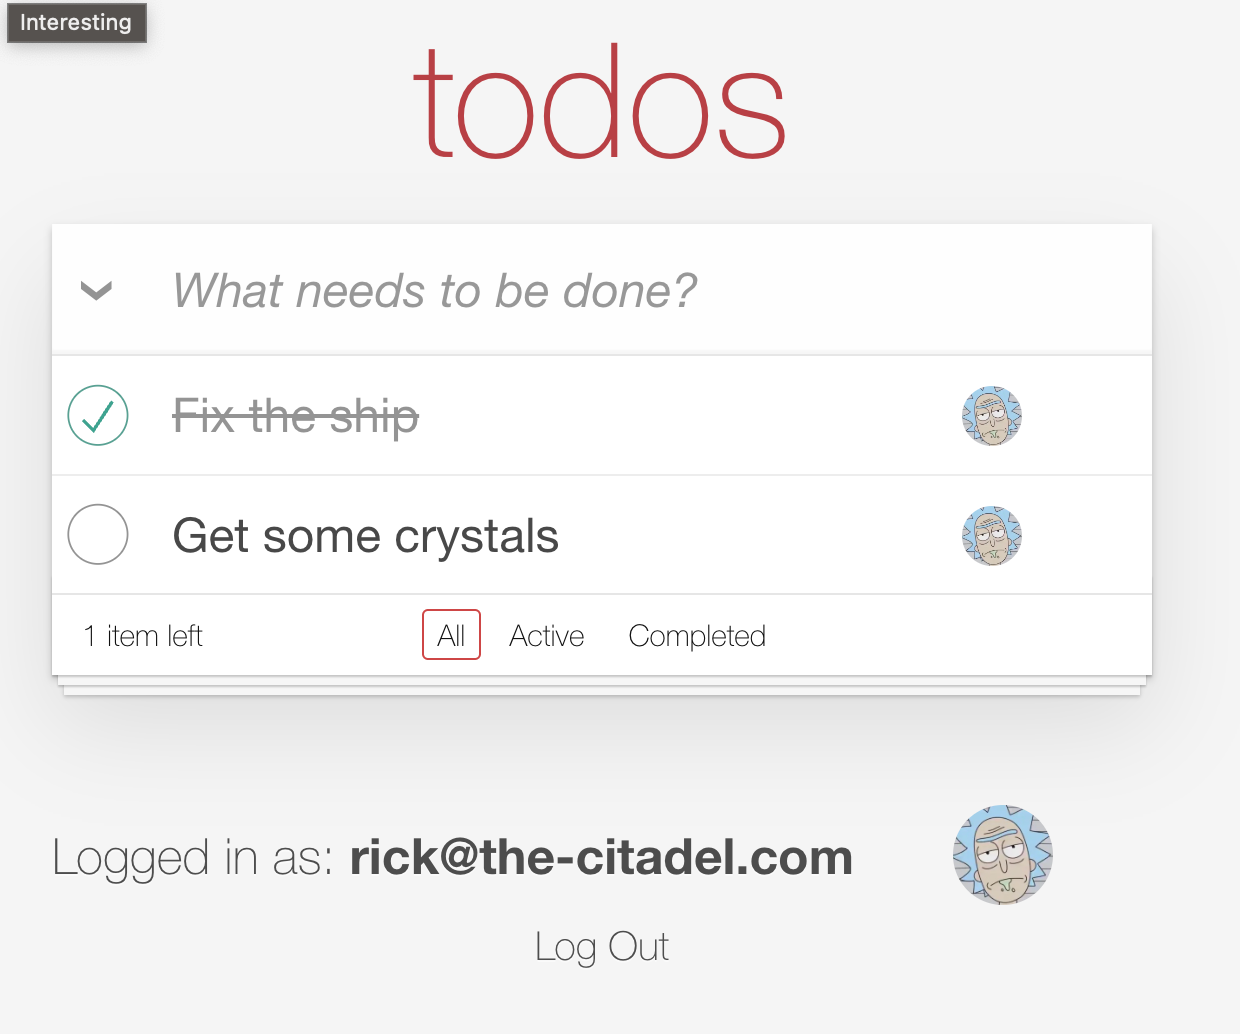
yarn startYour browser should now open on the http://localhost:3000 page, and you should see the todo app.
Start by logging in as the “admin” - using the email rick@the-citadel.com and the password V@erySecre#t123!. You can add some todo items, then complete and delete some of them. Next, log in as the “editor” - with the email morty@the-citadel.com using the same password. As you’ll see, because we didn’t plug in our authorization middleware just yet, you’ll be able to complete and delete any of the todo items - even ones that are not owned by morty@the-citadel.com. Of course, this isn’t the desired behavior - so let’s add authorization to the application.
Adding authorization to the Todo app
If you’d like to skip to the end, the complete source code is available here. If you’d like to build it yourself, follow the steps below.
We can now add the authorization to our API endpoints. It is responsible for:
- Resolving the policy module that should be invoked, based on the request.
- Passing the identity context to the decision engine. In our case, the middleware will extract the JWT from the “Authorization” header.
- Passing the resource context to the decision engine. In our case, we’re passing the todo’s ID as a request parameter, and the middleware attaches it to the resource context.
First, we create a small wrapper over the Authorizer Client:
package com.aserto.server;

import com.aserto.AuthorizerClient;
import com.aserto.authorizer.v2.Decision;
import com.aserto.model.IdentityCtx;
import com.aserto.model.PolicyCtx;
import com.google.protobuf.Value;

import java.util.Collections;
import java.util.List;
import java.util.Map;

public class Authorizer {
    private AuthorizerClient authzClient;

    public Authorizer(AuthorizerClient authzClient) {
        this.authzClient = authzClient;
    }

    public boolean isAllowed(IdentityCtx identityCtx, PolicyCtx policyCtx) {
        return isAllowed(identityCtx,policyCtx, Collections.emptyMap());
    }
    public boolean isAllowed(IdentityCtx identityCtx, PolicyCtx policyCtx, Map<String, Value> resourceCtx) {
        List<Decision> decisions = authzClient.is(identityCtx, policyCtx, resourceCtx);


        return decisions.stream()
                .filter(decision -> decision.getDecision().equals("allowed"))
                .findFirst()
                .get()
                .getIs();
    }
}
The wrapper is just a utility to easily issue isAllowed calls.
In each handler, we will need to add the authorization code. Let’s start with the creation of todos, the postTodo in the TodosHandler class should become:
    private void postTodos(HttpExchange exchange) throws IOException {
        String jwtToken = Utils.extractJwt(exchange);
        IdentityCtx identityCtx = new IdentityCtx(jwtToken, IdentityType.IDENTITY_TYPE_JWT);
        PolicyCtx policyCtx = new PolicyCtx("todo", "todo", "todoApp.POST.todos", new String[]{ALLOWED});

        boolean allowed = authorizer.isAllowed(identityCtx, policyCtx);
        if (!allowed) {
            exchange.sendResponseHeaders(403, 0);
            return;
        }

        String userKey = getUserKeyFromJwt(jwtToken);
        String value = getResponseBody(exchange);
        Todo todo = objectMapper.readValue(value, Todo.class);
        todo.setOwnerID(userKey);

        todoStore.saveTodo(todo);

        String response = "{\"msg\":\"Todo created\"}";

        exchange.sendResponseHeaders(200, response.length());

        OutputStream outputStream = exchange.getResponseBody();
        outputStream.write(response.getBytes());
        outputStream.flush();
        outputStream.close();
    }
We first extract the JWT token from the request:
String jwtToken = Utils.extractJwt(exchange);Then we need to create the identity context and use the JWT Token we just extracted from the request:
IdentityCtx identityCtx = new IdentityCtx(jwtToken, IdentityType.IDENTITY_TYPE_JWT);For the policy context, we set the name of the policy as todo, the label as todo, the submodule from the policy that will be used for evaluation as todoApp.GET.todos, and the decision we want to invoke as new String[]{ALLOWED}.
Now that we have the identity and policy context, we can make the call to the authorizer and check the response.
boolean allowed = authorizer.isAllowed(identityCtx, policyCtx);
if (!allowed) {
    exchange.sendResponseHeaders(403, 0);
    return;
}
We will proceed similarly for all the other handlers.
You can see the difference between the server with no authorization and the one with authorization enabled here.
Testing the Todo application with authorization
Login as Rick using rick@the-citadel.com for email and V@erySecre#t123! for password. Create some todos, mark some as completed and even delete one if you want.
Log out and login as Morty using morty@the-citadel.com for email and V@erySecre#t123! for password. If you try to edit or delete one of Rick’s todo, you will get the following error message:
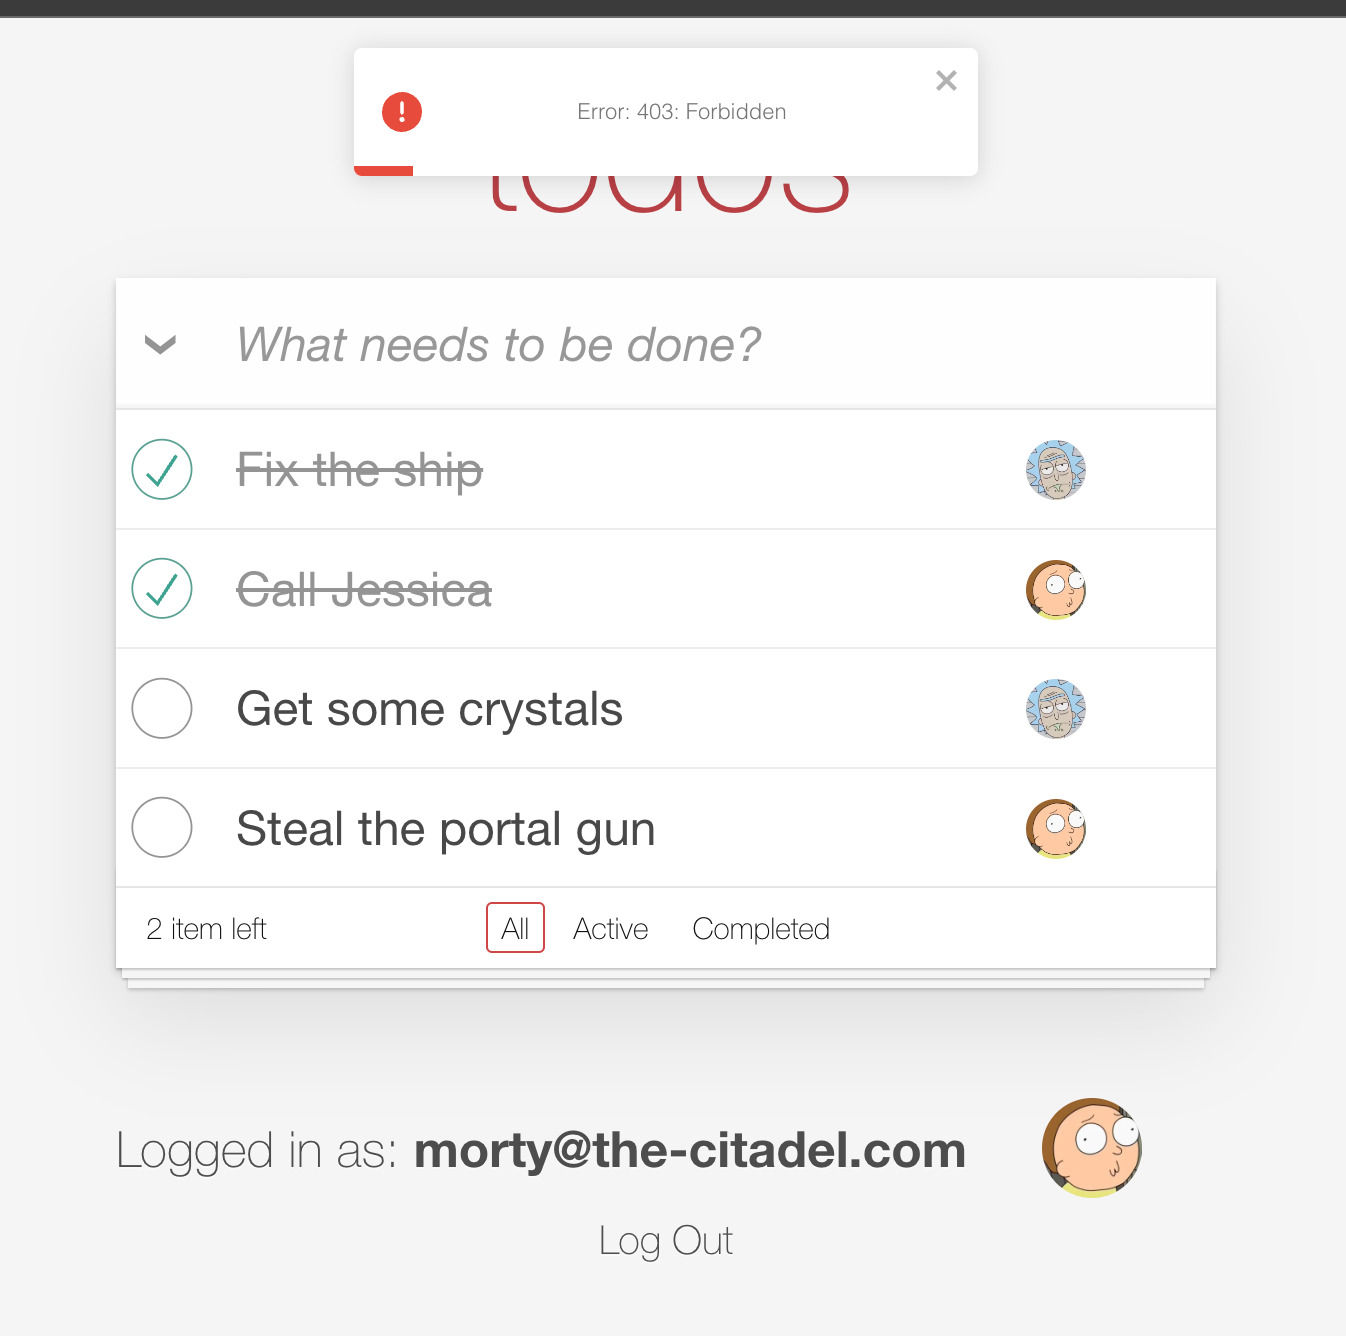
Finally, if you login as Rick again (username: rick@the-citadel.com, password: V@erySecre#t123!) and try to delete the todo items that were created by Morty, you’ll see there are no errors.
Conclusion
In this developer guide, we learned how to create a simple todo application with an authorization layer using the Aserto Java SDK. We learned about how the Aserto authorization policies work and how to test them using the evaluator found in the Aserto console. We hope you found this tutorial useful and that you can use it to implement authorization with Aserto for your own applications.
Bogdan Irimie
Senior Software Engineer
Related Content
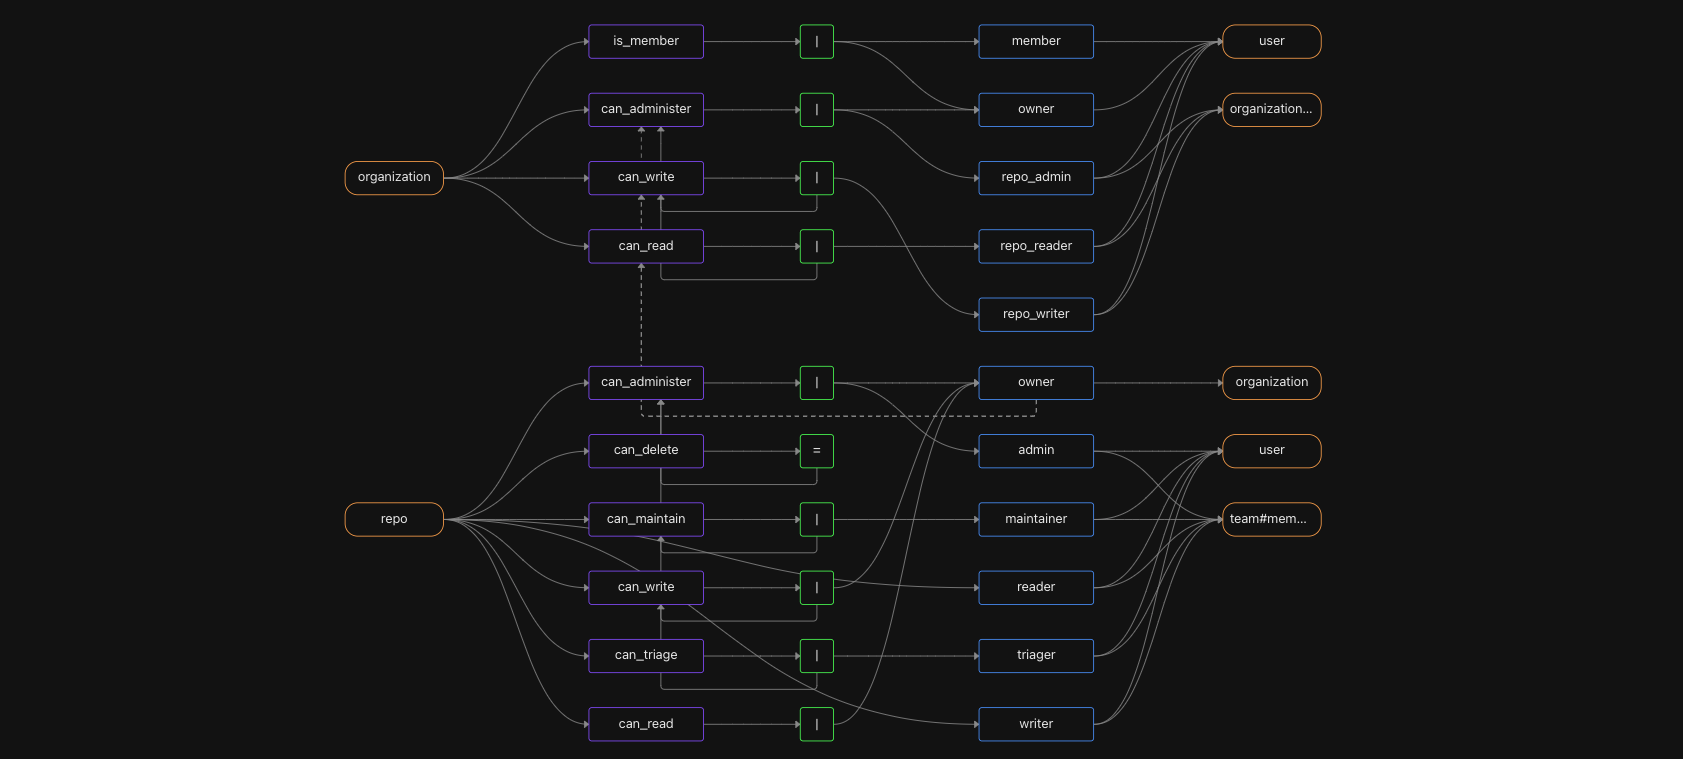
Authorize like GitHub: A real-world example of fine-grained authorization
GitHub is a familiar example of a sophisticated, fine-grained authorization model. GitHub's model includes roles, organization-wide permissions, and nested teams. Read on to learn how to model GitHub's permission system with Topaz.
Mar 21st, 2024

Authentication and authorization with Auth0 and Aserto
In this guide, we will demonstrate adding application authorization and role-based access management to the sample Auth0 web app using Aserto.
Oct 28th, 2024

Goodbye Open Policy Registry, Hello Open Policy Containers!
Open Policy Containers (OPCR) is now a CNCF Sandbox project, and it’s time to sunset the Open Policy Registry!
Dec 30th, 2022